

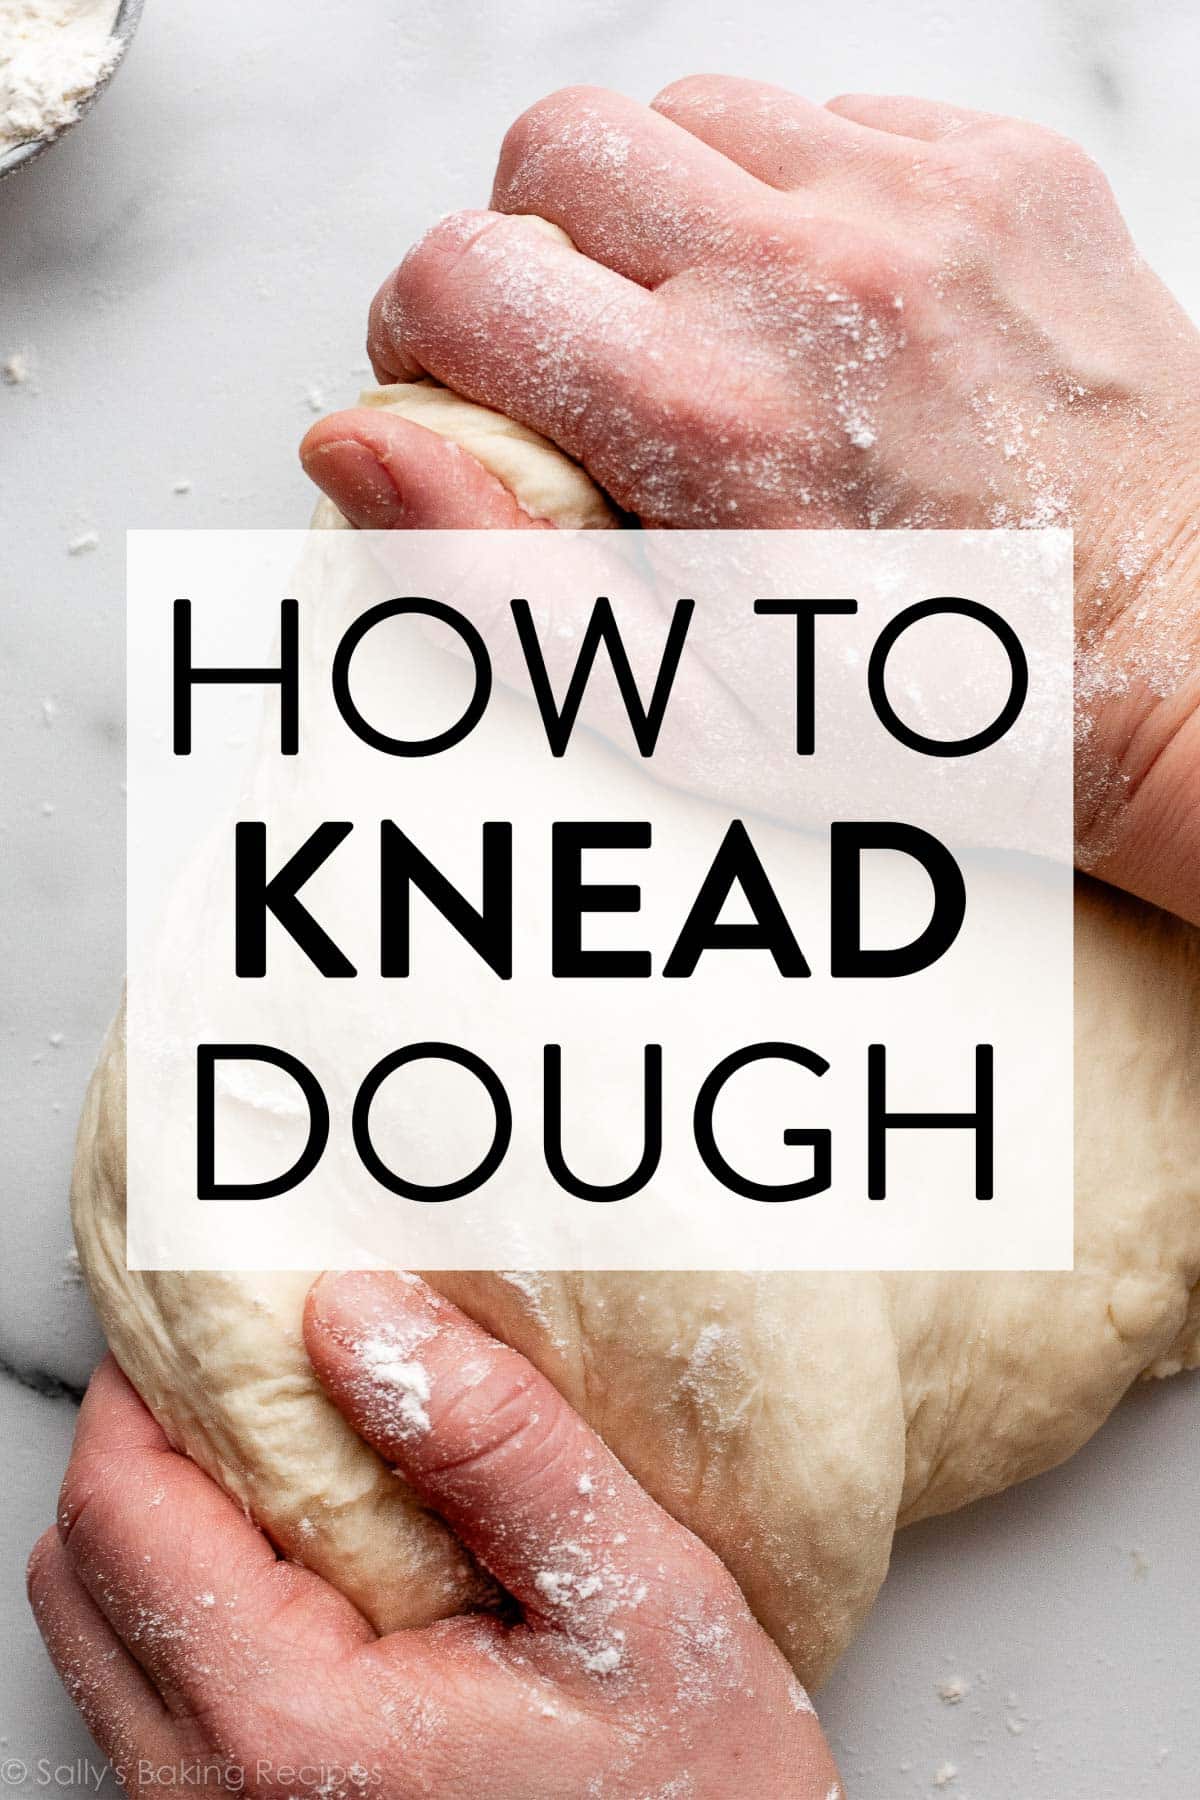
As we speak I’m educating you the fundamentals it is advisable learn about the right way to knead dough. Study why kneading is a crucial and needed step in most yeasted bread recipes, the right way to do it correctly, and the right way to know when your dough has been kneaded lengthy sufficient and is able to rise. On this submit & video, I exhibit 2 methods I exploit, which you need to use with any yeast dough that requires kneading, whether or not you’re baking sandwich bread, cinnamon rolls, or selfmade pizza.

Regardless of the scrumptious style and alluring aroma of fresh-baked bread, many aspiring bakers hesitate to start the journey of selfmade bread baking. I, too, prevented it for a few years. There was simply no method I may attainable deal with a dough with yeast. How scary!
However the reality is that making yeasted bread is a surprisingly easy course of, so long as you will have dependable, approachable recipes and a primary understanding of how yeast works. (Plus, slightly endurance!) The toughest half is, really, discovering the braveness to only BEGIN.
By the best way, in the event you’re new to working with yeast, reference my Baking with Yeast Information for easy solutions to widespread yeast FAQs. It’s a massively useful start line, and can assist provide the base data wanted to efficiently embark in your bread baking journey. 😉
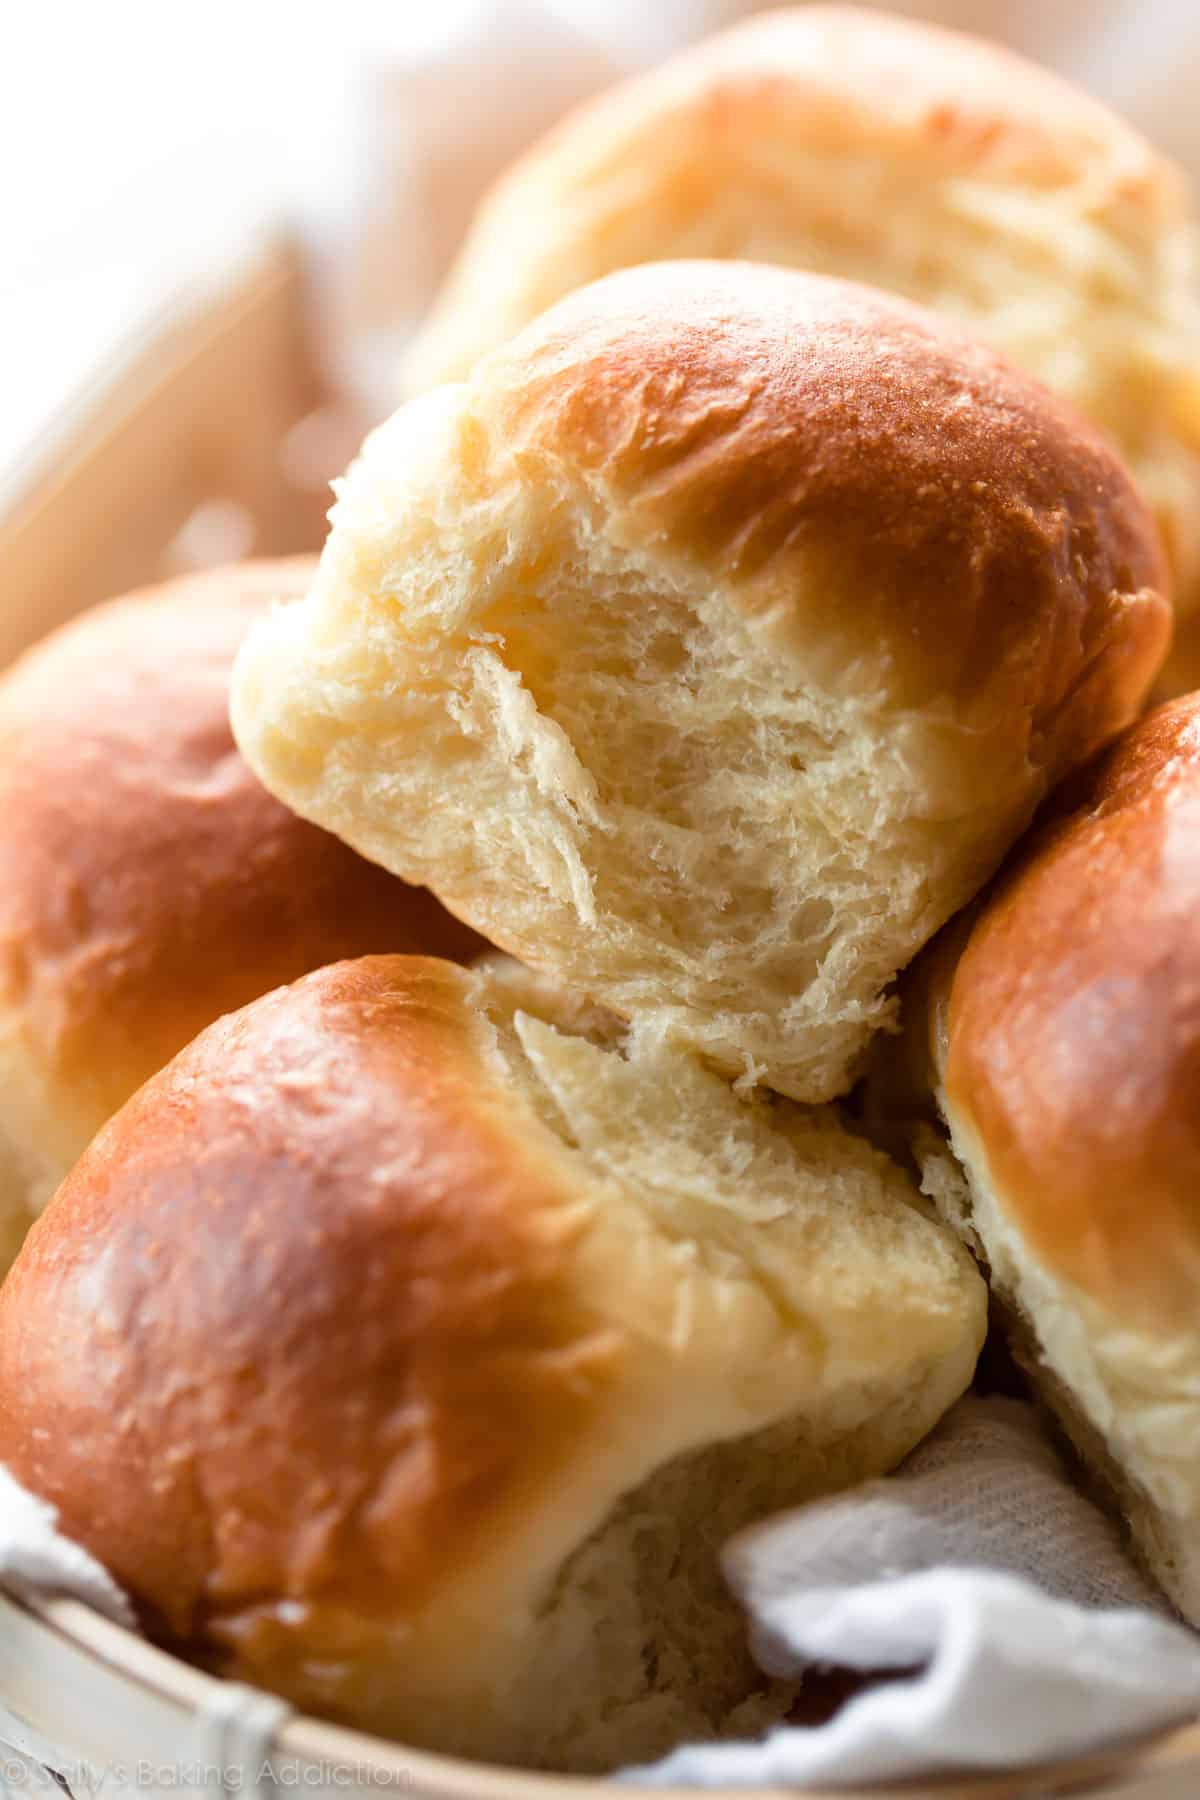
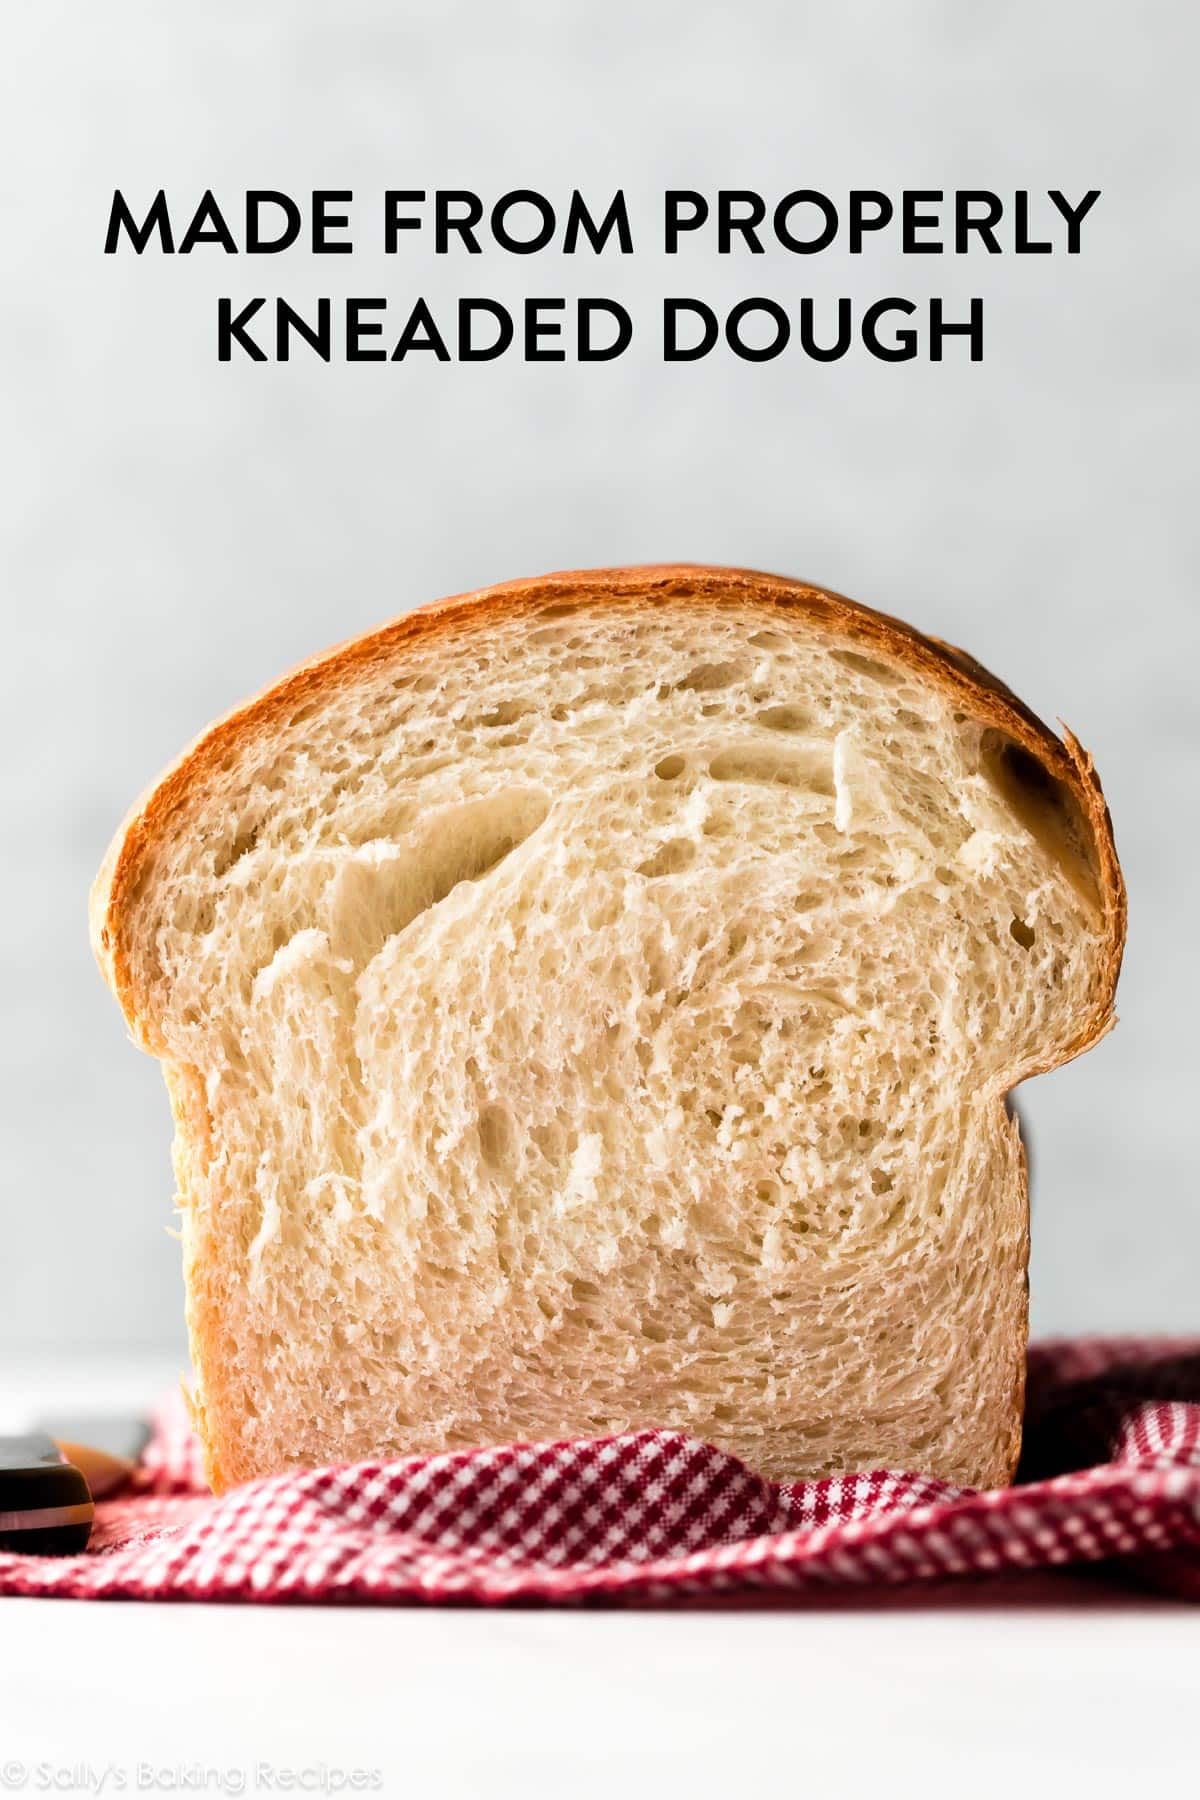
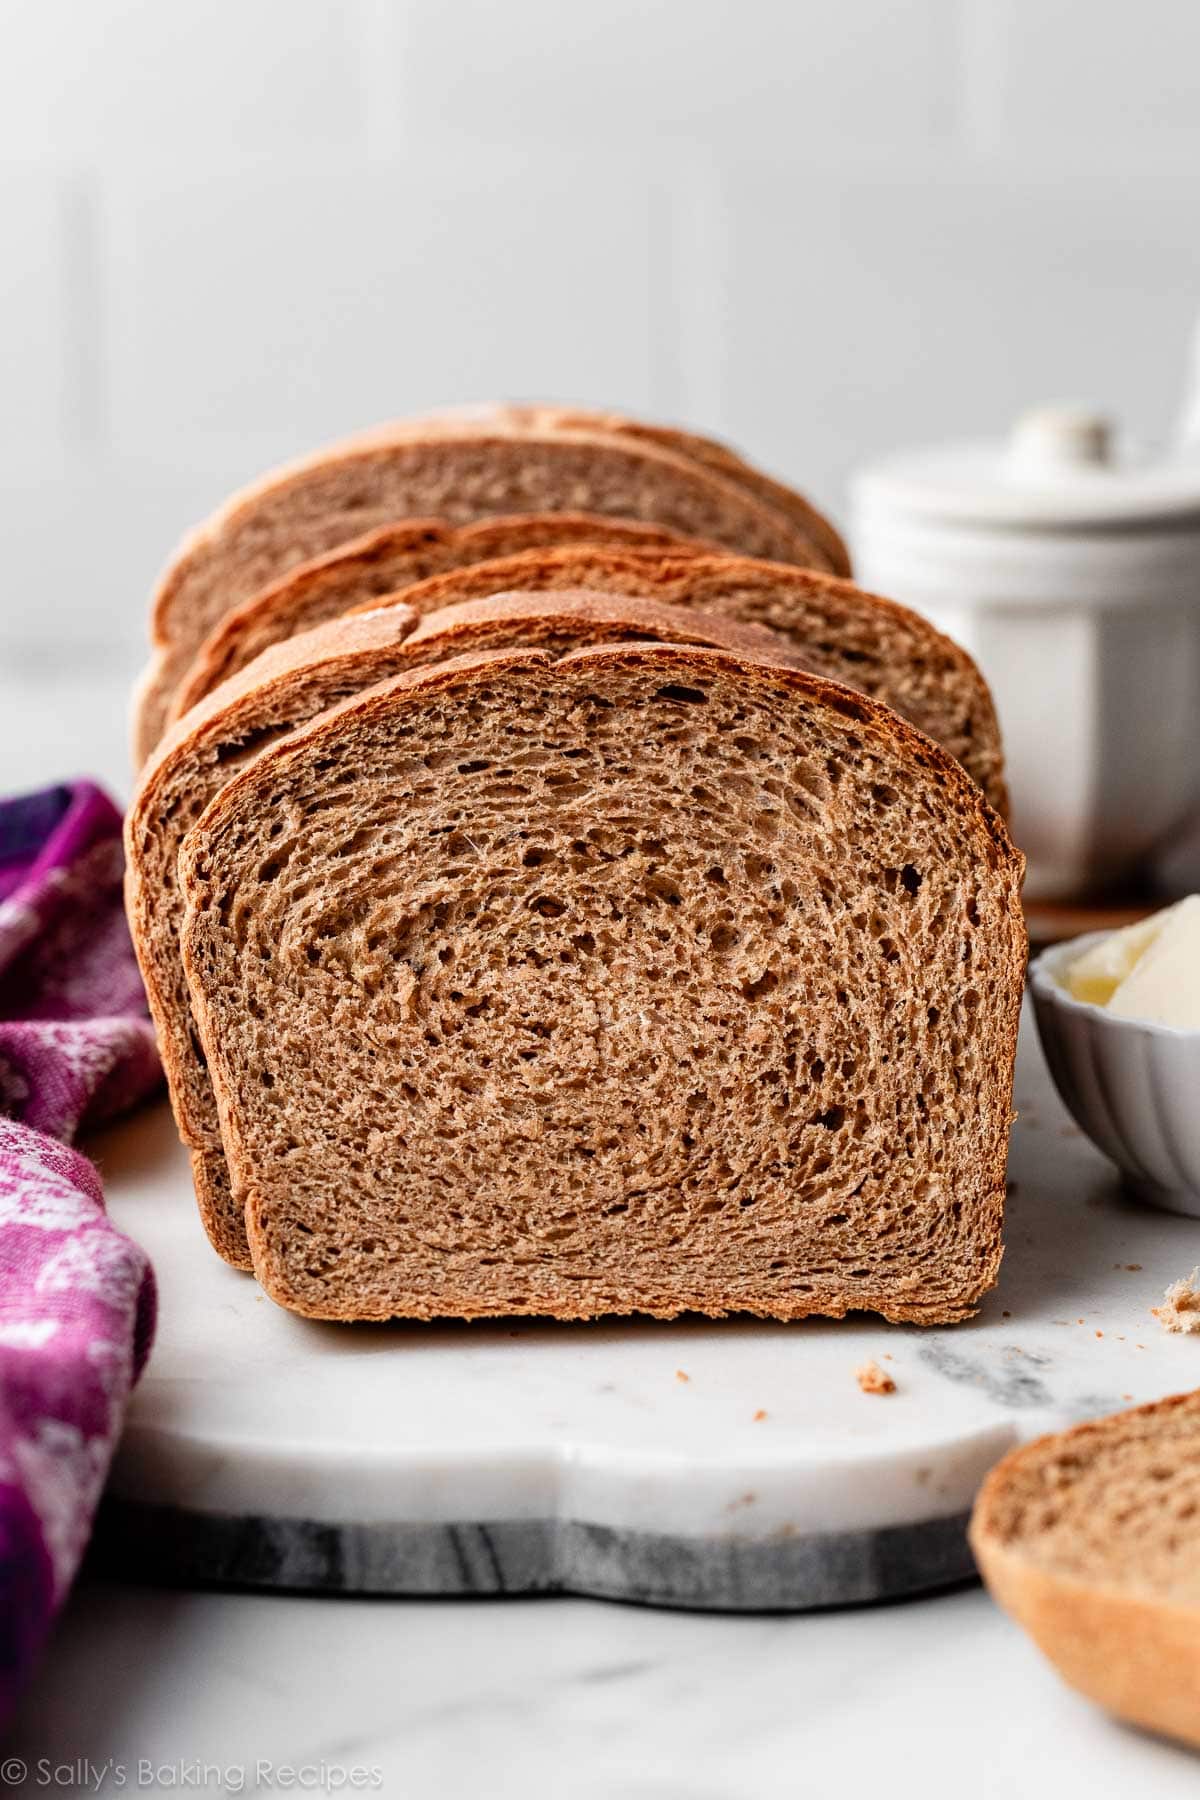
As we speak’s submit is an extension of my Baking with Yeast Information. Right here I’m educating you the right way to knead dough. Kneading dough is a vital step in bread baking, whether or not you’re making tender multigrain bread (pictured above), breadsticks, entire wheat bread, gooey raspberry candy rolls, or flaky dinner rolls (pictured under).
Why Do We Have to Knead?
Kneading serves a pair functions.
First, we’re incorporating air into the dough. And second, we have to stretch out the gluten strands to construct construction and energy into the bread. Merely mixing the dough collectively leaves us with a random, disorganized array of gluten proteins. We nonetheless must “develop” the gluten, i.e., encourage the proteins within the flour and moisture within the dough to hyperlink collectively and kind a robust gluten community. This construction permits for trapping of gasses so the bread will stand up good and excessive. And gluten is what makes bread deliciously chewy.
Should you don’t knead your dough, your baked bread received’t rise as excessive, and the general texture and look will probably be dense. Correctly kneaded dough guarantees a softer, fluffier, taller, and chewier bread.
OK, that’s your science class carried out for right this moment!
I’ve made yeasted breads earlier than that don’t require kneading, and have a number of printed together with this no-knead honey oat bread, cranberry nut no-knead bread, 4-ingredient artisan bread, and this jalapeño cheddar bread. So what’s the distinction? These bread recipes use a really moist dough and a slow-rise technique, which permits for fermentation to happen because the extremely hydrated dough rests within the fridge for not less than 12 hours, and even longer.
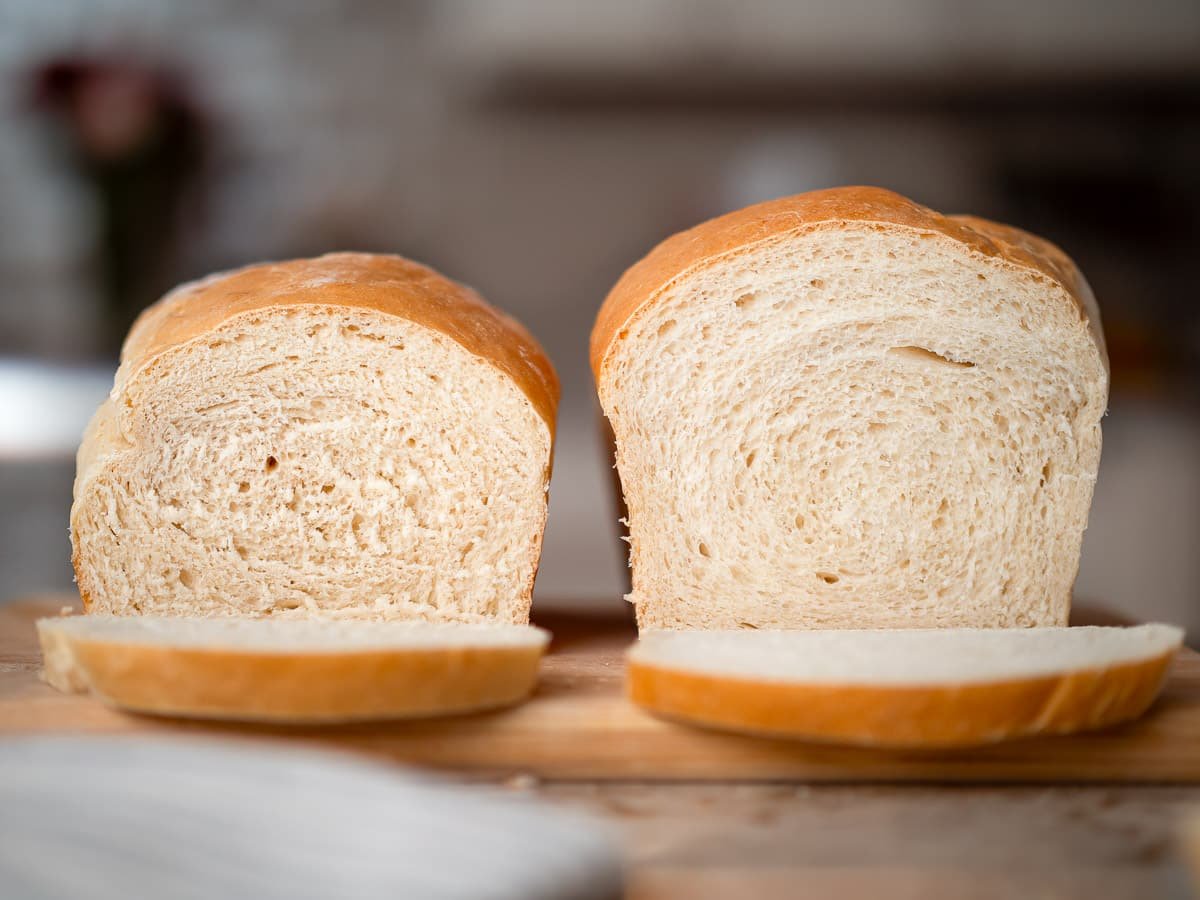
Comparability Photographs
Check out the next image. On the left is a dense, squat, and crumbly loaf of sandwich bread. I didn’t knead the dough that produced this baked loaf. On the precise, I kneaded it because the recipe instructs. It’s the identical actual dough, solely the left was not kneaded.
And, under, right here is that very same “not kneaded” loaf. As a result of I didn’t knead the dough, it didn’t have the energy to entice the yeast’s gases.
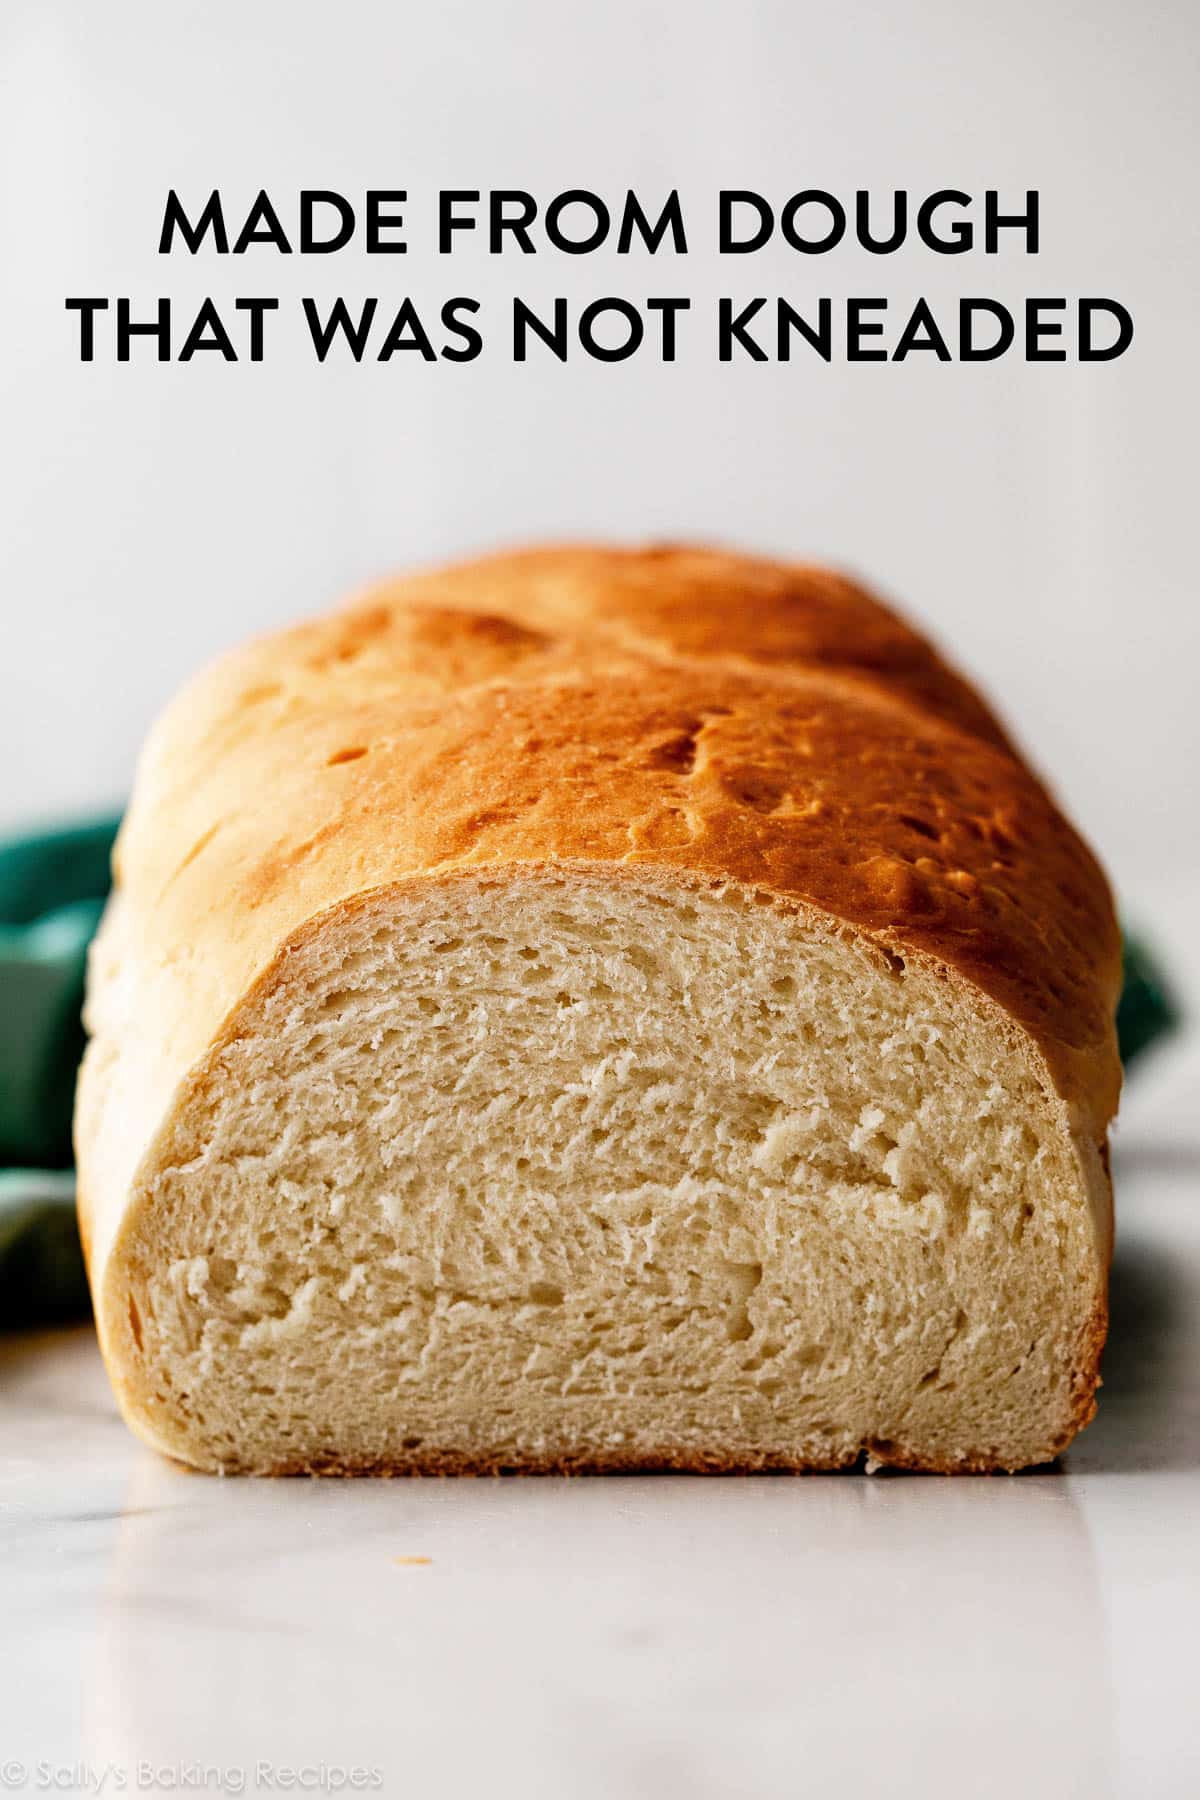
And now, the identical sandwich bread recipe, however I took the time to correctly knead the dough just like the recipe instructs. It’s a MAJOR distinction.
How one can Knead Dough by Hand
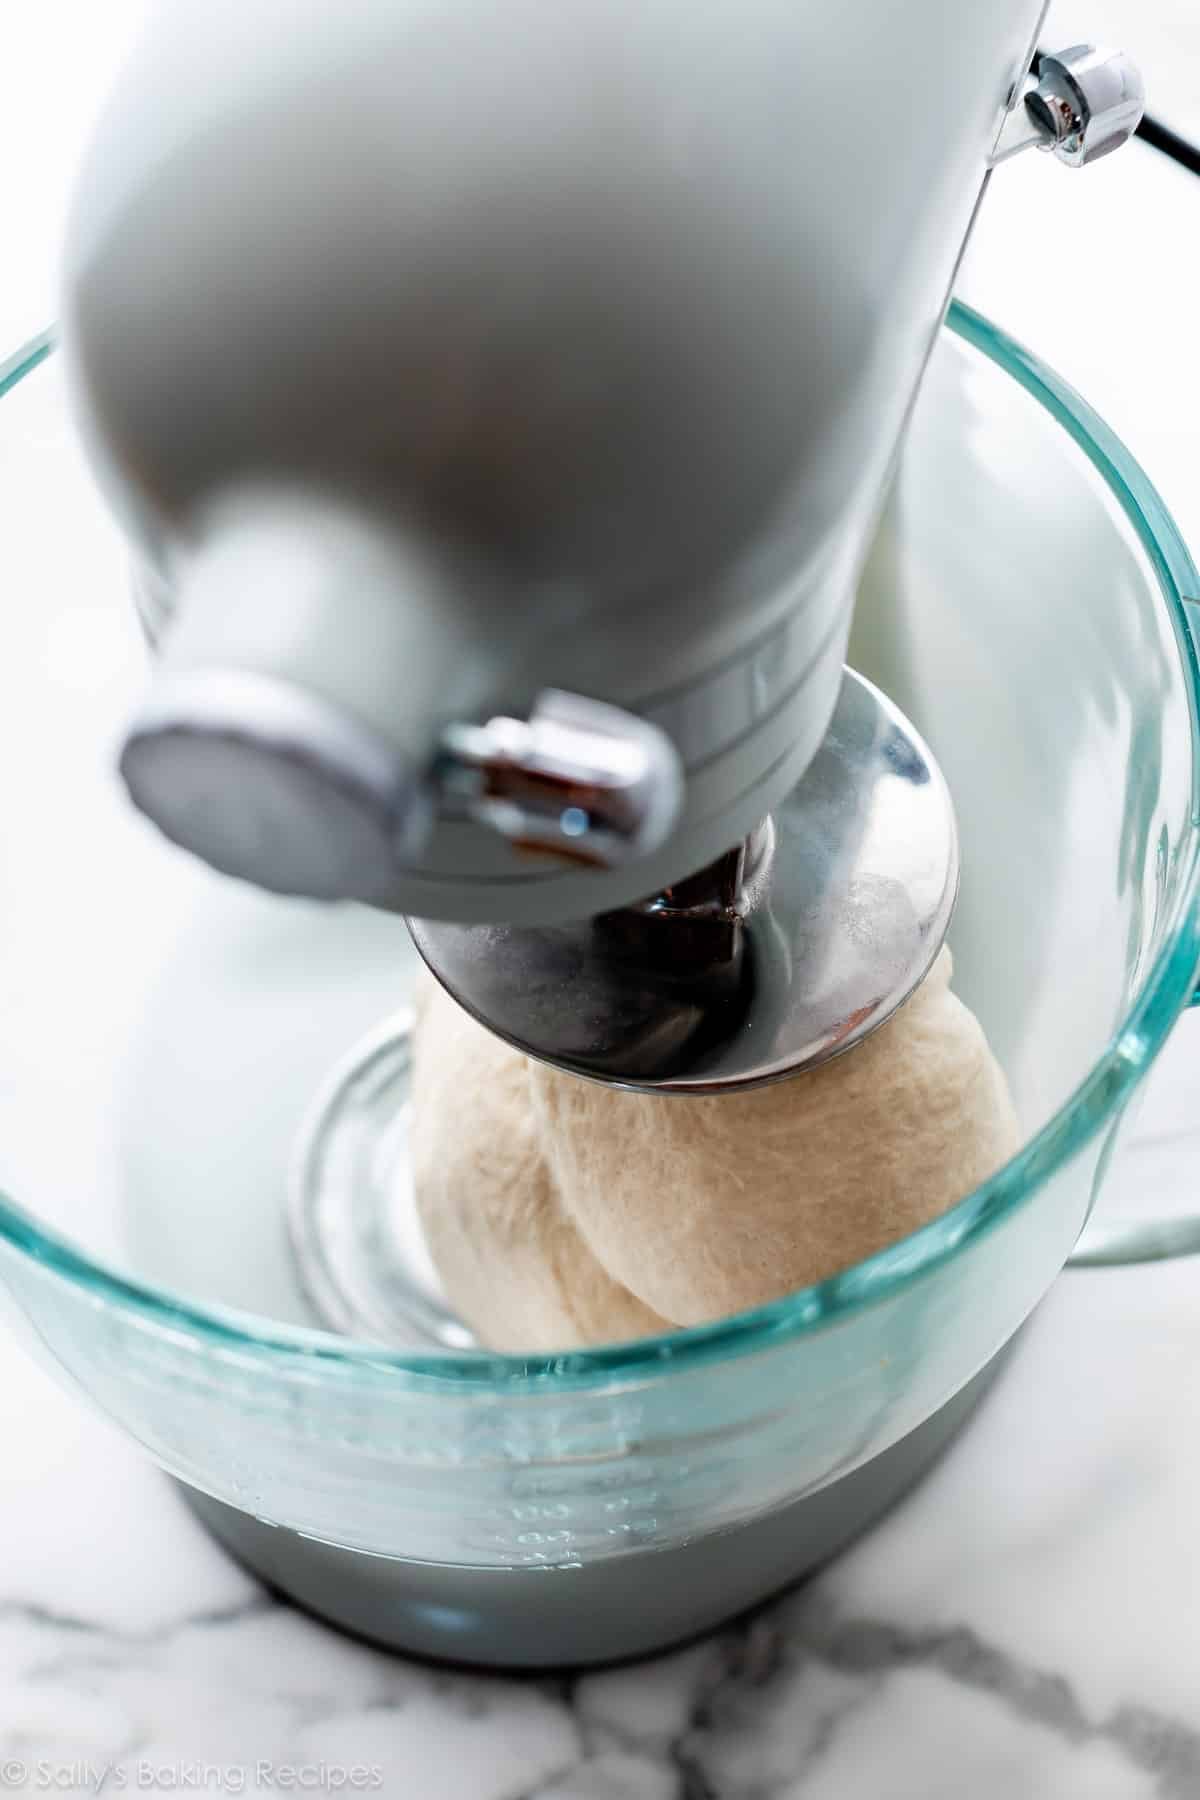
In case you have a stand mixer with a dough hook attachment, you may let the mixer run on low velocity and the dough hook can do the kneading, which makes the job hands-off; however I a lot want to knead dough by hand, for a number of causes:
- First, some doughs could be actually heavy, and may be an excessive amount of in your mixer to deal with.
- Letting a stand mixer do the work can doubtlessly result in over-kneading the dough. It’s so much tougher to over-knead dough together with your arms, since you get a great really feel for the dough, and can discover as the feel modifications. And likewise… you’d seemingly get very drained earlier than you attain that time!
- And naturally, kneading by hand is a superb stress reliever—give it a attempt!
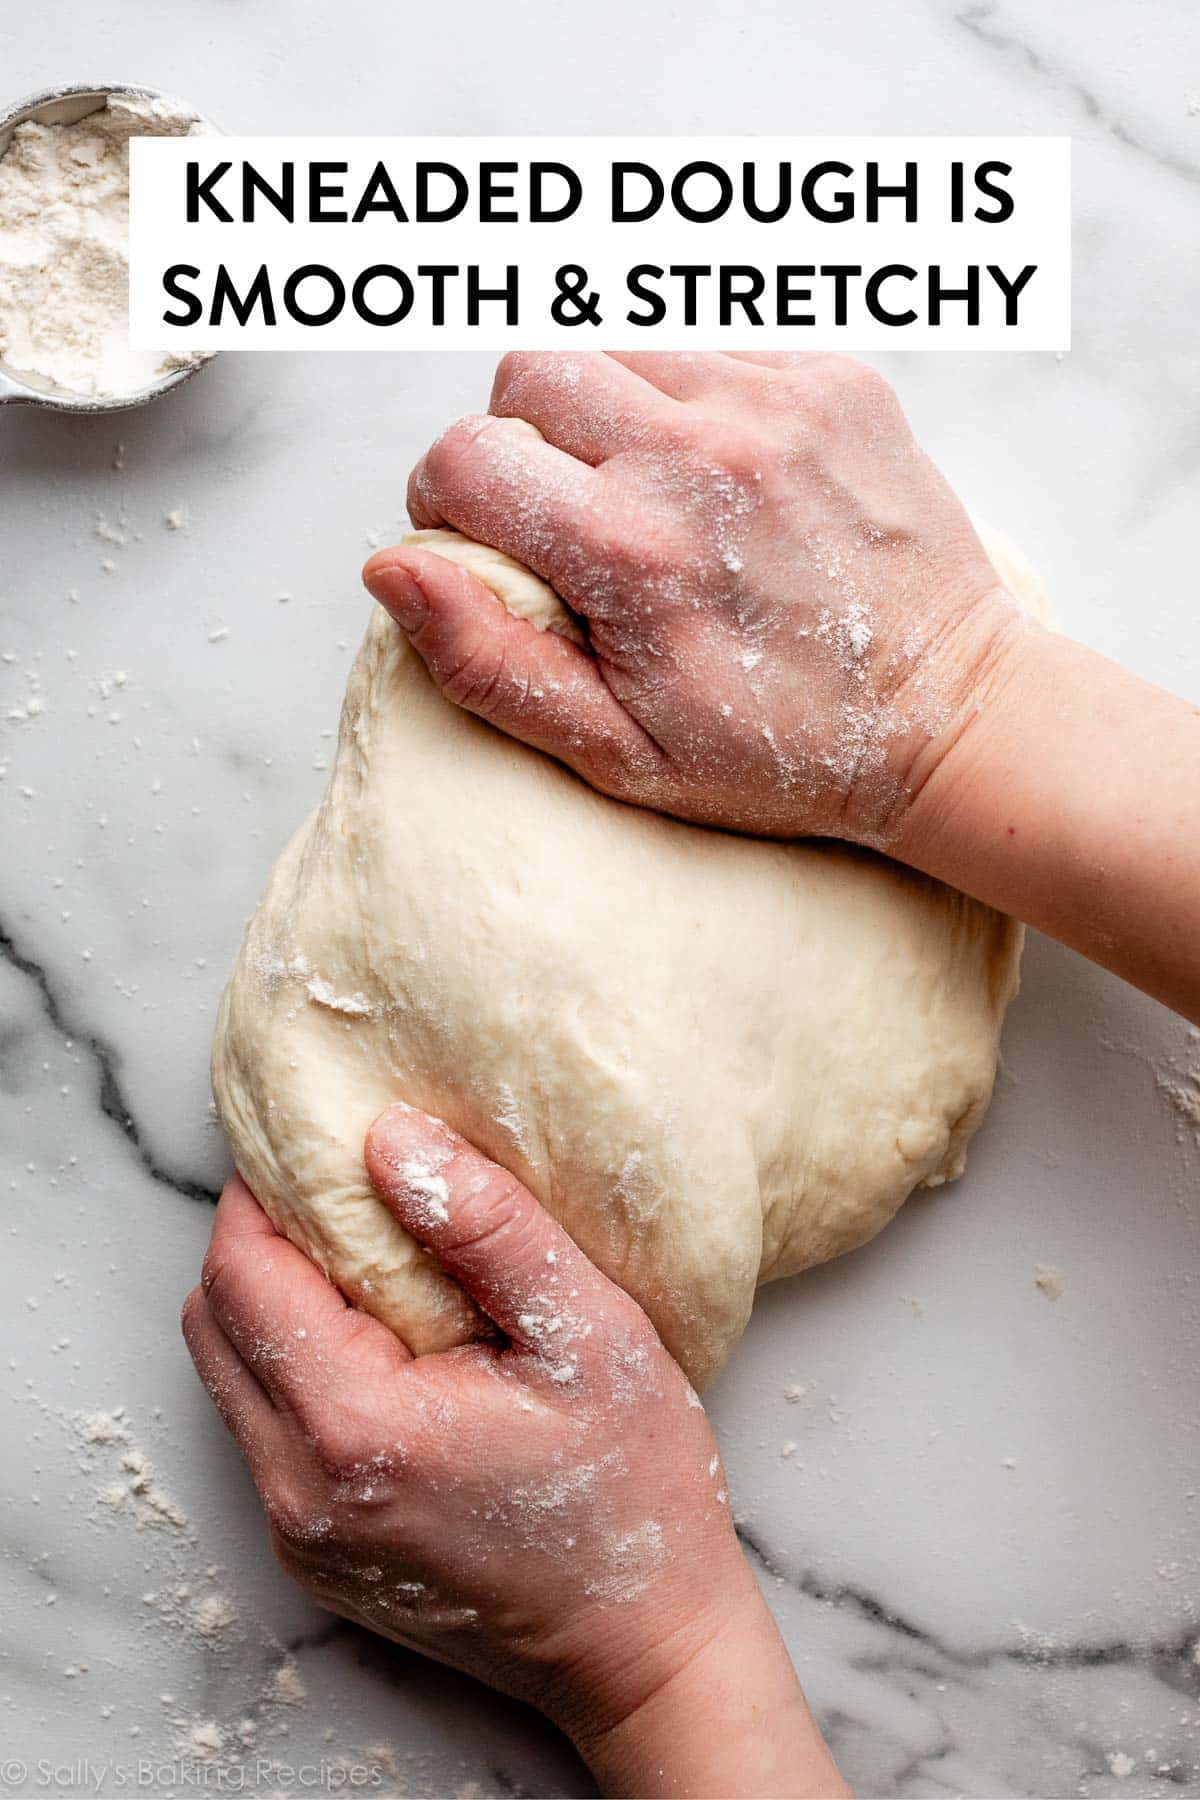
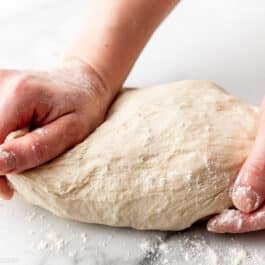
Should you want to make use of your arms, too, right here’s what you’ll do: Utilizing the heels of your arms, gently push the dough away from you in a rocking movement, alternating arms as you go. You wish to put some vitality into it, to actually stretch the dough out.
Video Tutorial
As you noticed within the video, after you’ve combined collectively your whole dough substances, it’s kneading time. Right here’s what you want:
- Clear onerous floor, similar to a countertop or a big reducing board.
- Small dish of all-purpose or bread flour, aka “bench flour.”
- A bench scraper is a great tool to have available; if the dough is sticking to your work floor, simply scrape it off with a bench scraper after which add slightly extra flour to the floor.
Success Suggestions
- Don’t add any extra flour than you really want—use simply sufficient to stop it from sticking an excessive amount of to your arms and work floor. The dough ought to nonetheless really feel slightly cheesy.
- If the dough begins sticking to your arms, add slightly extra flour to your arms, fairly than to the dough, so that you don’t throw off that cautious ratio of substances in your bread recipe.
- As you knead, you’ll begin to really feel the feel of the dough change; it would start to clean out and really feel softer and extra elastic.
How one can Knead Further Sticky Dough
In case you have an particularly tender or sticky dough, there’s one other kneading method you need to use. I exploit this technique primarily with extra-soft wealthy doughs, similar to my in a single day cinnamon rolls. Wealthy doughs have extra fats in them (for instance, milk, butter, and egg), versus lean doughs like pizza dough and selfmade bagels.
With the heel of your hand, push the dough out, then fold it again. Give the folded dough 1 / 4 flip, and repeat. Push it out, fold it again, and switch. This technique is a bit more light, and I discover it really works higher when you will have a very moist, sticky dough. You may watch me do that within the video above.
How one can Know When Dough Has Been Kneaded Sufficient
How do we all know when the dough has been kneaded sufficient and is able to rise? I’ve two methods you may take a look at your dough for doneness:
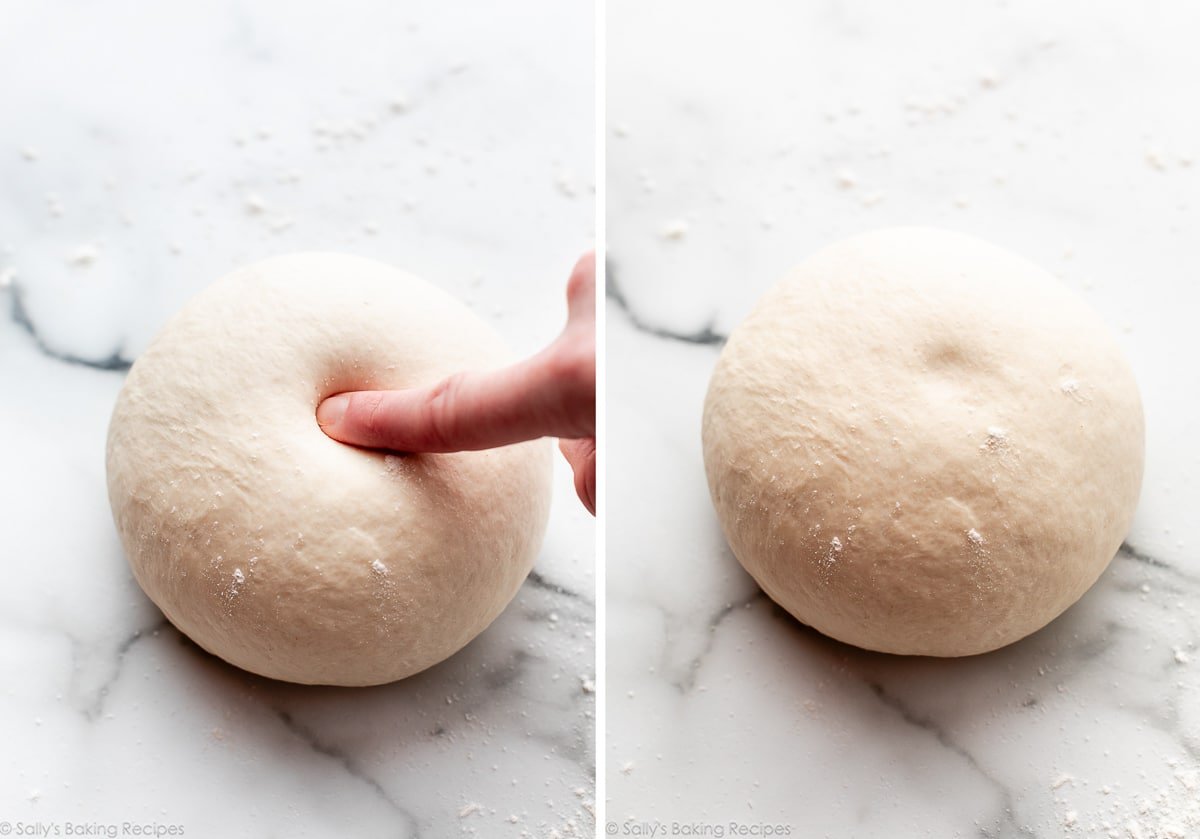
The primary approach to verify is to easily poke the dough together with your finger. If the dough bounces again with out sticking to your finger, it’s been kneaded sufficient. If it doesn’t, it is advisable hold kneading.
Windowpane Check for Dough
The second approach to verify in case your dough has been kneaded lengthy sufficient is one thing known as the windowpane take a look at. Tear off a small piece of the dough, and stretch it out till you may see some gentle coming via it. (Simply maintain it as much as a lightweight or window.) If the dough tears earlier than that time, then it is advisable hold kneading a bit longer.
Kneading size varies enormously in yeast bread recipes. Some doughs take simply 3–5 minutes, whereas others can take as much as 10–quarter-hour. For these longer knead instances, in case your arms are getting drained, be happy to pop the dough again into your stand mixer and use the dough hook for a couple of minutes to provide your arms a break.
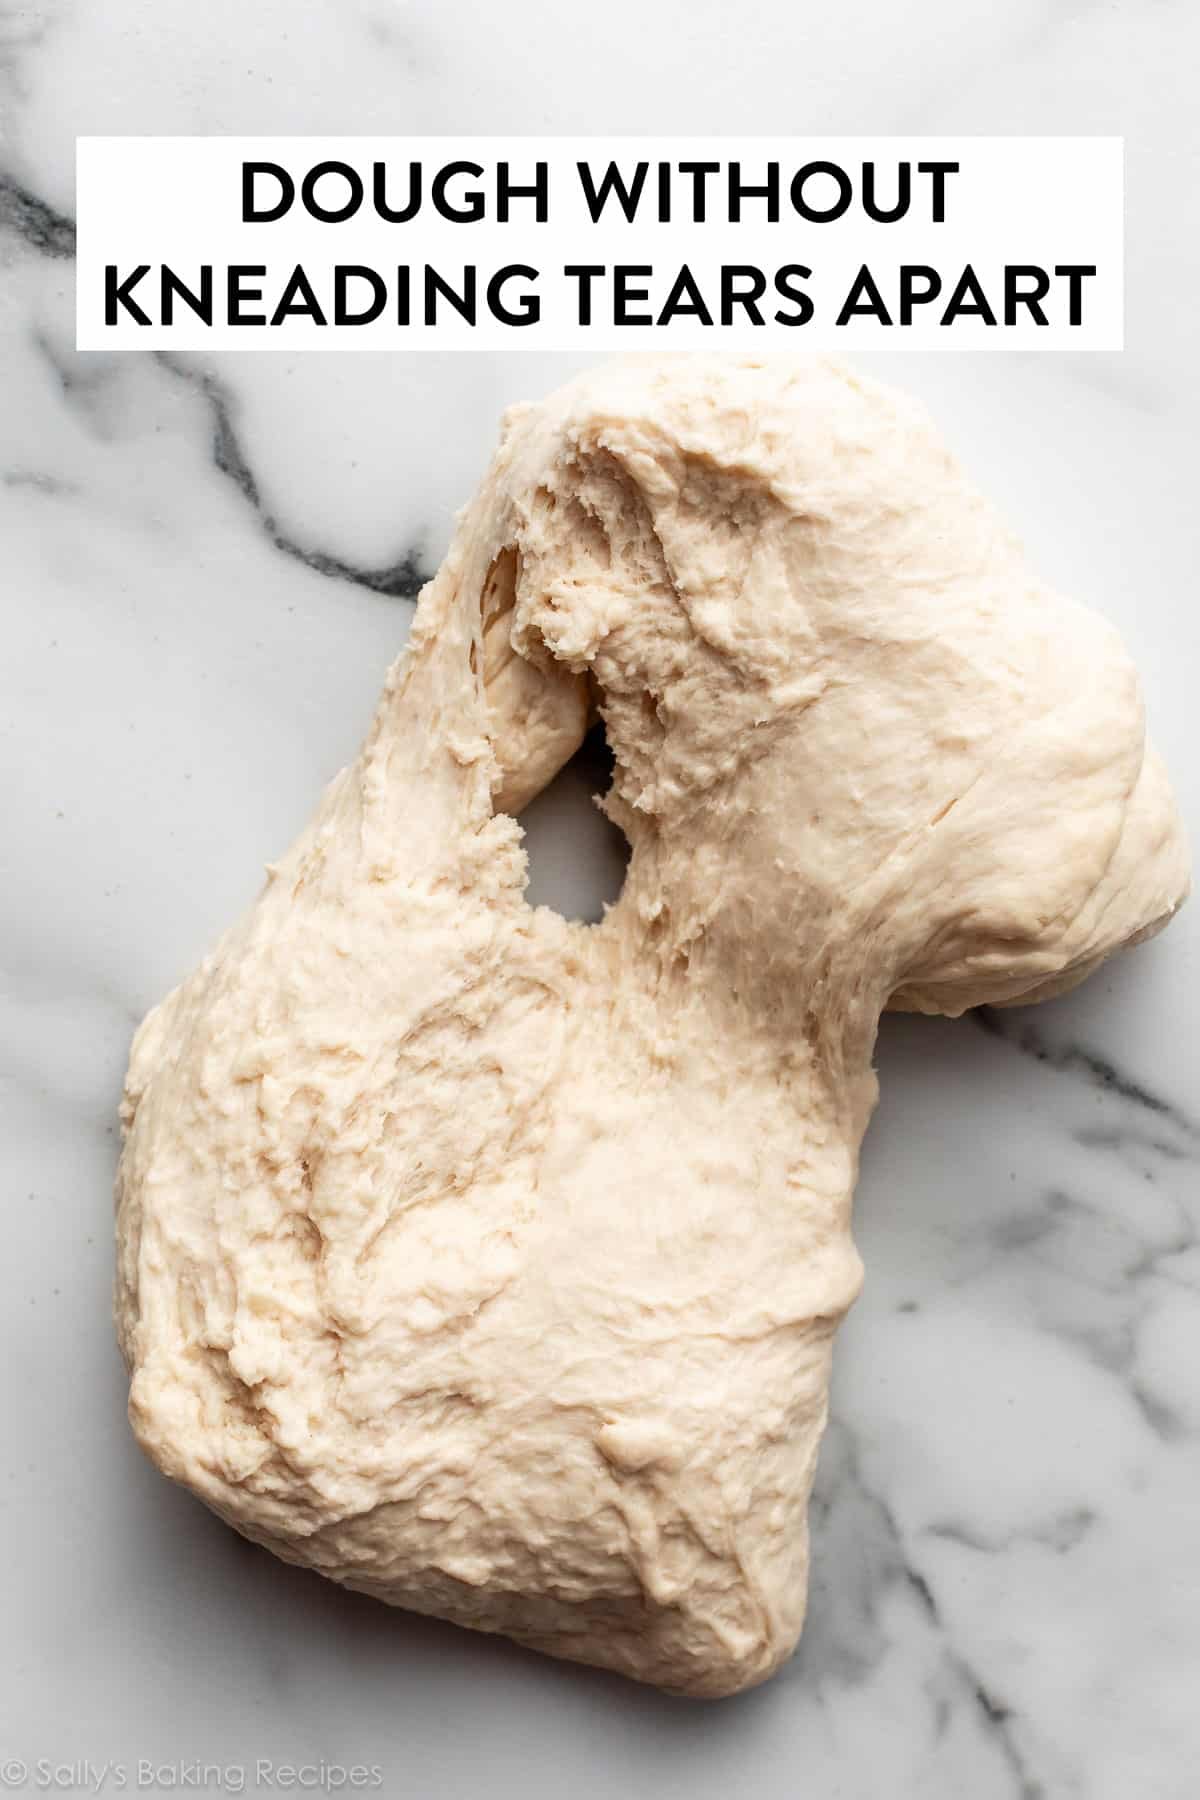
What Does Beneath-Kneaded Dough Look Like?
Dough that has not been kneaded, or hasn’t been kneaded lengthy sufficient seems lumpy, doesn’t stretch very nicely, and tears simply. In case your dough is like this, it wants extra kneading. Hold kneading it till it’s clean, stretchy, and extra pliable.
Clearly, kneading dough does take some time, however the effort is nicely price it, particularly since you are already taking the time to make bread from scratch. I believe you’ll discover it’s truly some of the satisfying steps in bread-making (nicely, apart from the smelling and tasting components on the finish). Silky clean, stretchy and cushiony… kneading dough is the unique stress reliever toy!
I hope this tutorial has been useful. Strive my entire wheat bread in the event you haven’t already!
Newbie Bread Bakers, Begin With These:
How one can Knead Dough By Hand
Prep Time: 10 minutes
Cook dinner Time: 0 minutes
Whole Time: 10 minutes
Yield: 1 dough
Class: Bread
Methodology: Kneading
Delicacies: American
Description
Use this tutorial to information you thru a key step in yeast bread baking: kneading dough. See recipe Notes, and watch the video tutorial to assist. Should you’re new to working with yeast, reference my Baking with Yeast Information for easy solutions to widespread yeast FAQs.
Directions
- Frivolously flour your arms, work floor, and dough. Utilizing the heels of your arms, gently push the dough away from you in a rocking movement, alternating arms as you go. You wish to put some vitality into it, to actually stretch the dough out. The dough might get sticky as you knead, and that’s high-quality. Simply sprinkle slightly extra flour in your arms. Don’t add any extra flour than you really want—use simply sufficient to stop it from sticking an excessive amount of to your arms and work floor. Dough ought to sometimes nonetheless really feel slightly cheesy.
- As you knead, you’ll begin to really feel the feel of the dough change; it would start to clean out and really feel softer and extra elastic. The size of time a dough requires kneading is dependent upon the recipe. Some doughs take simply 3–5 minutes, whereas others can take as much as 10–quarter-hour. For these longer knead instances, in case your arms are getting drained and you’ve got a stand mixer, be happy to pop the dough into your stand mixer bowl and use the dough hook for a couple of minutes to provide your arms a break.
- 2 methods to verify the dough for doneness, and you need to use both or each: The first approach to verify is to easily poke the dough together with your finger. If the dough bounces again with out sticking to your finger, it’s been kneaded sufficient. If it doesn’t, it is advisable hold kneading. The second approach to verify is one thing known as the “windowpane take a look at.” Tear off a small (roughly golfball-size) piece of dough and gently stretch it out till it’s skinny sufficient for gentle to move via it. Maintain it as much as a window or gentle. Does gentle move via the stretched dough with out the dough tearing first? If that’s the case, your dough has been kneaded lengthy sufficient and is able to rise per your recipe’s directions. If not, hold kneading.
Notes
- In case you have an particularly tender or sticky dough, there’s one other kneading method you need to use. I exploit this technique primarily with extra-soft wealthy doughs. Wealthy doughs have extra fats in them (for instance, milk, butter, and egg), versus lean doughs like pizza dough. With the heel of your hand, push the dough out, then fold it again. Give the folded dough 1 / 4 flip, and repeat. Push it out, fold it again, and switch. This technique is a bit more light, and I discover it really works higher when you will have a very moist, sticky dough.
- Can I Knead Dough with a Hand Mixer? No, I don’t advocate it. The dough will simply get caught within the beaters. Use a stand mixer or knead by hand.