

This publish might include affiliate gross sales hyperlinks. Please learn my disclosure coverage.
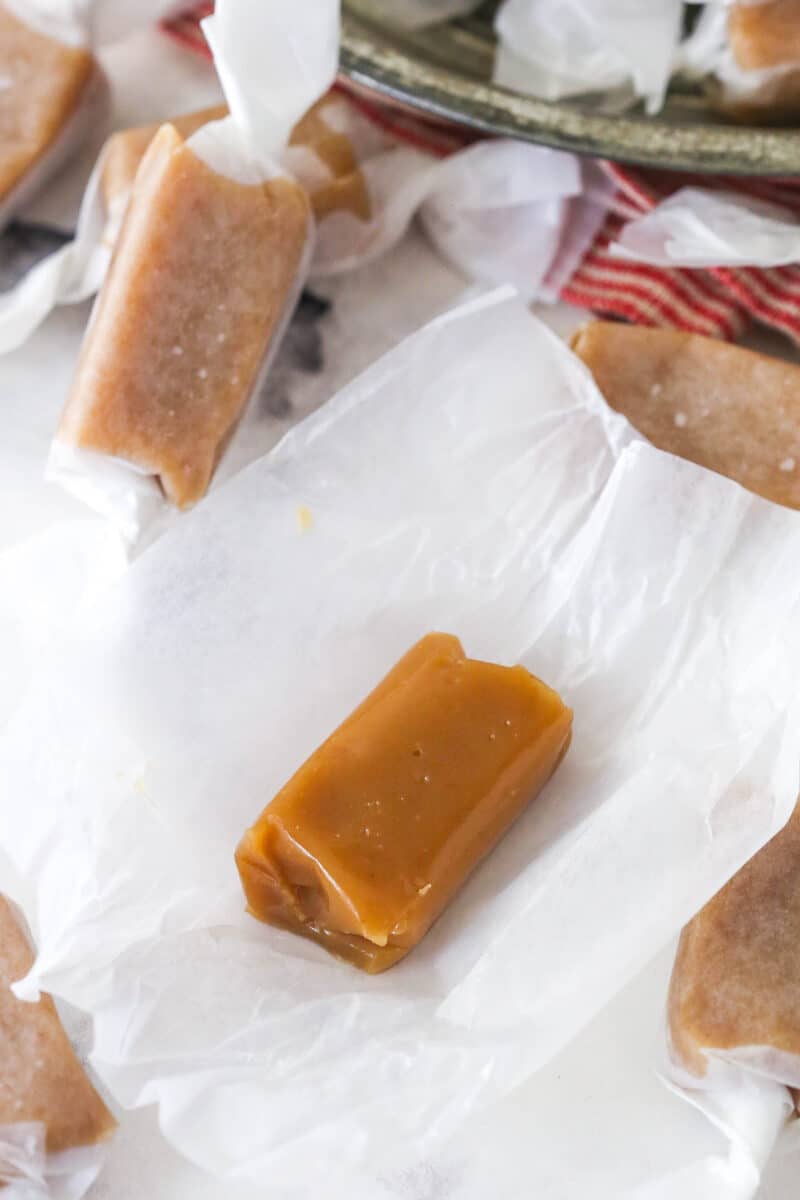
These selfmade caramels are mushy, chewy and FULL of taste! They’re not exhausting to make and use easy elements. With my detailed directions and step-by-step photographs, you’ll be gifting selfmade caramels to everybody you realize!

Higher Than Retailer-Purchased
I’m such a giant caramel fan. It’s simply one among my favourite flavors. In a bag filled with sweet and sweets, I’ll all the time eat something with caramel first and should not even hassle with the remainder. It’s real love.
And these selfmade caramels are even higher than store-bought ones – and just about each different recipe I attempted. Once I make one thing selfmade, I would like even higher taste than what I can purchase, in any other case what’s the purpose? Many recipes on the market have caramel taste that simply isn’t sufficient for me. So I got down to make one thing higher.
Reasonably than having only one caramelization course of that’s lower brief by the temperature wanted to have softer caramels, this recipe has two rounds of caramelization. You principally begin out by making my selfmade salted caramel sauce, which already has wonderful taste, then add a number of extra elements and cook dinner it once more till it’s on the proper temperature for chewy caramels. Purely addicting and wonderful. The flavour is the most effective.
Why You’ll Love These Do-it-yourself Caramels
- Superb taste – As defined above, the flavour of those caramels is the most effective. Twice the caramel taste of most different recipes! You gained’t have the option to withstand them!
- Mushy and chewy – They’re mushy, chewy and simply the fitting texture. Plus, with slight changes to the temperature you cook dinner them to, you may make them roughly mushy to your choice. Straightforward!
- Excellent for gifting – Transfer over cookies! Do-it-yourself caramels are on the town! Not solely are selfmade caramels particular and spectacular feeling, additionally they last more than any cookie. Reward all of them season lengthy, ship them – they keep excellent.

Ingredient Notes
These caramels are made with easy elements and also you doubtless have most, if not all, of them readily available. Yow will discover the precise measurements for every ingredient within the recipe card under.
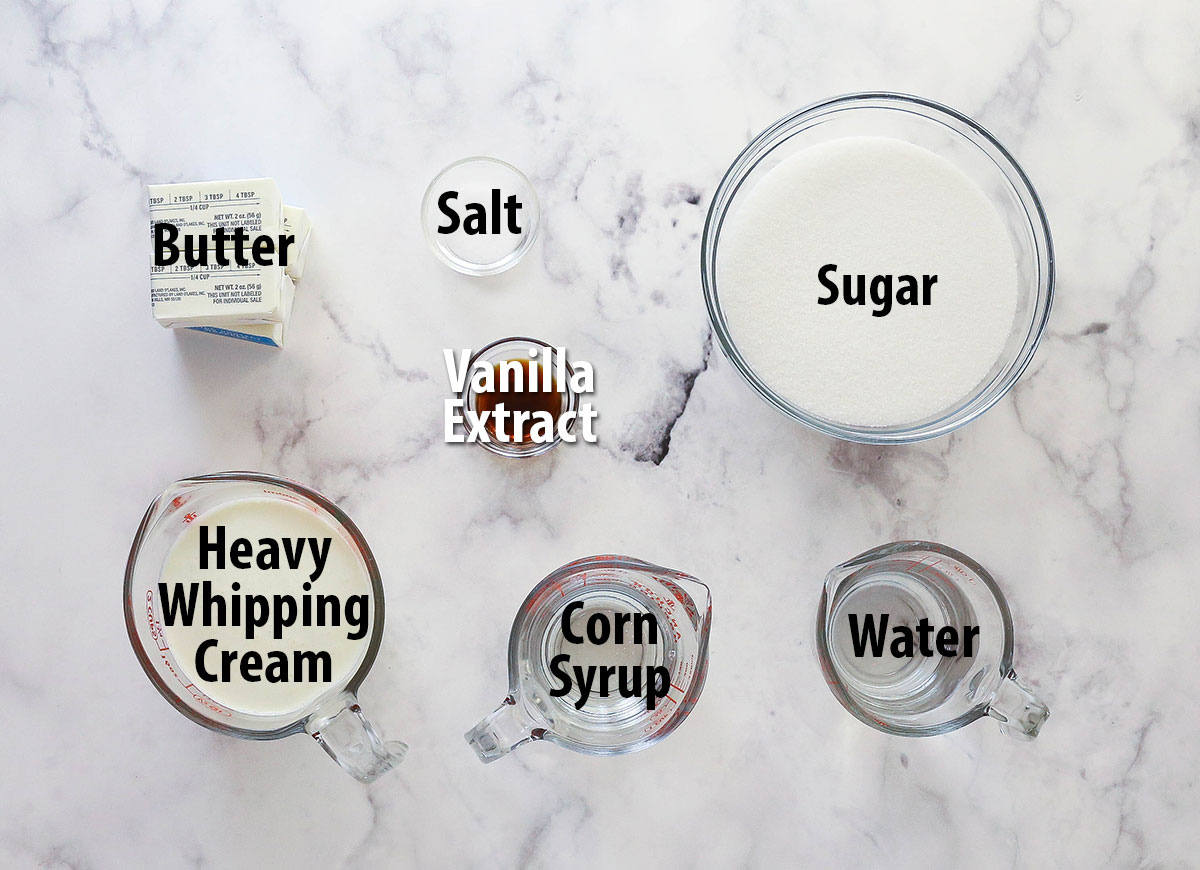
- Sugar – The caramel taste comes from melting and cooking – or caramelizing – the sugar. Follow common granulated sugar.
- Water – The sugar is cooked in water when making the caramel sauce. The water helps regulate the temperature of the melted sugar because it cooks in order that it doesn’t burn earlier than it caramelizes. You wouldn’t need to swap this out for one thing else, like cream, as a result of cream is extra more likely to burn at larger temperatures.
- Butter – For taste and texture. You really need to have the ability to management your salt content material right here, so go for unsalted butter.
- Heavy Whipping Cream – You should definitely use heavy whipping cream, not half and half, milk or one other different. You need the upper fats content material in order that your caramels thicken/agency up correctly.
- Mild Corn Syrup – Helps forestall crystals from forming within the caramels in order that they’ve a easy, creamy texture
- Salt – I really like the best way it makes the flavour of the caramels pop, however you can depart it out, should you desire.
- Vanilla Extract – Amps up the flavour of the caramels.
How you can Make Do-it-yourself Caramels
These caramels take some time to make, however they aren’t exhausting. The principle factor is to have an immediate sweet thermometer so you realize what temperature issues are and once they’re finished. In any other case, it’s plenty of stirring and ready. Yow will discover the printable model of the directions within the recipe card under.
- Prep: Line an 8 or 9-inch baking pan with parchment paper. Put aside.
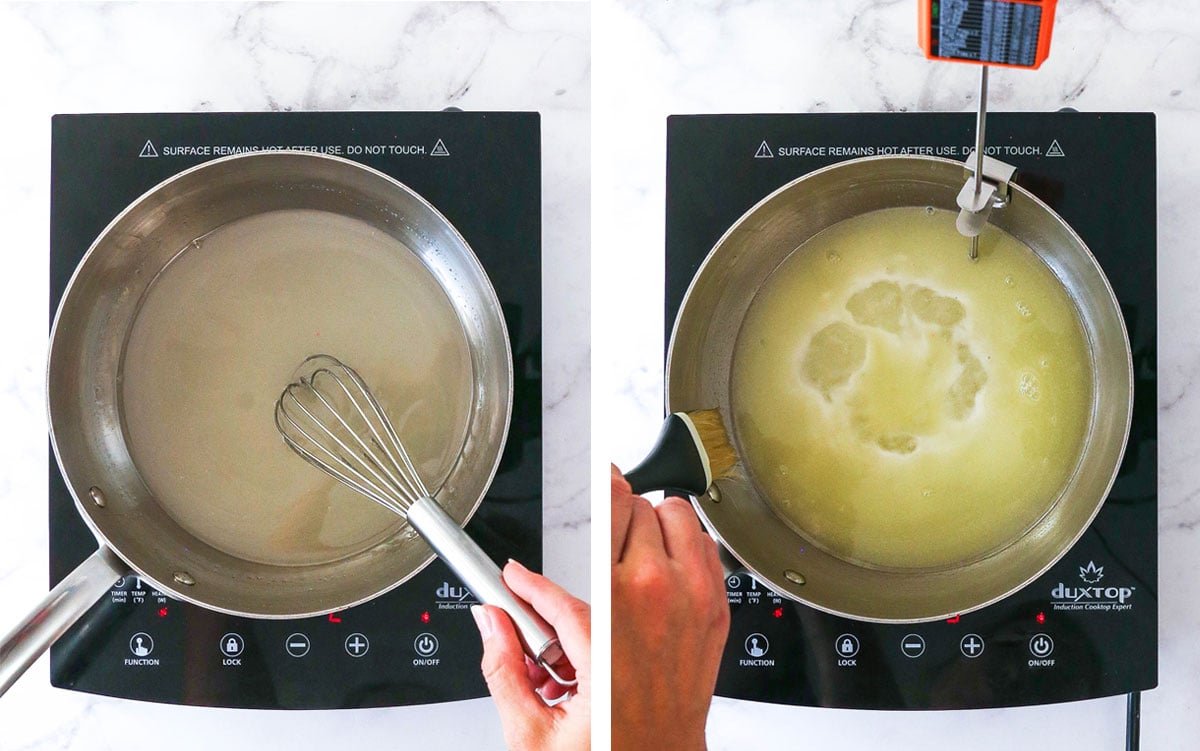
- Begin making the caramel sauce. Mix the sugar and water and cook dinner over medium-low warmth till the sugar is dissolved. Add ½ a cup of the butter and let it soften.
- Convey sugar combination to a boil. Flip the warmth to medium and produce the combination to a boil. Use water and a pastry brush to wash the edges of the pan to assist cut back crystallization. Don’t whisk in any respect throughout this half.
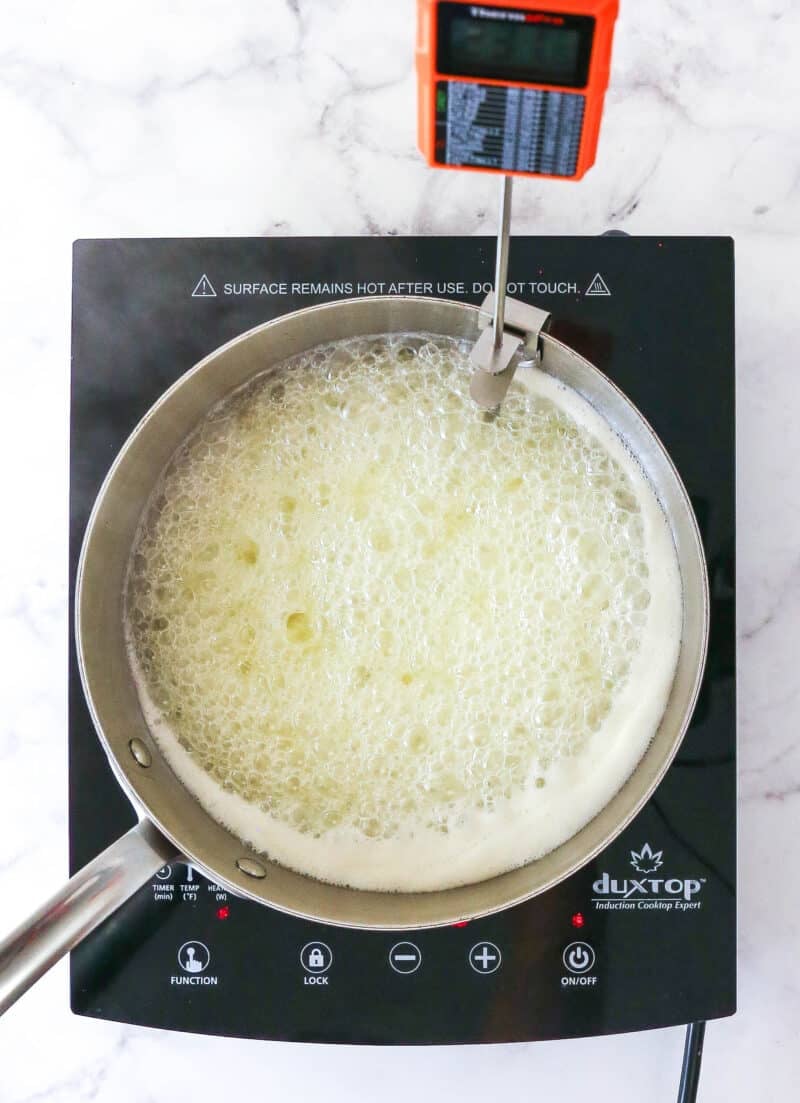
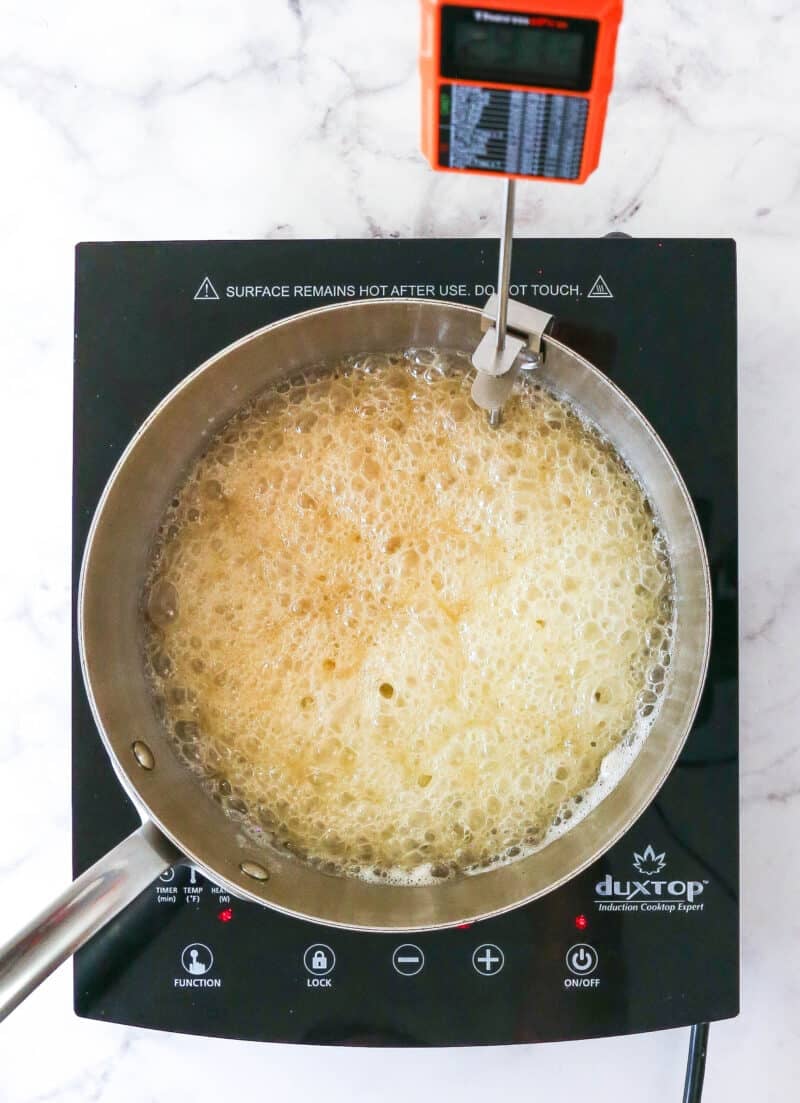
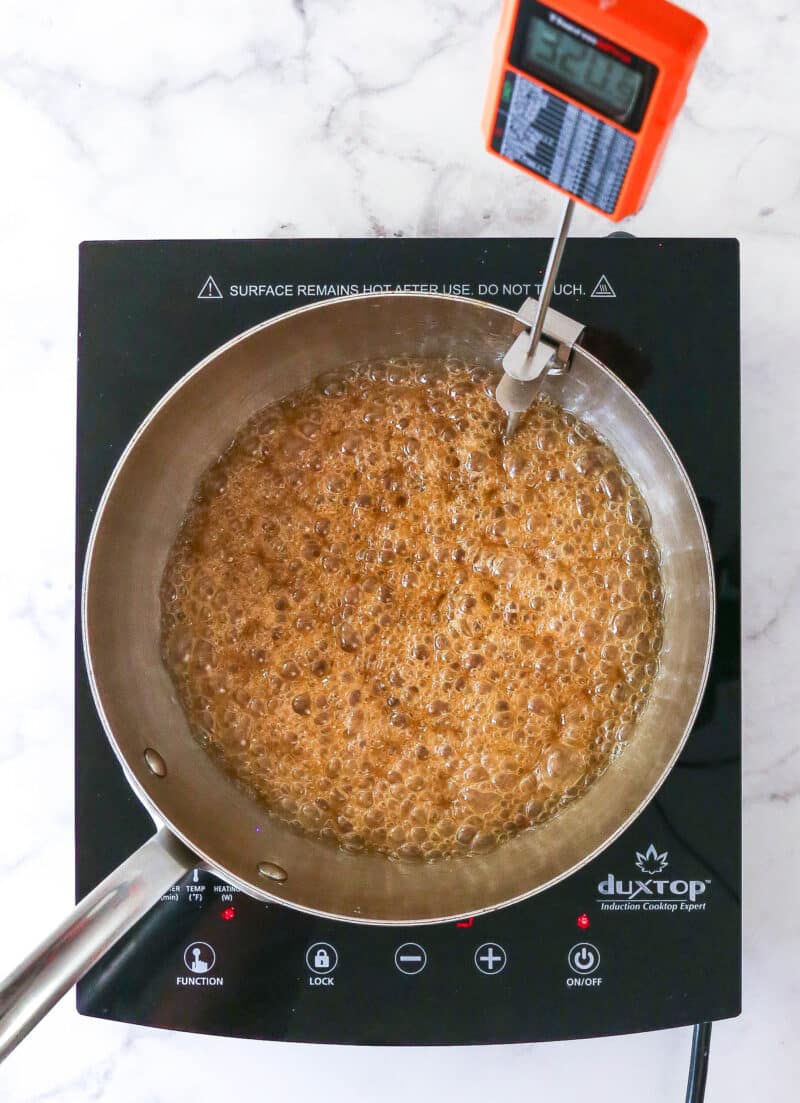
- Let the sugar caramelize. Enable to boil till it turns a deep golden copper shade and reaches 330°F. If wanted, tip the pan back and forth to assist issues cook dinner evenly, and to see how darkish it’s to verify it isn’t burning.
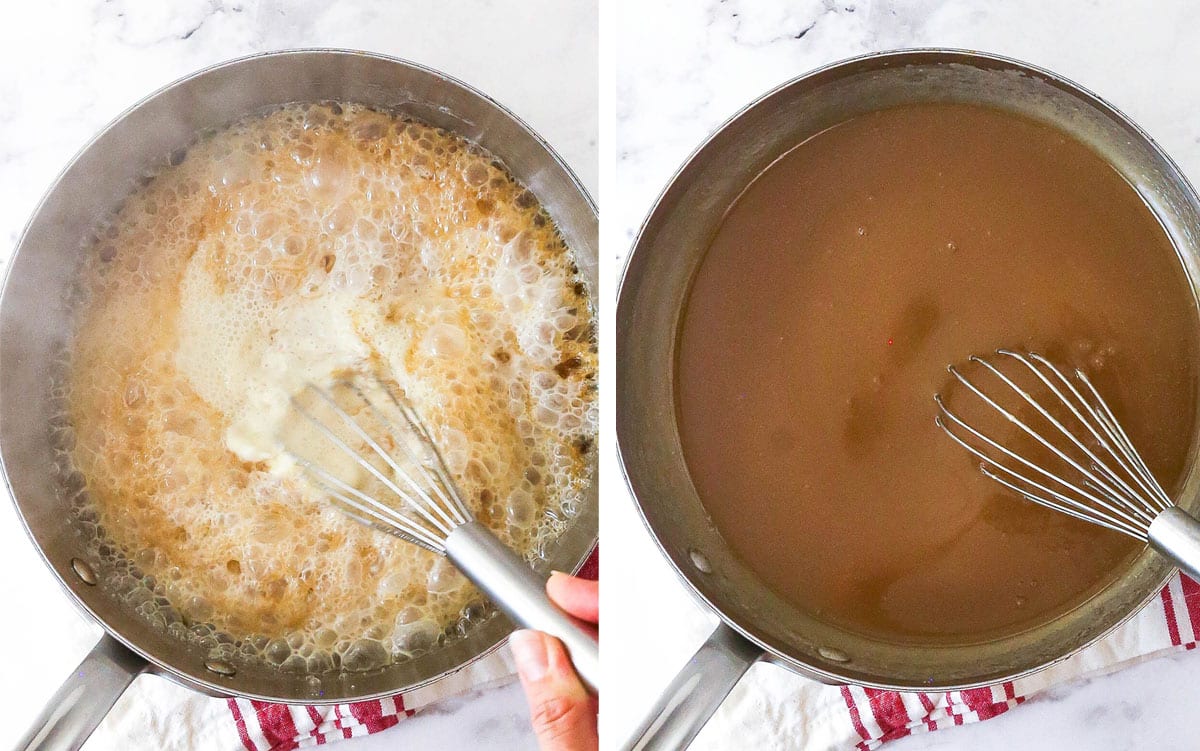
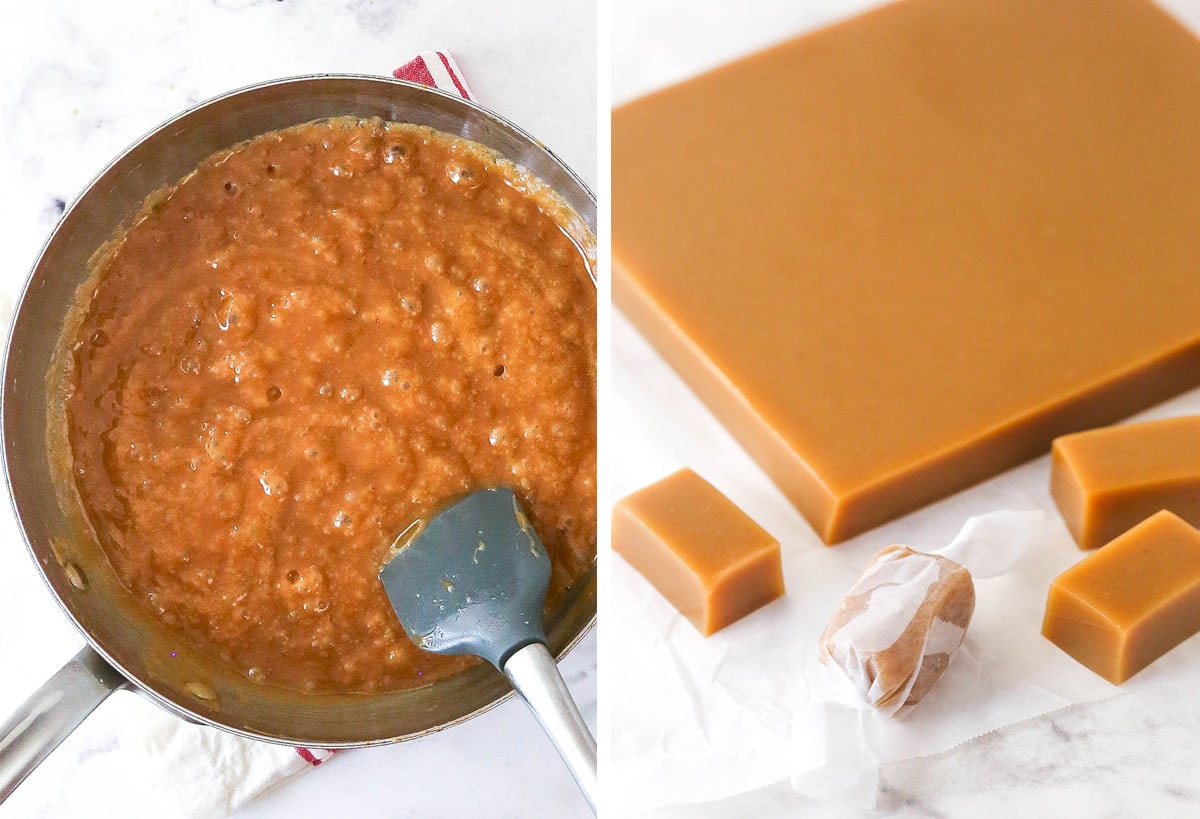
- End caramel sauce. Take away caramel from warmth and add the heavy whipping cream. The caramel will bubble up fairly a bit, so watch out. Whisk rapidly as you add the cream, whisking till nicely mixed.
- Flip the caramel sauce into caramels. Add the remaining ½ cup of butter and let it soften, then add the corn syrup. Warmth over medium warmth and produce to a boil. Stir usually with a silicone spatula to assist forestall burning.
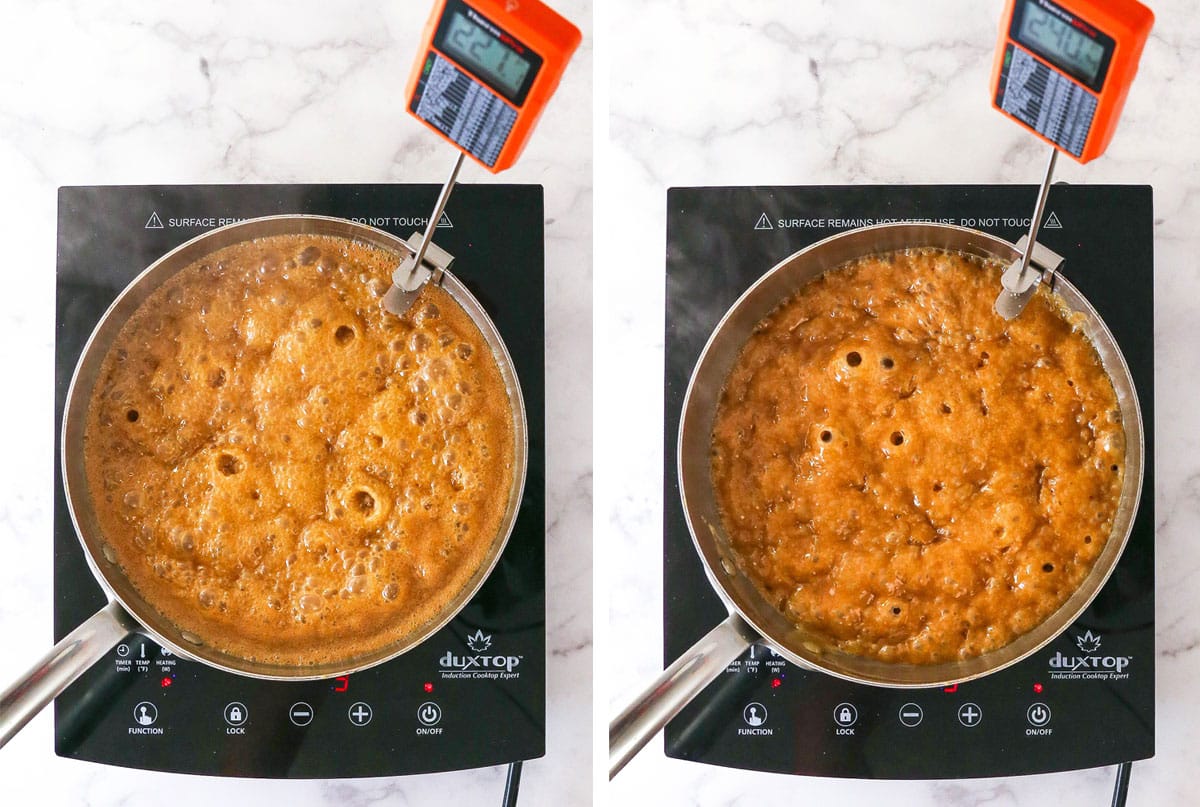
- Warmth to the fitting temperature. Prepare dinner the caramel till reaches 240-245°F. The upper the temperature, the firmer the caramels can be. When you don’t have a sweet thermometer, it’s also possible to check it the old style means by dropping a spoonful of scorching caramel right into a cup of ice water. When you can form it into a reasonably agency however barely sticky ball, it needs to be prepared.
- Add further taste. Take away from warmth and stir within the salt and vanilla extract. It’s going to bubble up a bit, so watch out.
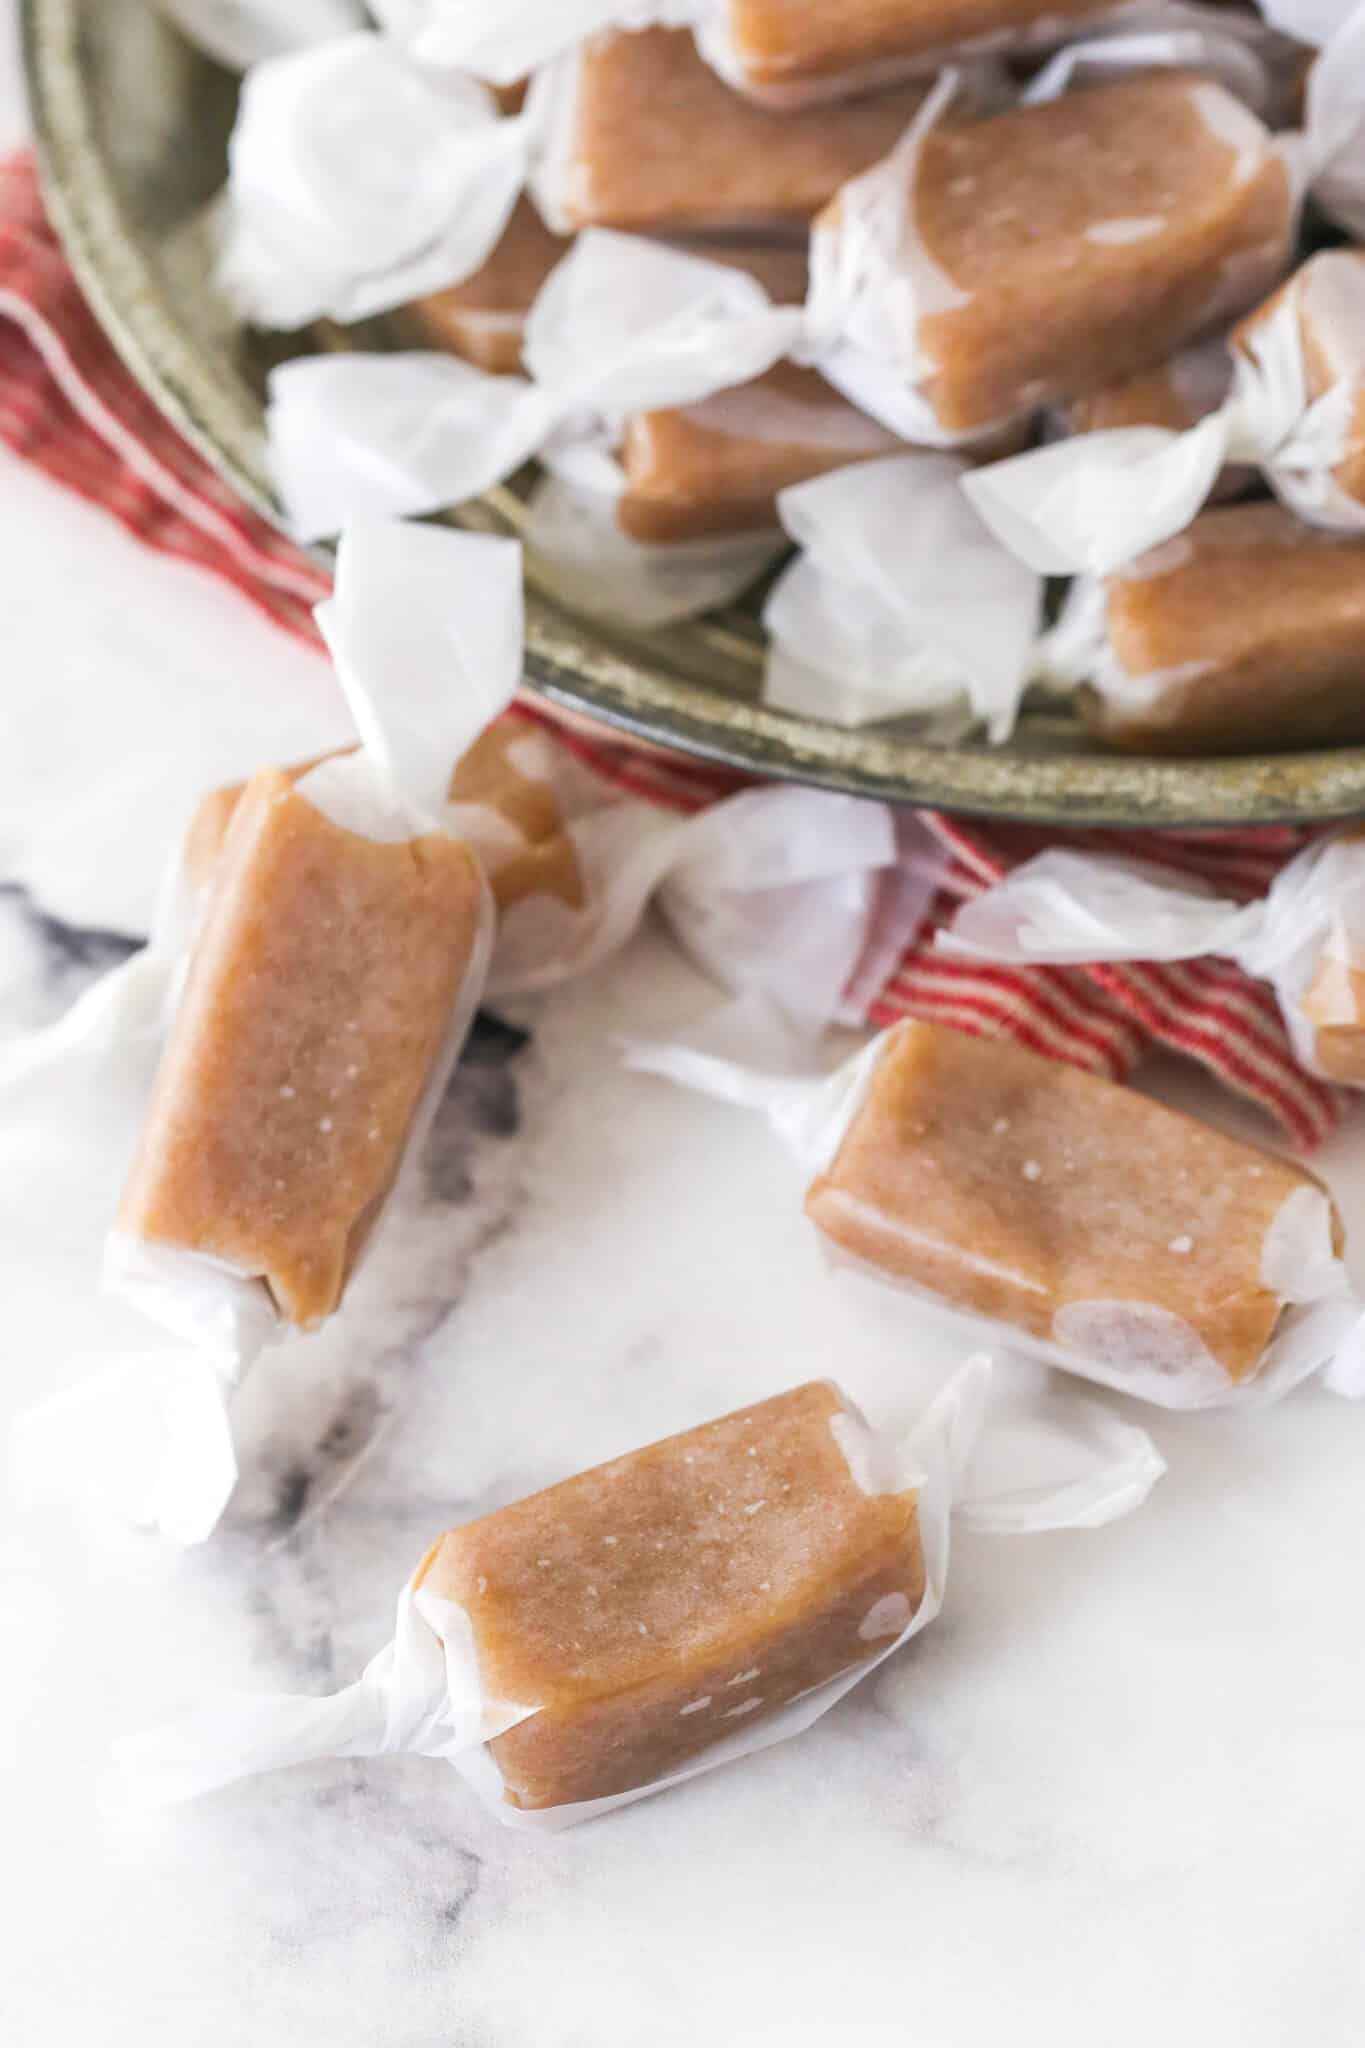
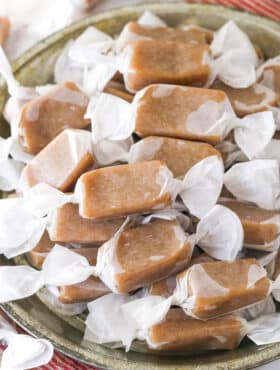
- Cool, lower, wrap. Pour the caramel combination into the ready pan and let cool fully. Lower the caramels to your required measurement and wrap them in wax paper.
Ideas For Excellent Caramels
- Keep away from crystallization – There are a number of locations crystallization can occur throughout this course of, so pay attention to the place it’s talked about within the recipe. Don’t stir whereas the preliminary caramel sauce is cooking and use a pastry brush and water to wash the edges of the pan when wanted.
- Gradual and regular – Don’t crank up warmth to make the caramels cook dinner sooner. The entire course of takes about 45 minutes to an hour, however dashing it could actually trigger caramels to separate or simply typically not end up proper.
- Use a stainless-steel saucepan – Actually not required, however it’s useful. It means that you can extra clearly see the colour of the caramel sauce whereas it’s cooking. Plus, a superb high quality pan additionally helps with extra even heating.
- Use an immediate sweet thermometer – I really like the moment sweet thermometer as a result of it takes the guessing out of it. It’s vital to cook dinner the preliminary caramel sauce as a lot as you’ll be able to with out burning it. This spherical of cooking is what offers the sturdy caramel taste to the caramels. Cooking it to a decrease temperature will imply much less taste. Equally, the second spherical of cooking is what offers the caramels their stage of firmness. Decrease temperature means a softer caramel and small variations in temperature make a giant distinction in ultimate texture, so it’s vital to know what temperature the combination is at. Additionally, don’t let the thermometer contact the underside of the pan or it gained’t be correct.
If Your Caramels Are Too Mushy Or Too Agency
This goes again to utilizing the sweet thermometer talked about above. Small temperature variations make a giant distinction in outcomes. In case your caramels are too mushy, they weren’t cooked to a excessive sufficient temperature. If they’re too agency, they have been cooked to too excessive of a temperature. Additionally remember that everybody has a distinct concept of the “excellent” quantity of softness. As soon as you discover that candy spot, a sweet thermometer will assist ensure that they’re excellent each time.
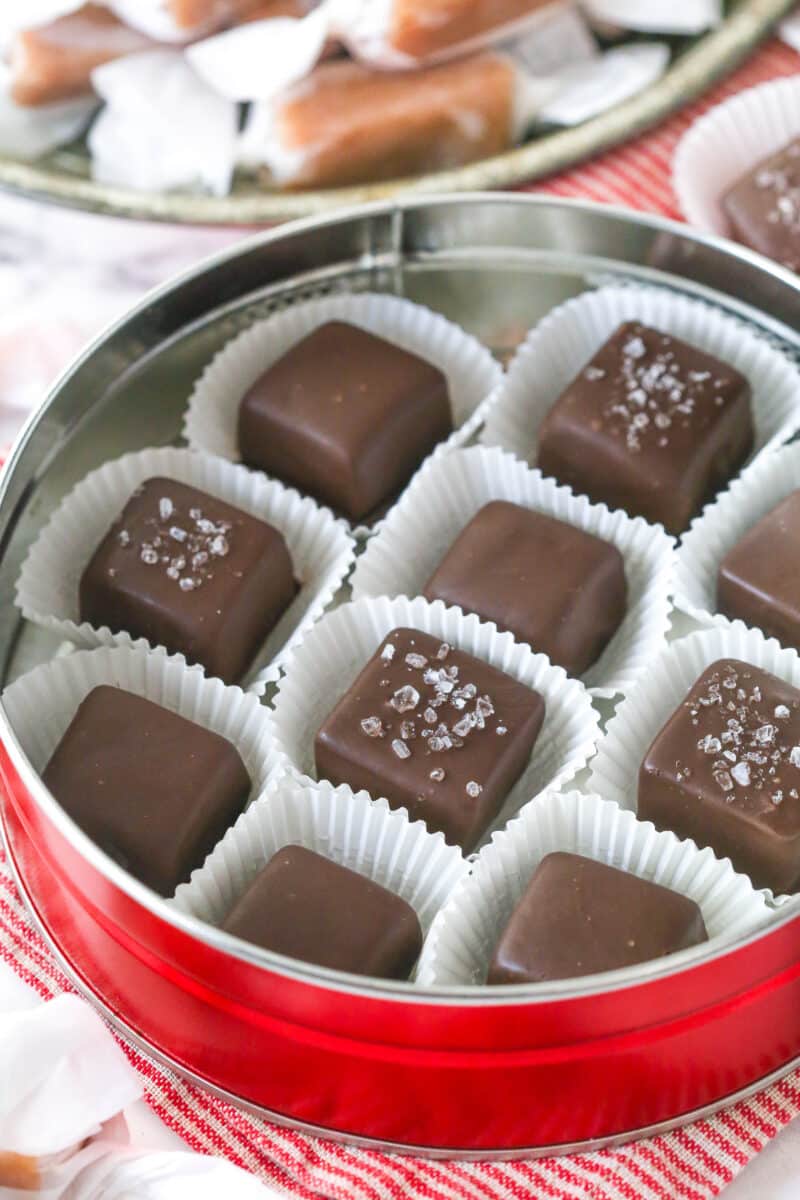
Make Chocolate Lined Caramels
You can even flip your selfmade caramels into selfmade chocolate lined caramels. Set out a bit of parchment paper and soften your most well-liked chocolate (I discover Ghirardelli melting wafers to be best to work with). Use a toothpick or related software to dip every caramel sq. into the chocolate to coat it, then faucet or shake off any extra chocolate and set the caramels on the parchment paper to dry absolutely. You may add just a little sea salt, should you like. The quantity of chocolate you want relies upon just a little on how large you narrow your caramels, however it is best to want about 10 ounces.

How To Retailer Do-it-yourself Caramels
- Storage – Wrapped selfmade caramels will be saved in an air-tight container at room temperature for six to 9 months.
- Freezing – Whilst you don’t actually need to freeze them, you can and so they’d final for nearer to a 12 months. Thaw within the fridge earlier than utilizing.
Extra Recipes With Caramel
Recipe
Mushy Do-it-yourself Caramels
Prep Time: half-hour
Cooling Time: 2 hours
Prepare dinner Time: 1 hour
Whole Time: 3 hours half-hour
Yield: 35 caramels
Class: Dessert
Technique: Range
Delicacies: American
Description
These selfmade caramels are mushy, chewy and FULL of taste! They’re not exhausting to make and use easy elements. With my detailed directions and step-by-step photographs, you’ll be gifting selfmade caramels to everybody you realize!
Substances
- 2 cups (414g) sugar
- 3/4 cup (180ml) water
- 1 cup (224g) unsalted butter, divided
- 1 3/4 cups (420ml) heavy cream, room temperature
- 1/2 cup (120ml) mild corn syrup
- 1 tsp salt
- 2 tsp vanilla extract
Useful Instruments
Directions
- Line an 8 or 9-inch baking pan with parchment paper. Both measurement pan will work, the 8-inch will simply offer you thicker caramels.
- You’ll begin by making the caramel sauce. In a medium to massive saucepan, mix the sugar and water. Prepare dinner over medium-low warmth till the sugar is totally dissolved, about 3 to five minutes. Add ½ cup of the butter and let it soften.
- Flip the warmth as much as medium and produce the combination to a boil. Use water and a pastry brush to wash the edges of the pan (this helps the residue on the edges of the pan not trigger crystallization). Cease whisking and don’t whisk in any respect throughout this half (once more to assist keep away from crystallization).
- Enable to boil till the combination turns a deep golden copper shade and reaches 330°F (should you’re utilizing a sweet thermometer), about 10-Quarter-hour, perhaps longer relying in your range. Keep watch over it, however don’t stir. If wanted, you’ll be able to sometimes tip the pan back and forth to assist issues cook dinner evenly, and to provide you a take a look at how darkish it’s and ensure it isn’t burning.
- Take away the pan from the warmth and instantly add within the heavy whipping cream in a sluggish, regular stream. The caramel will bubble up fairly a bit, so watch out with this step. Whisk rapidly and nicely as you add the cream, whisking till nicely mixed.
- Now it’s time to show the caramel sauce into caramels. Add the remaining ½ cup of butter and let it soften, then add the corn syrup and stir to mix.
- Place the pan again over medium warmth and produce to a boil (it’ll occur rapidly). Stir usually with a silicone spatula to assist forestall burning. After stirring, you need to use water and a pastry brush to wash the edges of the pan (this helps the residue on the edges of the pan not crystallize).
- Prepare dinner the caramel till reaches 240-245°F (I desire 245°F). The upper the temperature, the firmer the caramels can be. When you don’t have a sweet thermometer, it’s also possible to check it the old style means by dropping a spoonful of scorching caramel right into a cup of ice water. When you can form it into a reasonably agency however barely sticky ball, it needs to be prepared.
- Take away from warmth and stir within the salt and vanilla extract. It’s going to bubble up a bit, so watch out.
- Pour the caramel combination into the ready pan and permit to chill fully. They’ll cool at room temperature or within the fridge. They’re firmer and simpler to chop when chilly, and are softer (however completely nonetheless cut-able) at room temperature.
- Lower the caramels to your required measurement and wrap them in wax paper. Retailer them in an air-tight container at room temperature or within the fridge, however serve at room temperature. They need to hold nicely at room temperature for about six to 9 months.
Notes
- Yield – I received about 35 caramels, however you can get roughly relying on how large you narrow them.
- Storage – Wrapped selfmade caramels will be saved in an air-tight container at room temperature for six to 9 months.
- Freezing – Whilst you don’t actually need to freeze them, you can and so they’d final for nearer to a 12 months. Thaw within the fridge earlier than utilizing.
Diet
- Serving Dimension: 1 caramel
- Energy: 126
- Sugar: 15.4 g
- Sodium: 72.1 mg
- Fats: 7.4 g
- Carbohydrates: 15.4 g
- Protein: 0.2 g
- Ldl cholesterol: 20.7 mg