

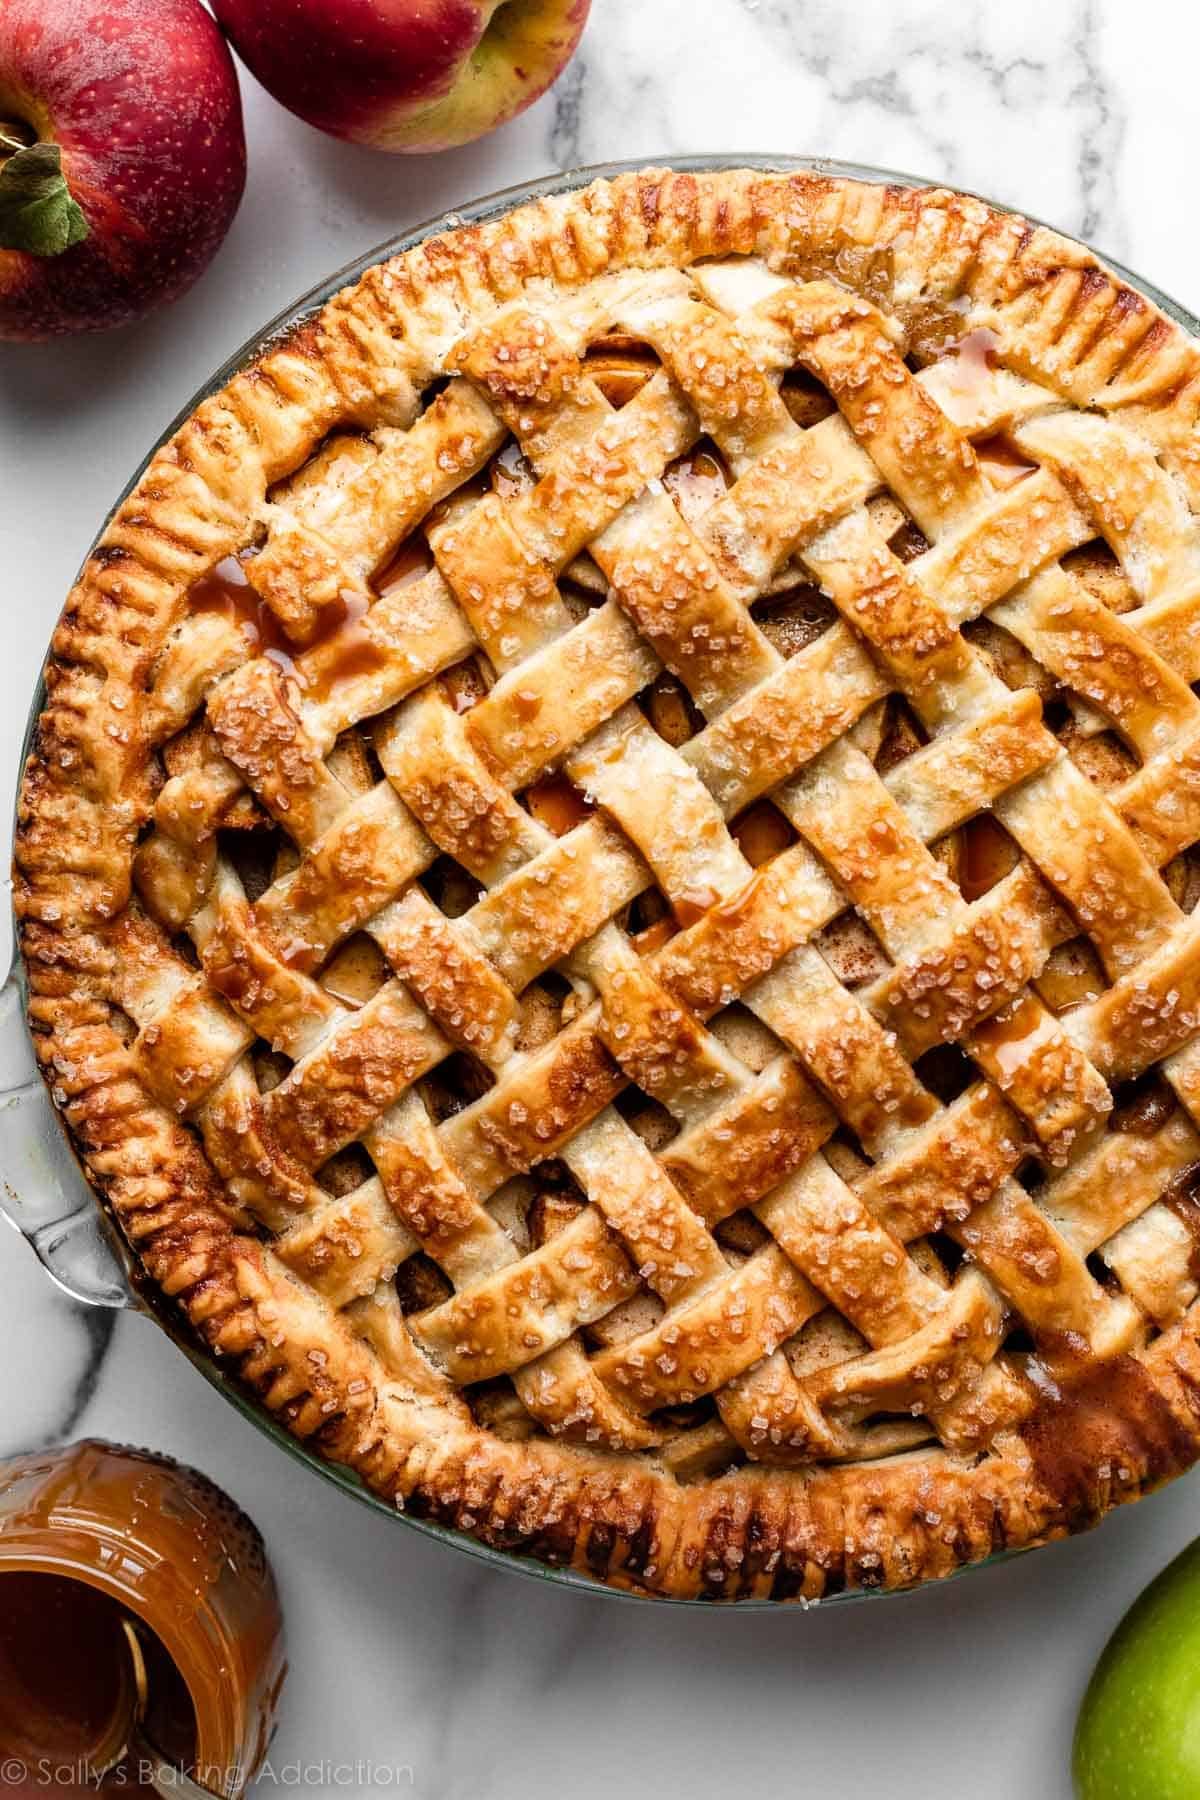
Learn to make a completely buttery, flaky pie crust from scratch utilizing this in-depth tutorial and video. This web page consists of all of my greatest success suggestions, plenty of step-by-step images, and a completely detailed recipe. Tens of millions of readers have been utilizing this beneficial information since 2015. Grasp this crust recipe and the remainder will likely be as straightforward as… consuming salted caramel apple pie!
For a baker, there’s nothing extra satisfying than making a pie utterly from scratch. Pies are sometimes made for particular events, and there’s a very good cause for that: they’re time consuming. This shouldn’t scare you! It ought to intrigue you. In case you’ve ever felt intimidated about making do-it-yourself pie crust, I’m right here to stroll you thru it and cheer you on. If I can do that, you are able to do this.
Pie crust is the muse for therefore many scrumptious desserts (plus savory pies and quiche), so when you construct up your confidence in making a crust, you’re opening a door to a complete baking class. And that’s thrilling! Whether or not your favourite pie filling is apple pie or creamy banana cream pie, and even eggs & cheese, the success of the general pie can actually hinge on the standard of the crust.
You wouldn’t hold a phenomenal piece of artwork or favourite photograph in a horrible body, proper?
Right this moment I’m instructing you all the pieces about making a buttery, flaky pie crust. That is my absolute favourite pie crust recipe and probably the most common recipes on this web site.
With all of the recipe testing that goes into publishing the numerous pie recipes on this web site and in my cookbooks, plus my annual Pie Week, it’s not an understatement to say that I’ve made a LOT of pies. Alongside the way in which, I’ve discovered what works and what doesn’t, and I’m blissful to share all of it with you.
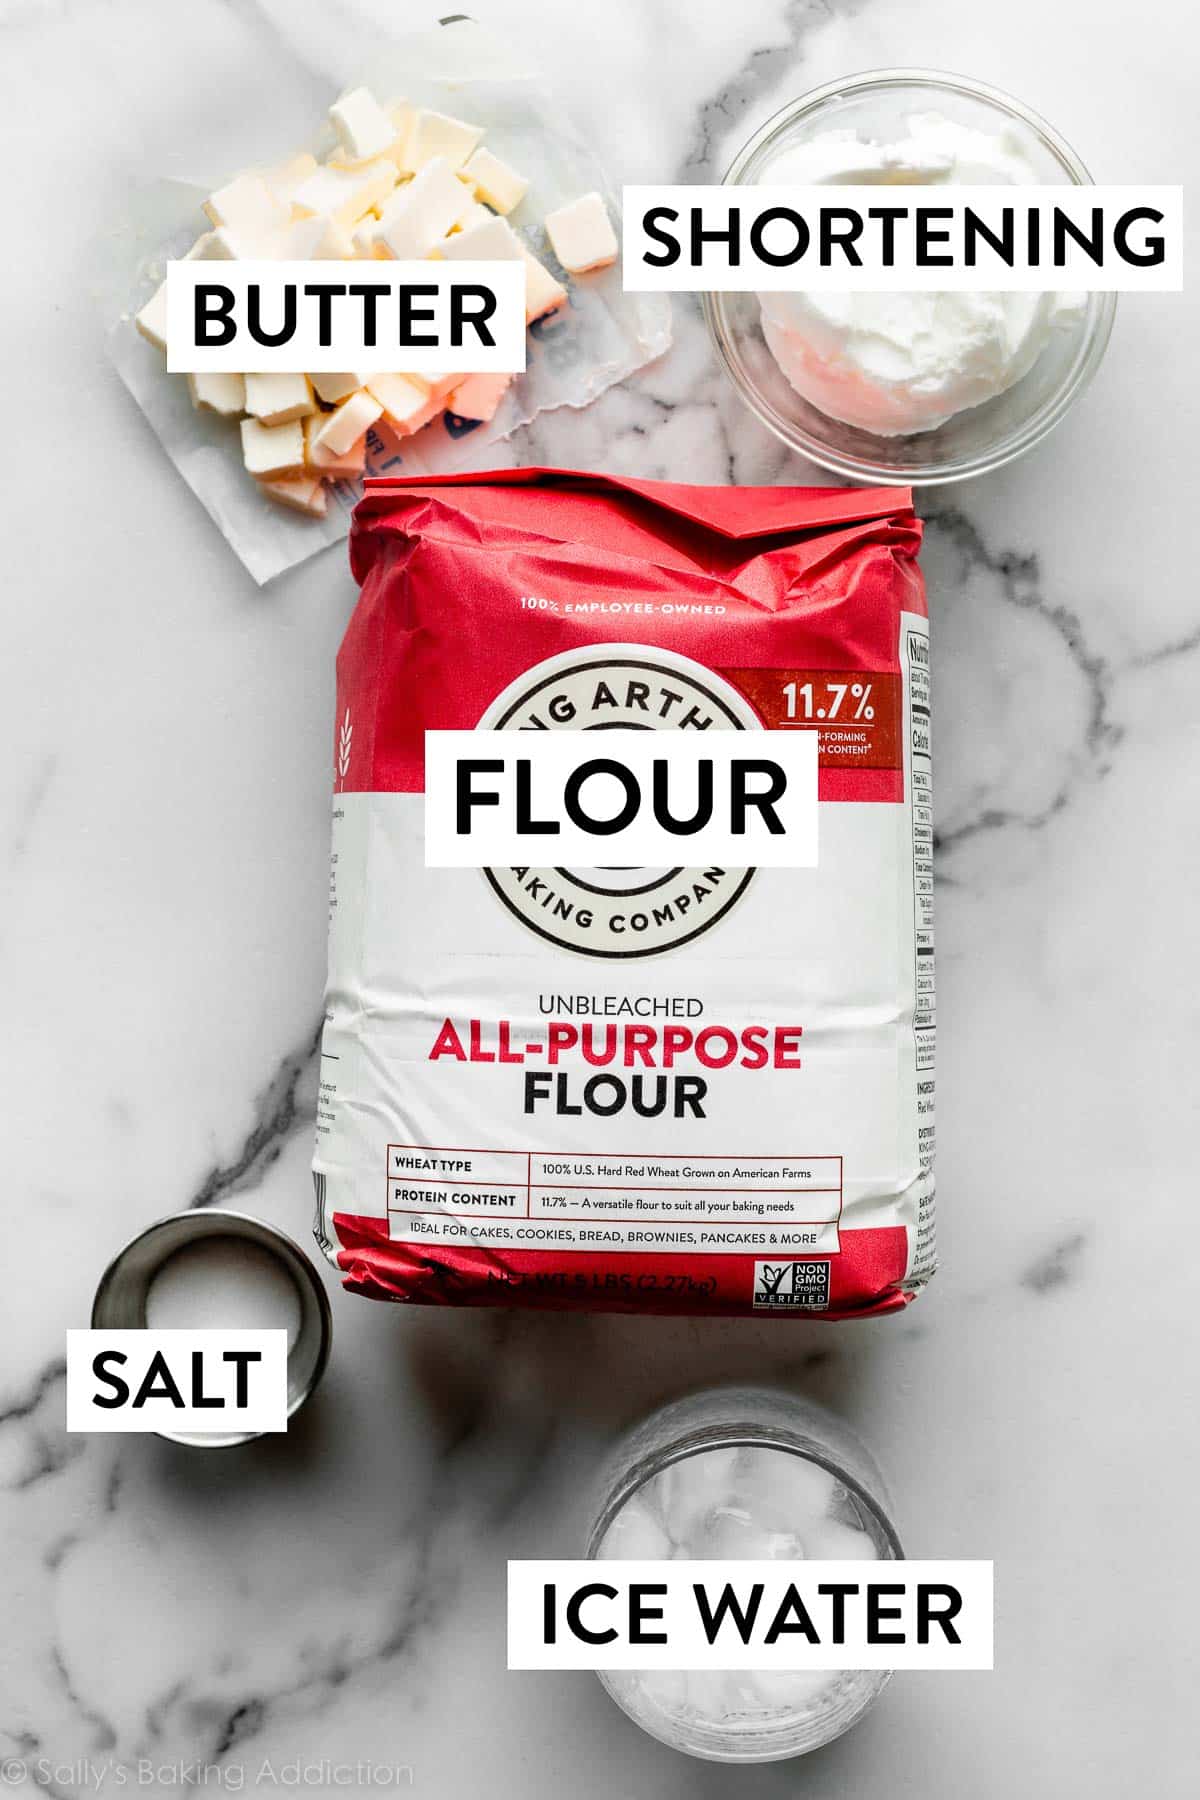
Begin With These 5 Substances
The ingredient record for pie crust is brief & easy:
- Flour: Begin with high quality flour. Do you know that not all all-purpose flours are equal? King Arthur Unbleached All-Function Flour is my go-to for not solely pie crust, however for all the pieces. (Not working with the model, only a true fan!) Why? Its excessive protein stage: “At 11.7% protein, it tops strange American all-purpose flours by practically 2 share factors.” What does this imply? Baked items rise greater and keep contemporary longer.
- Salt: Enhances the flavour.
- Butter: For that unparalleled buttery taste and flaky layers.
- Vegetable Shortening: For construction and stability. Extra on this under.
- Ice water: Liquid brings the dough collectively. Some recipes name for half water and half vodka, as a result of alcohol doesn’t promote gluten formation, which helps the crust keep flaky and tender. Mainly, it’s a present to anybody who by accident overworks dough. If you wish to attempt utilizing vodka, use 1/4 cup (60ml) every chilly vodka and chilly water on this recipe.
You should use this pie dough for therefore many recipes past a conventional pie, too, akin to mini pecan pies, mini fruit galettes, apple hand pies, and do-it-yourself brown sugar cinnamon pop tarts.
Is Pie Crust Higher With Butter or Shortening?
I take advantage of BOTH shortening and butter on this pie crust as a result of they work collectively to make the BEST crust. Buttery, flaky, and tender: the pie-fect trifecta.
- What does butter do? Butter provides taste and flakiness.
- What does shortening do? Shortening helps the dough keep pliable, which is useful if you’re rolling and shaping it. Plus, shortening’s excessive melting level helps the crust keep tender and preserve its form because it bakes. Have you ever ever had a butter pie crust lose its form utterly? Shortening is “form insurance coverage.”

In case you don’t need to use shortening, do this all-butter pie crust as a substitute. Let’s examine:
- Utilizing all butter creates a lighter-textured crust and that is because of the butter’s water content material. Because the crust bakes, the butter’s water converts to steam, lifting up the dough and creating flaky layers. However due to all this butter, the crust doesn’t normally have a wonderfully neat-edge/form in comparison with the shortening and butter mixture.
Each crusts style buttery and flaky. However total, this butter-and-shortening crust wins when it comes to texture and taste; AND, should you observe the pie crust recipe rigorously, it holds form too.
The Secret to Good Pie Crust: COLD
The fridge is as necessary because the oven if you’re making a do-it-yourself pie.
Why the emphasis on temperature? Preserving your pie dough as chilly as doable helps stop the fat from melting earlier than the crust hits the new oven. If the butter melts contained in the dough earlier than baking, you lose the flakiness. When the lumps of fats soften within the oven because the pie bakes, their steam helps to separate the crust into a number of flaky layers, as defined above. Heat fat will yield a tough, crunchy, greasy crust as a substitute of a young, flaky crust.
The colder the components, the simpler your pie crust is to work with, and the higher it would prove.
Two Methods to Begin as Chilly as Potential:
- I preserve a few of my butter within the freezer and switch it to the fridge a number of hours earlier than starting the crust. This fashion it’s nonetheless a bit bit frozen and really, very chilly. Merely preserve the shortening within the fridge.
- Combine the dry components collectively in a big bowl (the flour and salt). Place the bowl within the fridge or freezer when you get the remainder of the components prepared.
These Step-By-Step Images Will Assist
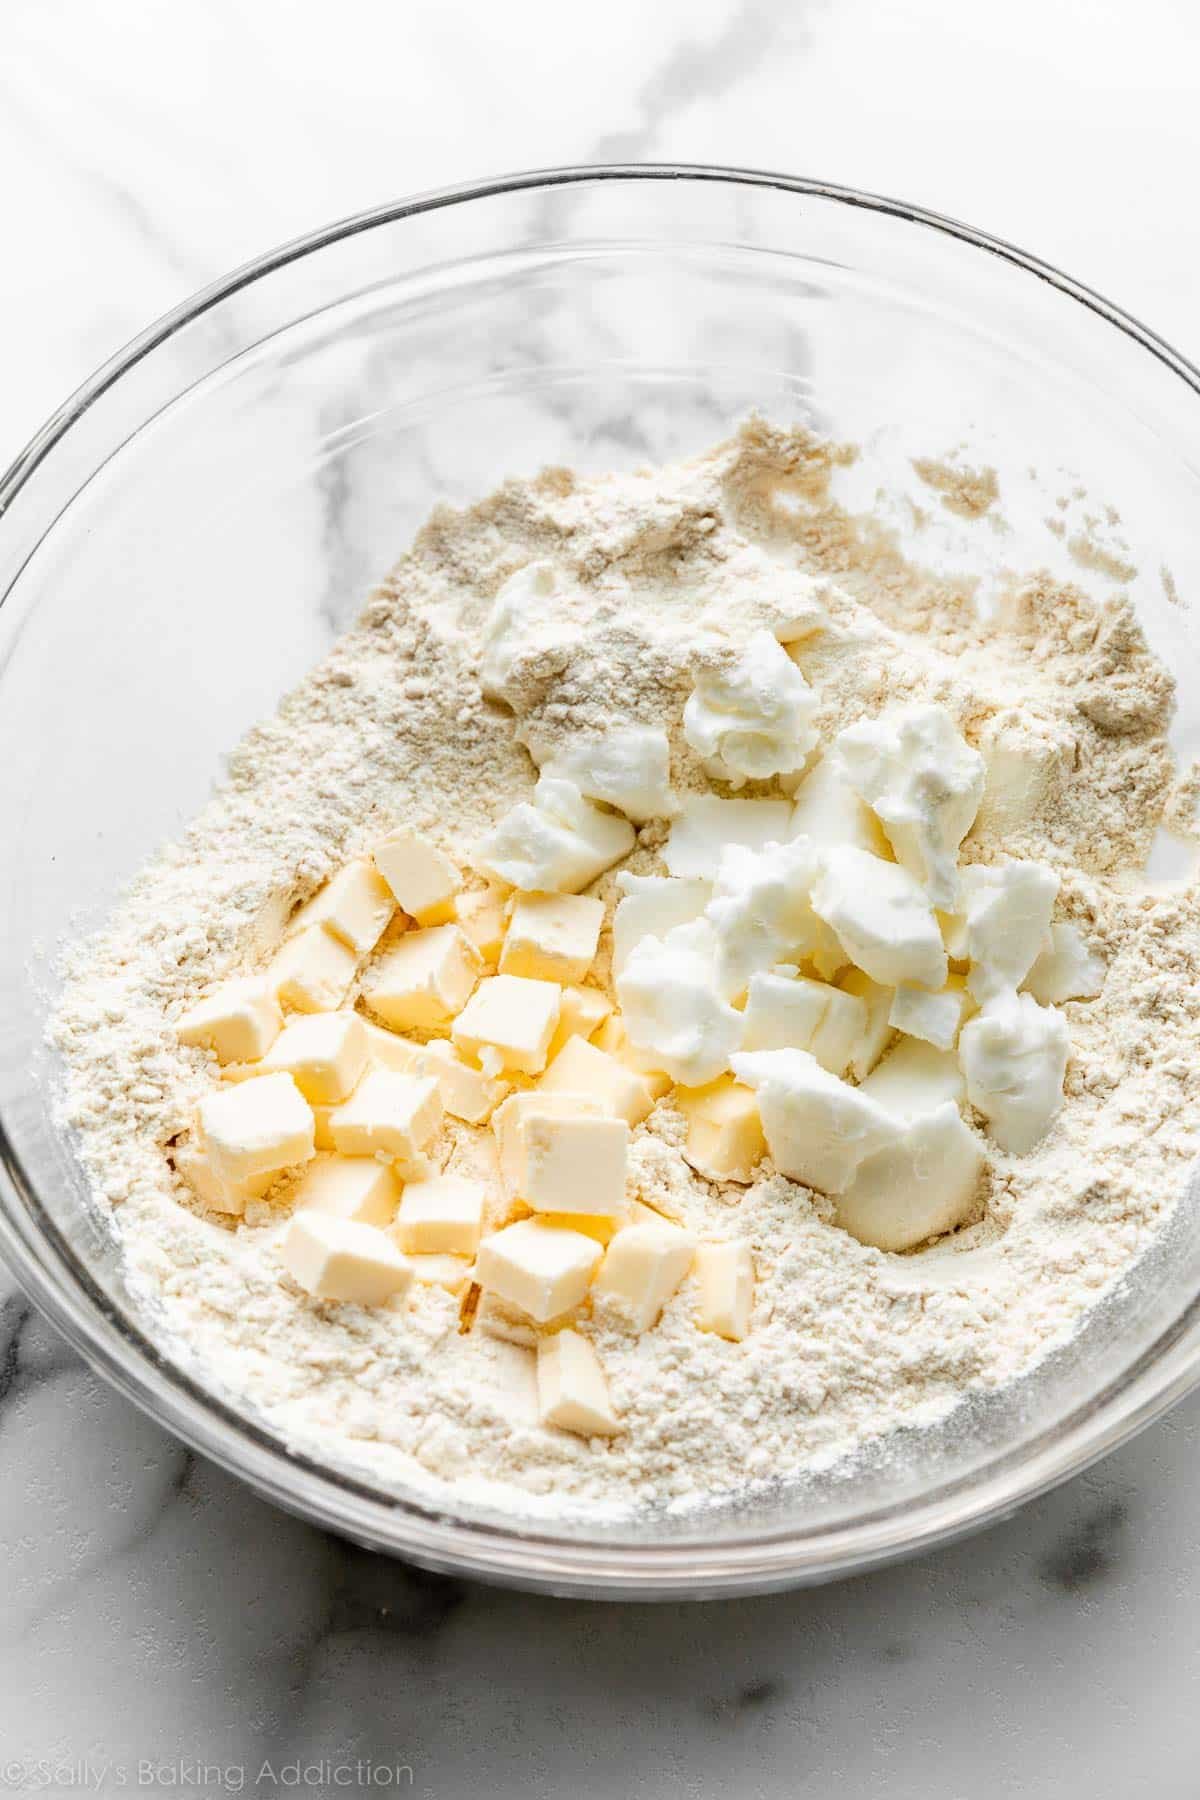
Take the butter and shortening out of the fridge. Dice the chilly butter and measure out the chilly shortening. Give the shortening a bit chop—that is truly elective as a result of, actually, the shortening is sort of mushy even when chilly so it’s straightforward to combine in.
Now it’s time to mix all the pieces. Add the butter and shortening to the dry components, and use a pastry cutter (or 2 forks) to chop within the fat. Some pie crust recipes use a meals processor for this, however I don’t advocate it, as a result of it might result in overworking the fat into the dough, reducing them up too small—which suggests you’ll want much less water and your dough will crumble.
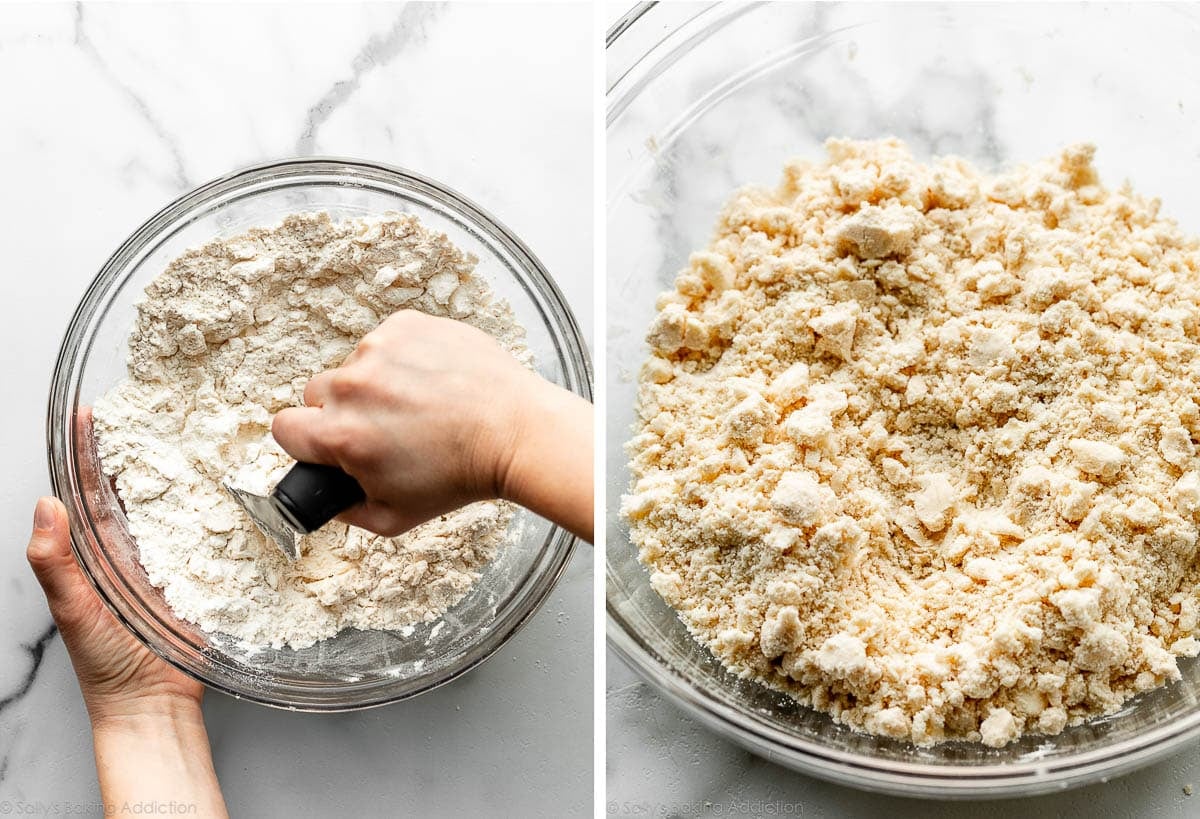
Minimize within the fat till the combination resembles coarse meal—crumbly with plenty of lumps, as you see above. You need to nonetheless have some bigger items of butter and shortening if you’re executed.
From a cup of ice water, measure out 1/2 cup (120ml), for the reason that ice has melted a bit. Drizzle the chilly water into the dough 1 Tablespoon (15ml) at a time, stirring after each Tablespoon has been added.
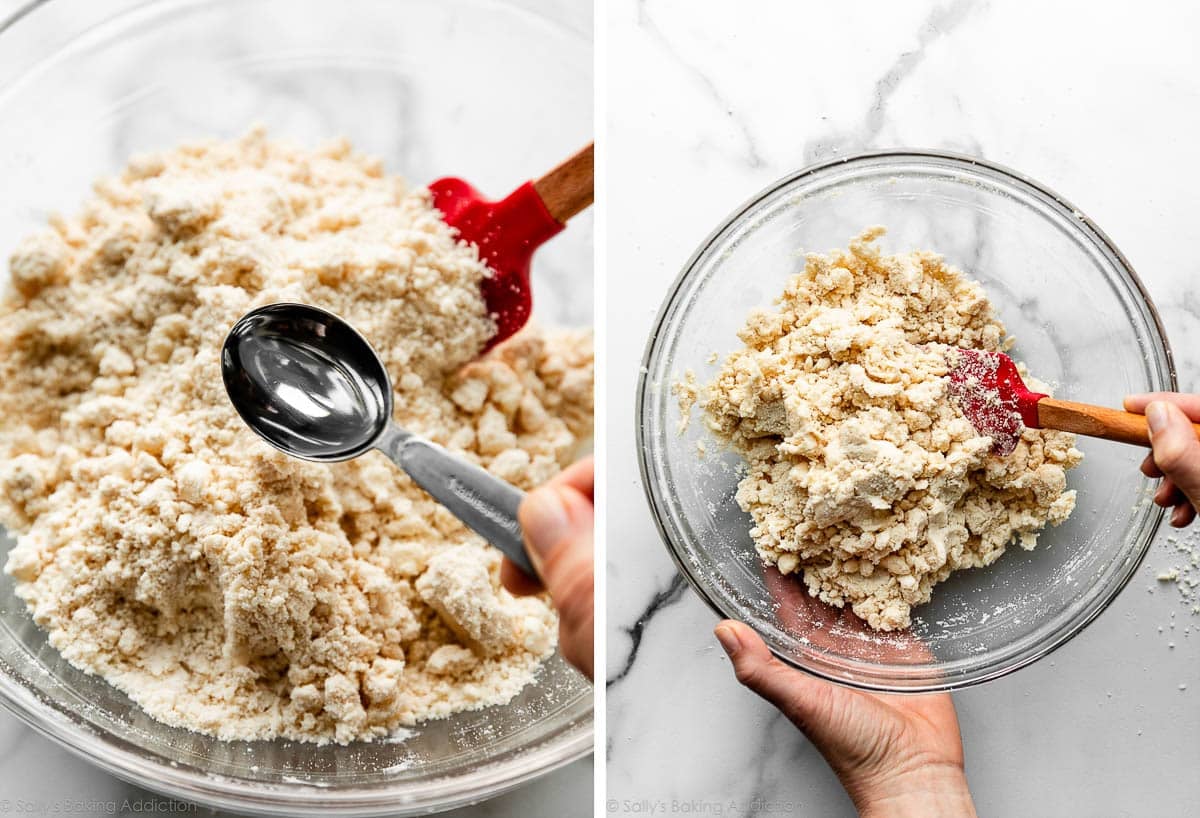
You’ll add just a bit water at a time so that you just don’t by accident add an excessive amount of. Cease including water when the dough begins to kind massive clumps. I normally use 1/2 cup (120ml) of water, but when the climate is humid, it’s possible you’ll not want as a lot, and if the climate is absolutely dry, it’s possible you’ll want a bit extra.
If an excessive amount of water is added, the pie dough would require extra flour and turn out to be powerful.
If too little water is added, you’ll discover the dough is dry and crumbly if you attempt to roll it out and deal with it. You need the dough to clump collectively, however not really feel overly sticky. In case you by accident add an excessive amount of water, add a bit extra flour in to make it workable.
As soon as the dough is clumping collectively, switch the dough to a floured work floor.
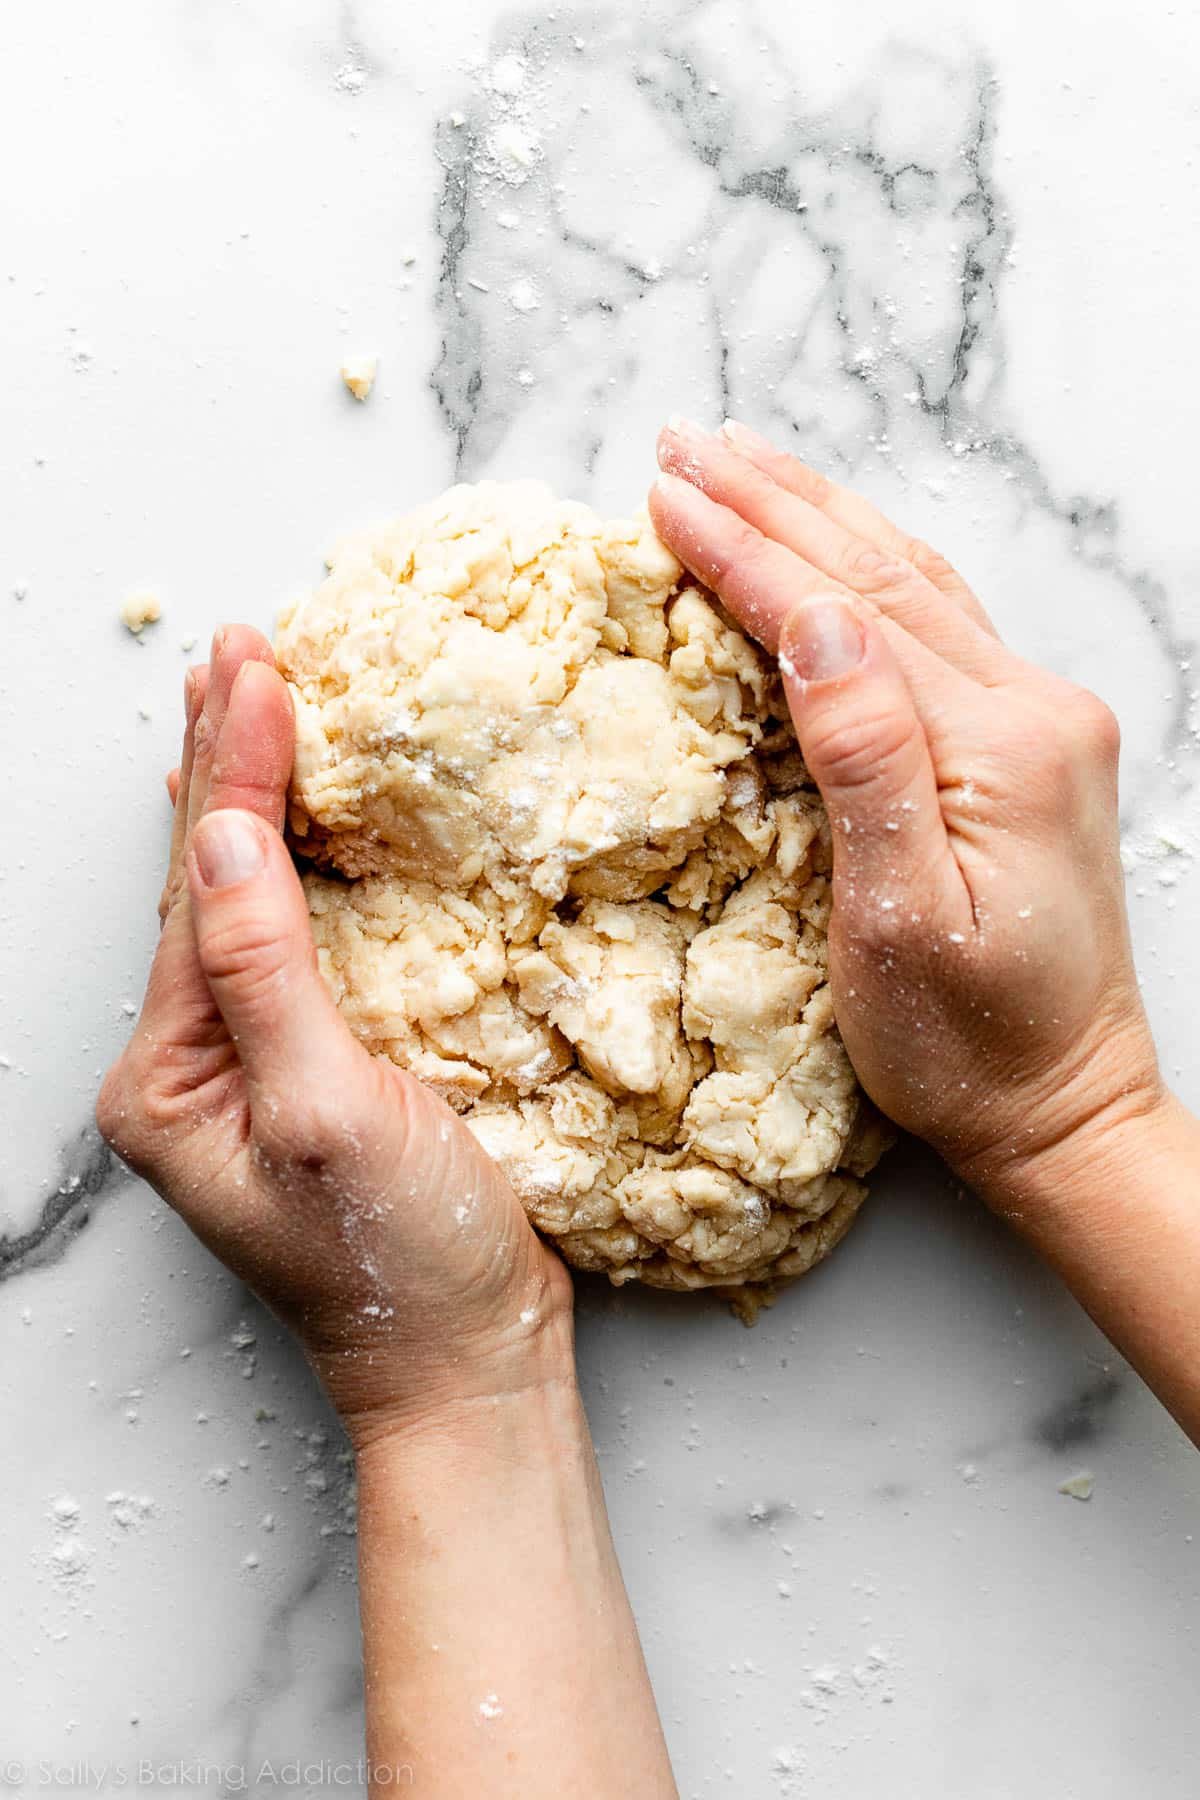
Utilizing floured palms, fold and smush (sure, that’s the technical time period) the dough into itself, forming the dough right into a ball. Your palms are your greatest instrument, identical to when making do-it-yourself puff pastry.
The ball of dough ought to come collectively simply. If it feels a bit too dry or crumbly, dip your fingers within the ice water after which proceed forming the dough along with your palms. If it feels too sticky, sprinkle on extra flour after which proceed forming the dough along with your palms.
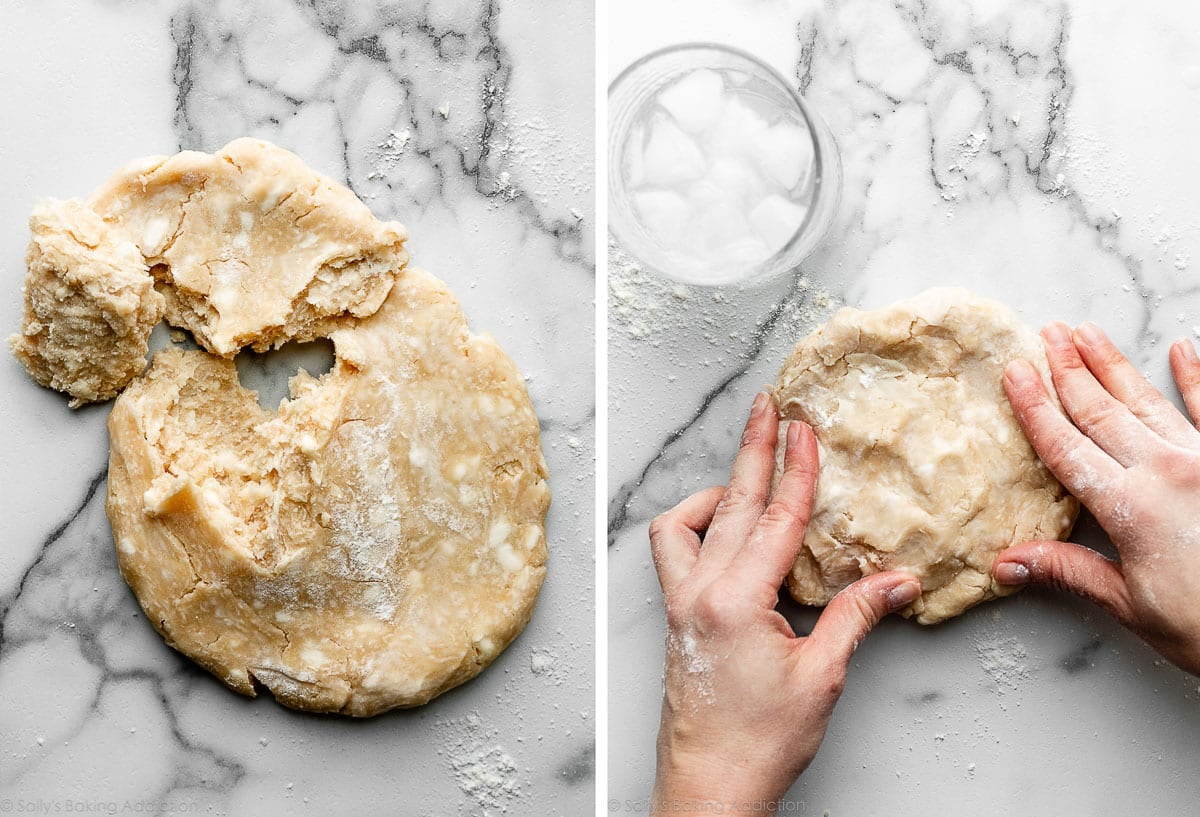
As soon as your ball of pie dough has come collectively, use a pointy knife to chop it in half:
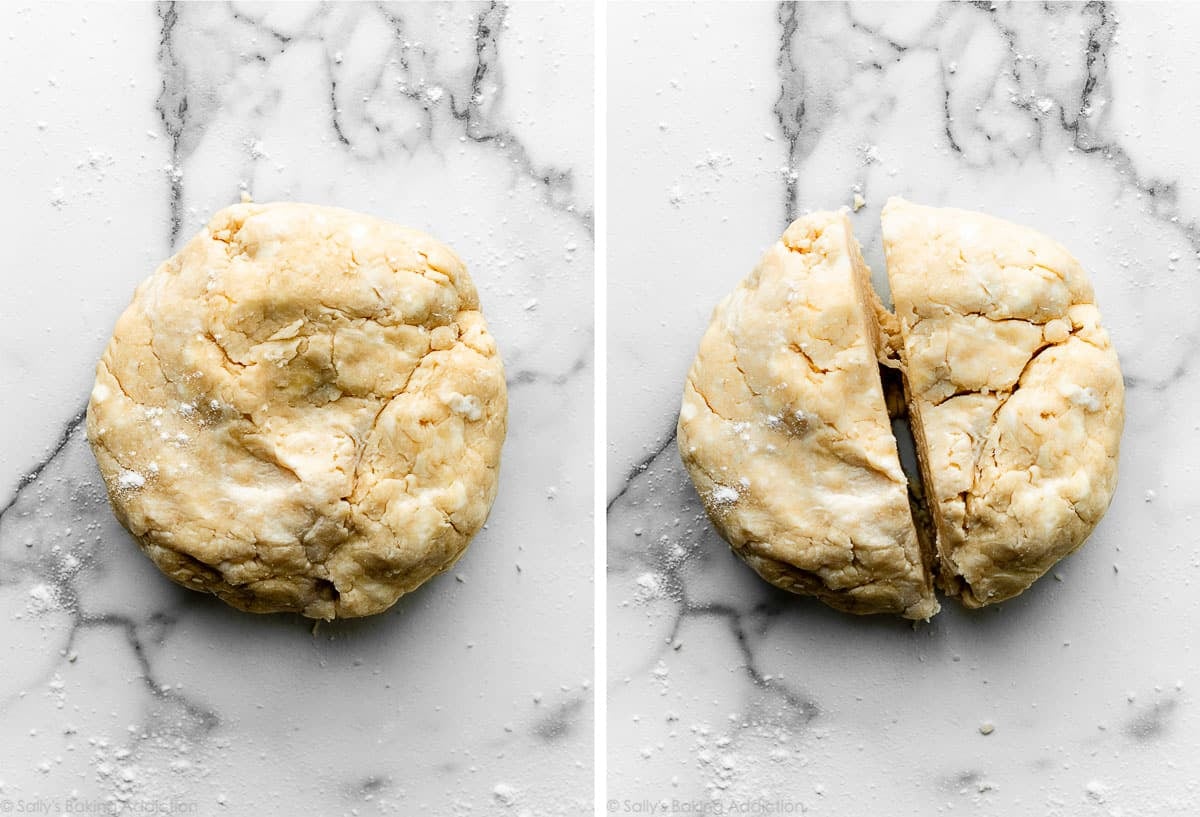
That is sufficient dough for two pie crusts. You should use each crusts for a double-crust pie, like rooster pot pie and strawberry rhubarb pie; or, in case your pie doesn’t require a high crust, like coconut cream pie, brownie pie, and lemon meringue pie, save the second pie crust for an additional pie. You may also roll out the second dough and use cookie cutters to make a straightforward pie design, like on this pumpkin pie.
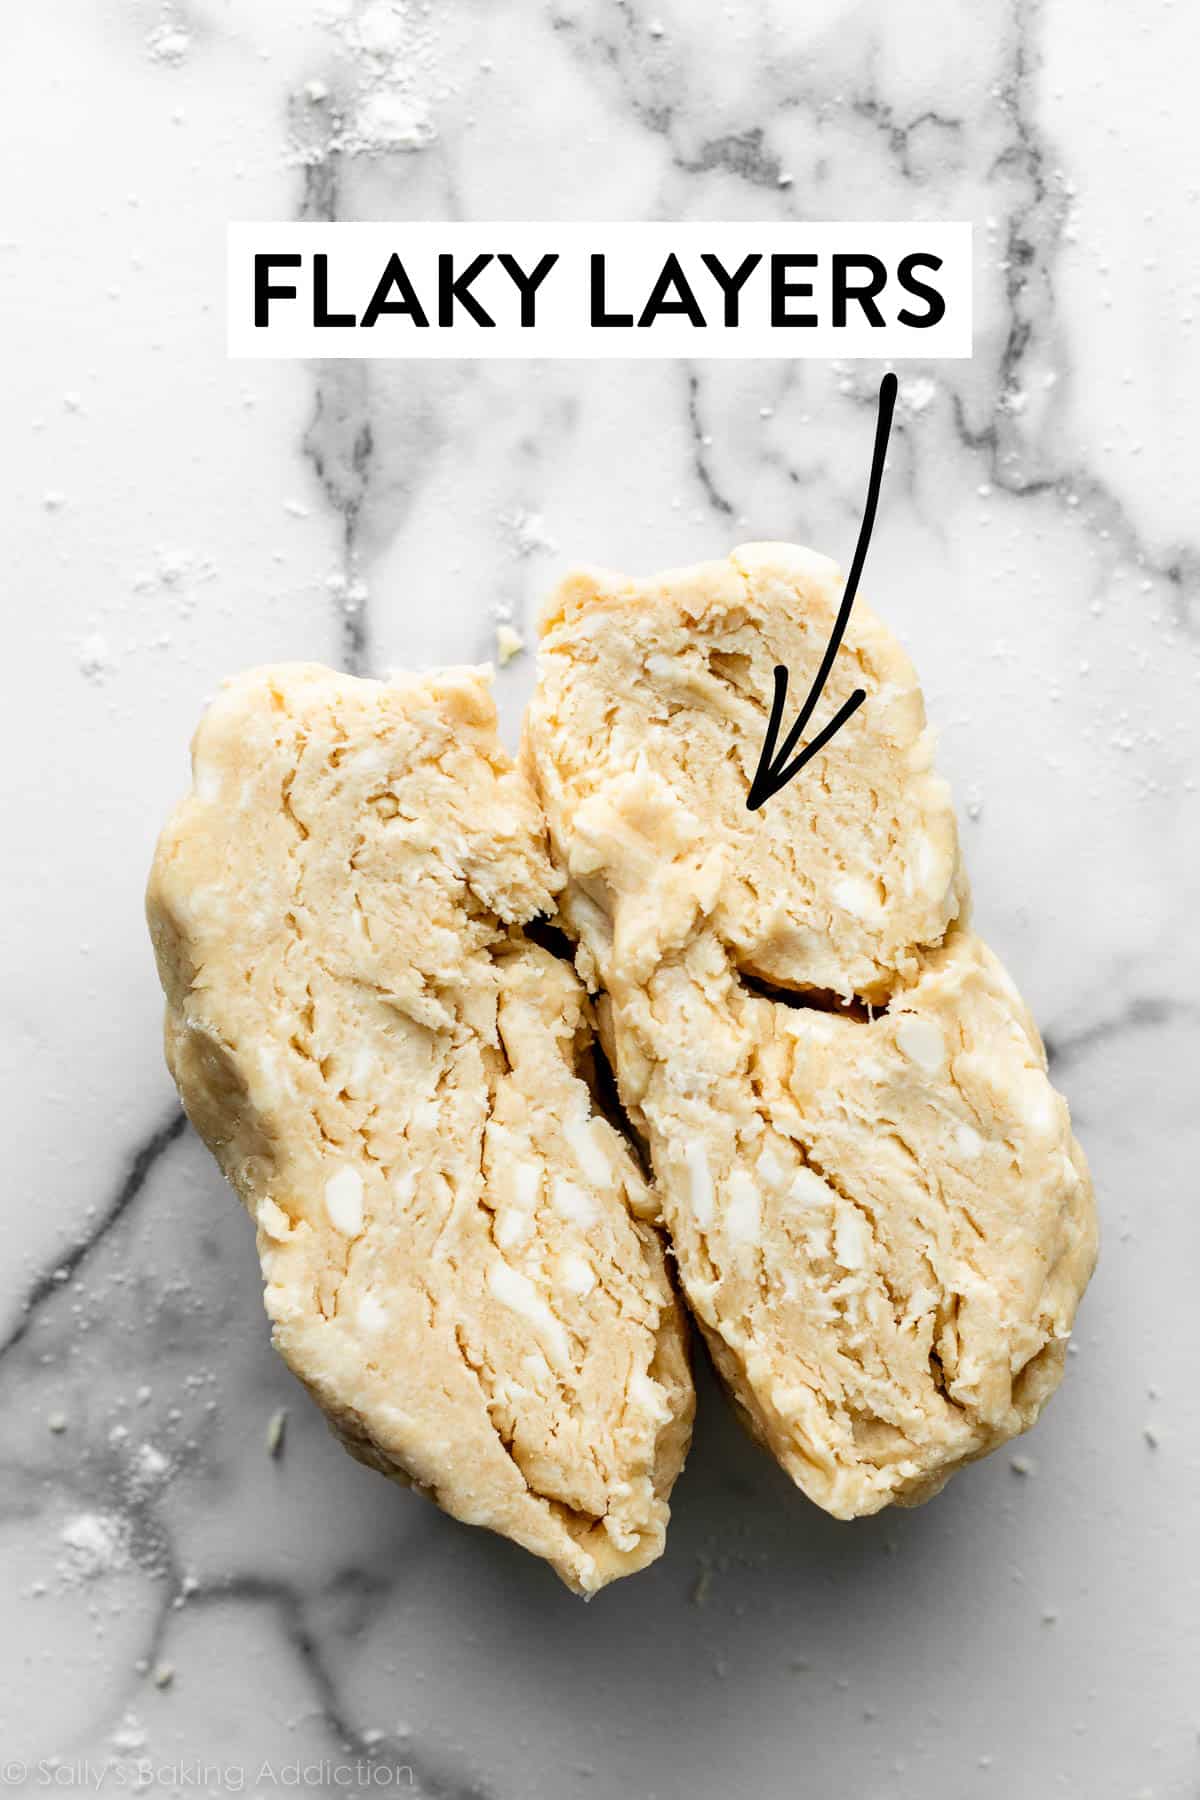
Success Tip: Seen Specks and Swirls of Fats in Pie Dough
Check out the within of the dough the place you simply sliced it. You need to see items of butter and flaky layers all through the pie dough. These specks and swirls of butter and shortening will assist guarantee a flaky pie dough. They’re a GOOD factor!
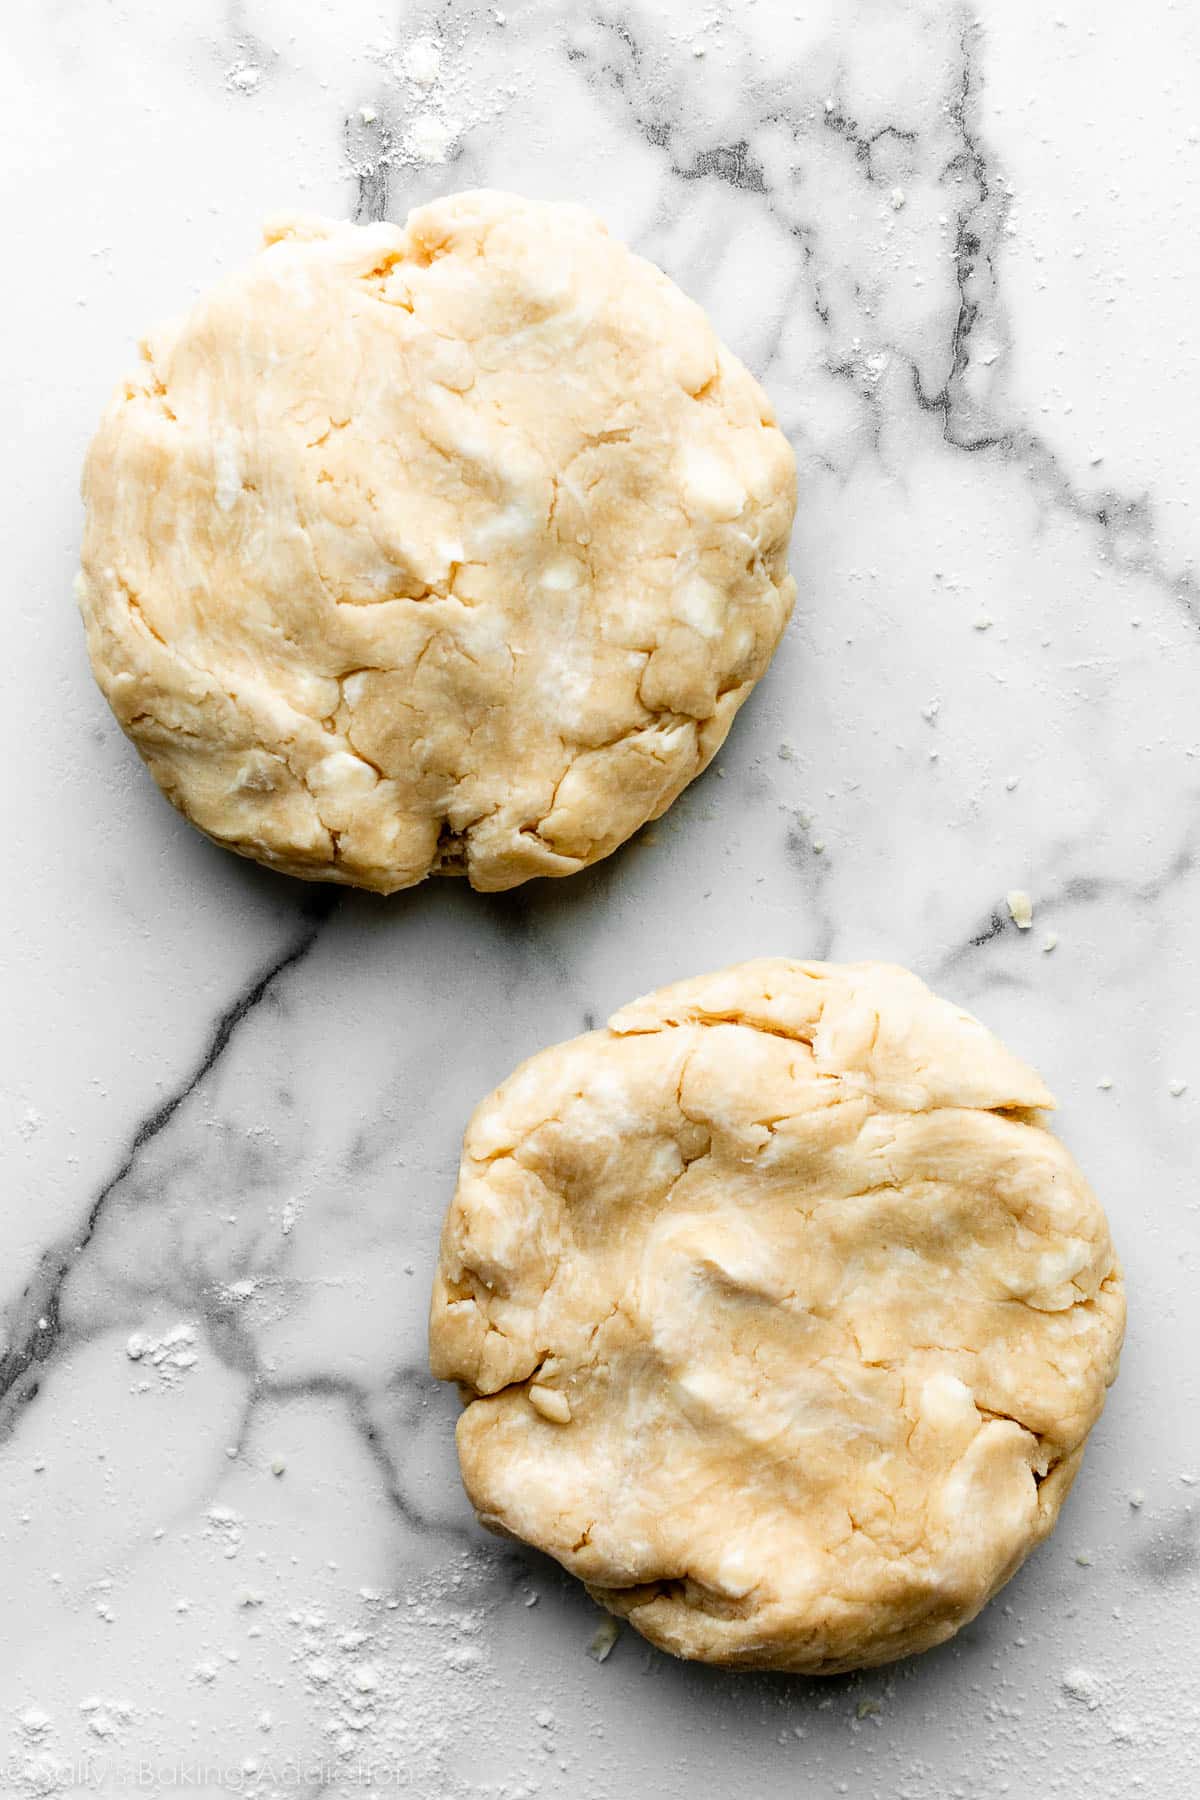
Now your pie dough is prepared for a relaxation within the fridge. Flatten every half into 1-inch-thick discs utilizing your palms. The disc form makes it simpler to roll out. Wrap every disc tightly in plastic wrap.
Refrigerate for a minimum of 2 hours or as much as 5 days.
Can I Freeze Pie Dough?
Sure, completely, and I encourage it! Pie crust freezes fantastically, so it’s an excellent factor to make forward of time. Retailer the tightly wrapped discs of pie dough within the freezer for as much as 3 months.
If you understand you’re going to need a number of pies across the holidays, or when your favourite fruit will likely be in season (cherry pie, anybody?), you may reduce down on the period of time it takes to make pies from scratch the day you need them by making a number of pie crusts prematurely and freezing them.
Thaw the pie crust dough in a single day within the fridge earlier than rolling it out. It is going to be further chilly, which is a good place to begin.
The way to Roll Out Pie Crust
After the dough has chilled for a minimum of 2 hours, you may roll it out. Work with one crust at a time, preserving the opposite within the fridge till you’re able to roll it out. You’ll want a clear work floor, a rolling pin, and a few flour. Frivolously flour the work floor, rolling pin, and your palms, and sprinkle a bit flour on high of the dough. Use gentle-medium pressure along with your rolling pin on the dough—don’t press down too onerous on the dough; you’re not mad at it!
When rolling dough out, begin from the middle and work your means out in all instructions, turning the dough along with your palms as you go:
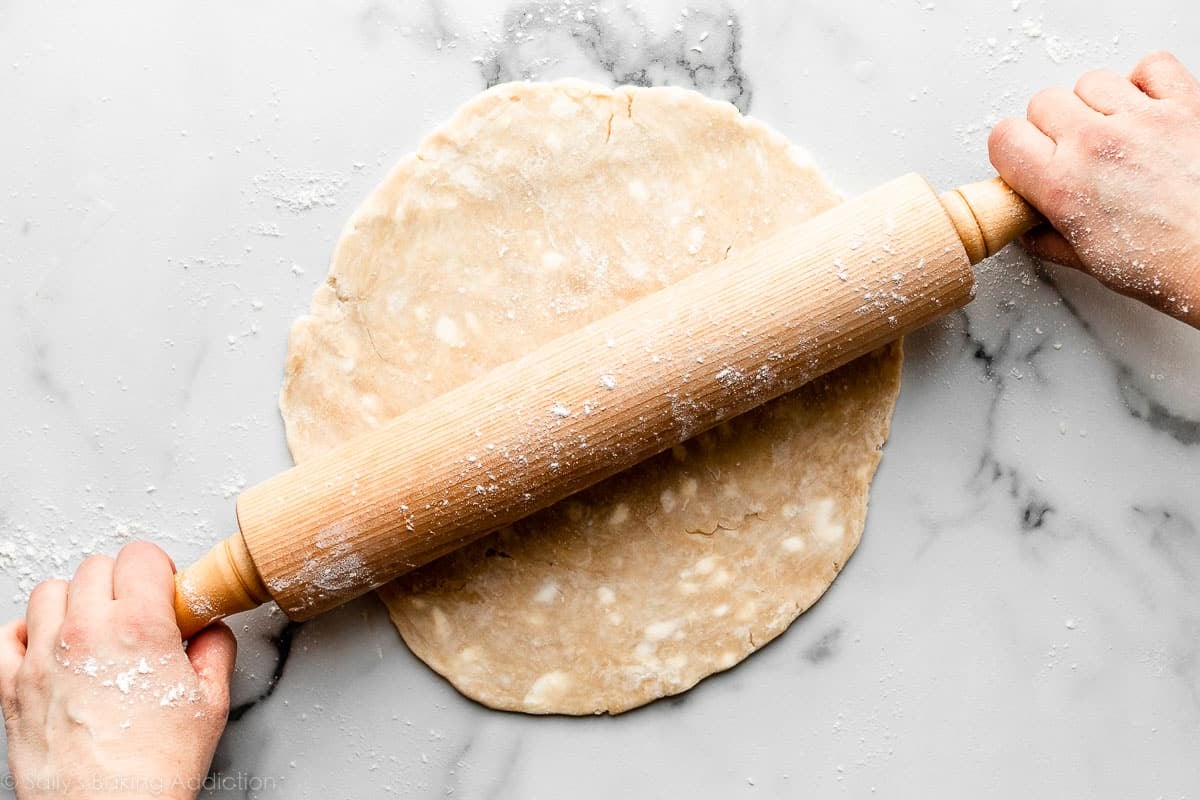
Between passes of the rolling pin, rotate the pie crust and even flip it, to ensure it’s not sticking to your work floor. Sprinkle on a bit extra flour if it’s sticking. Roll, flip. Roll, flip.
Do you see that lovely marbling of the butter and shortening all through the dough? Flaky layers, right here you come!
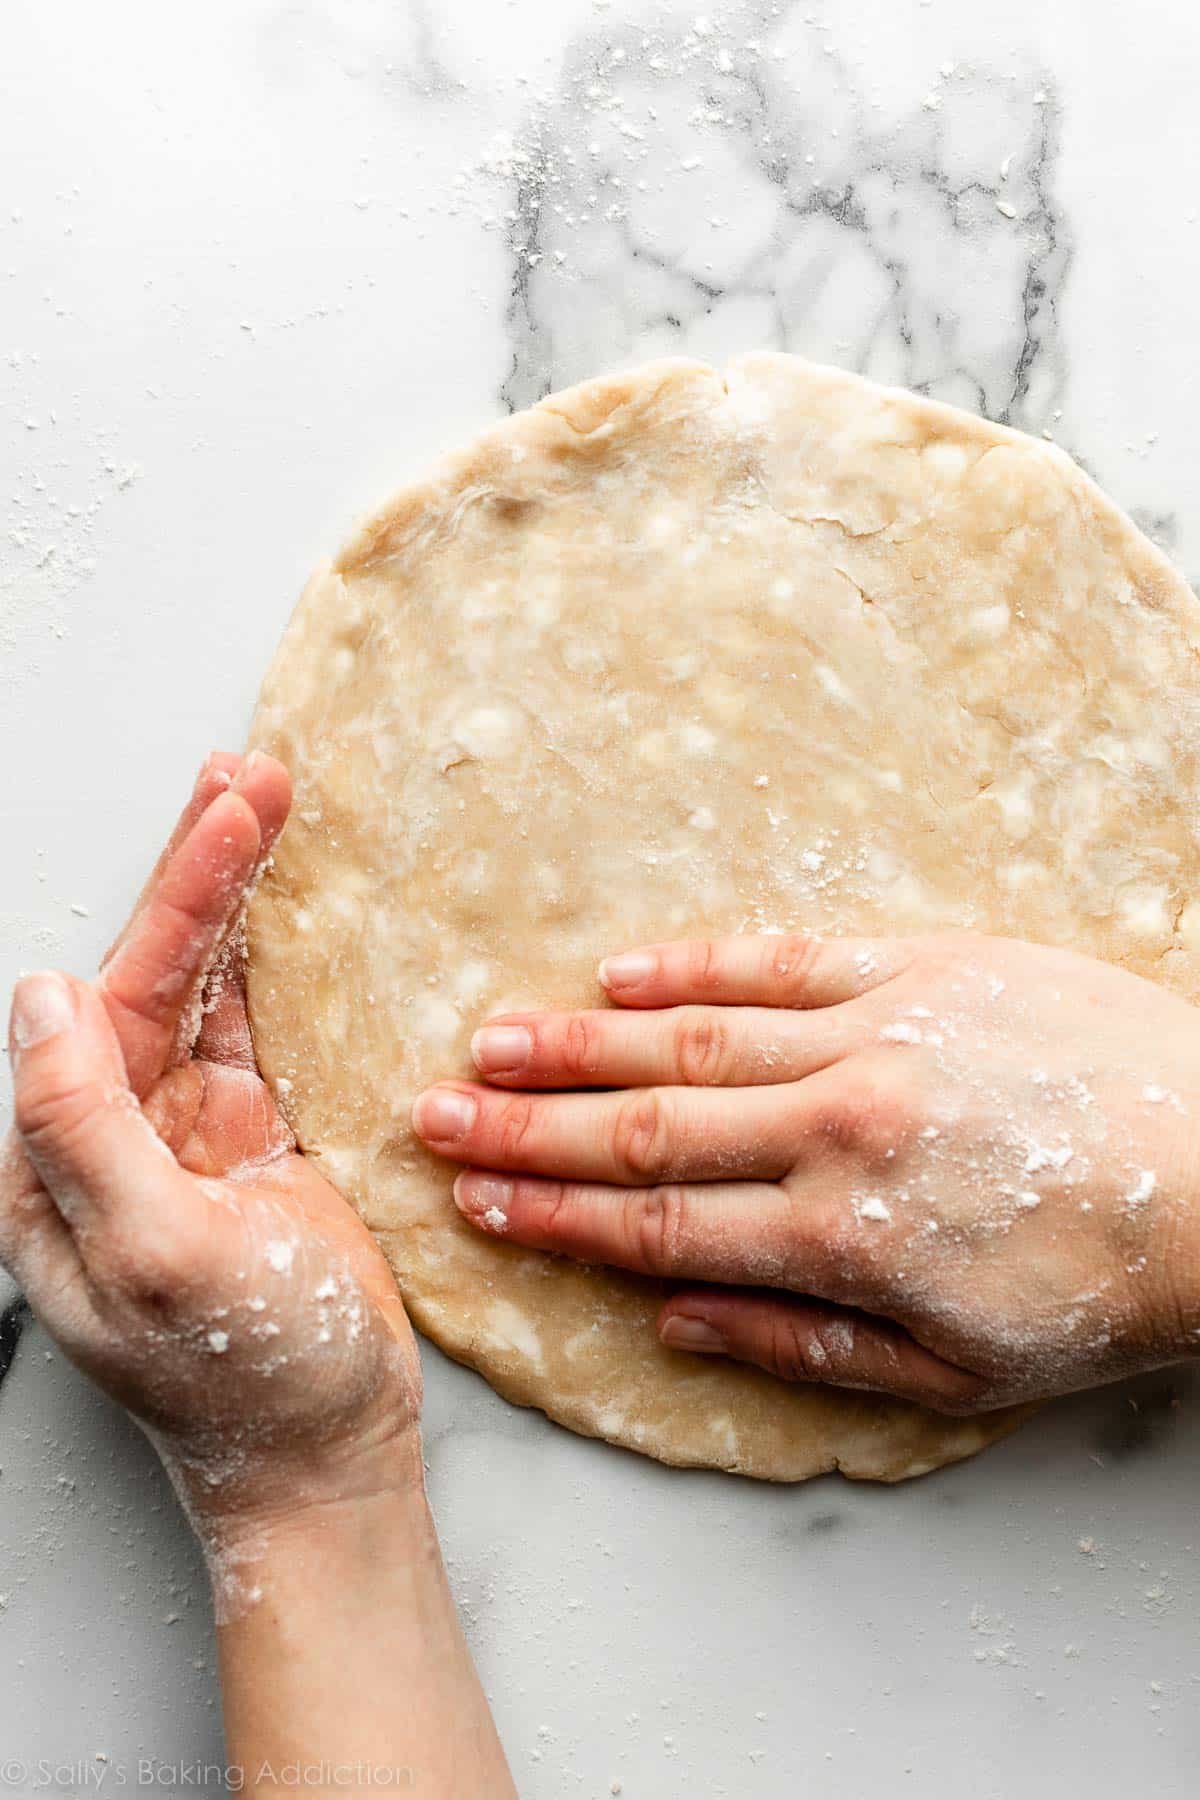
Success Tip: In case you discover the dough turning into a lopsided circle as you’re rolling it out, put down the rolling pin and use your palms to assist mildew the dough again into a good circle:
Roll the dough into a skinny 12-inch circle, which is the right dimension to suit a 9-inch pie dish. You need sufficient crust to have some overhang so you may make an ornamental edge.
Your pie dough will likely be about 1/8-inch thick, which is sort of skinny.
Success Tip: Since your dough is so skinny, use your rolling pin to assist switch the pie crust to the pie dish. Rigorously roll one finish of the circle of dough gently onto the rolling pin, rolling it again in the direction of you, slowly peeling it off the work floor as you go. Decide it up, and thoroughly roll it again out excessive of the pie dish. It’s useful to look at how I do it within the video under.
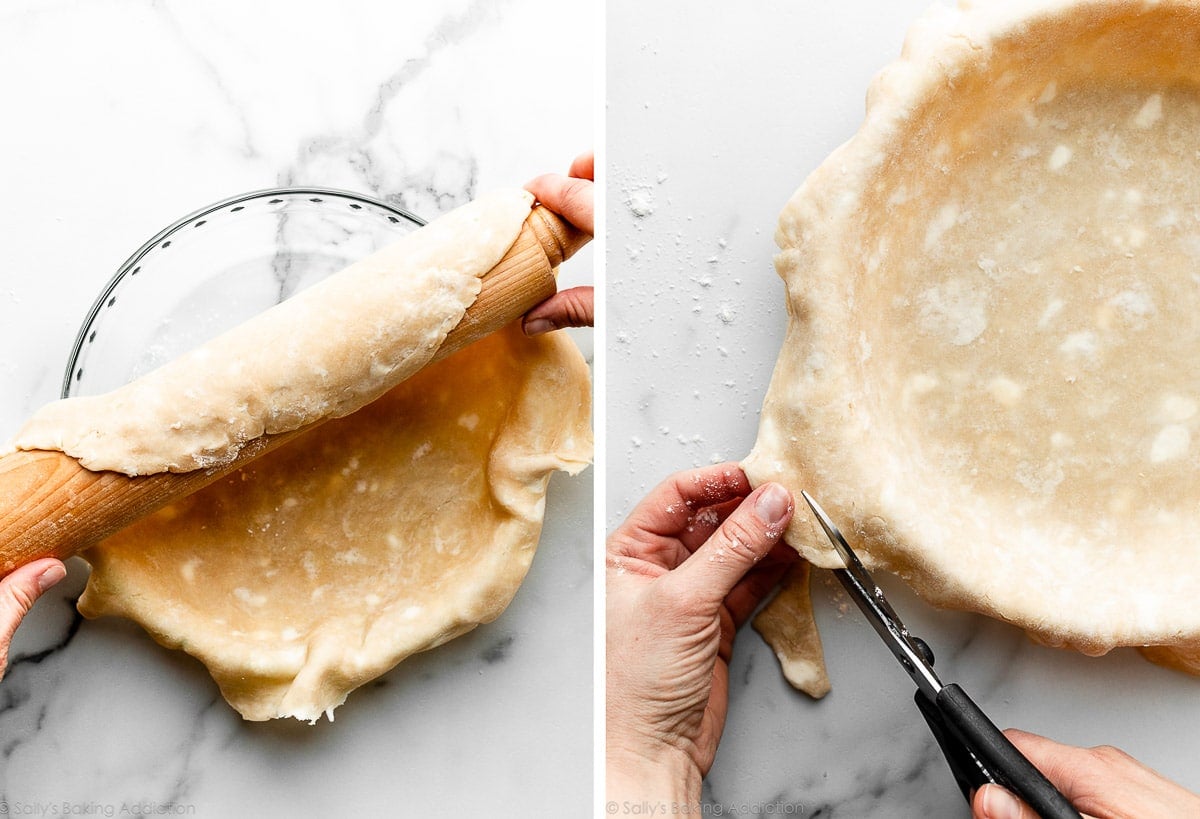
Ensure that the pie crust is fairly properly centered within the dish, with some overhang throughout the edges. Tuck the crust into the pie dish, gently urgent it to the inside all the way in which round—no air bubbles.
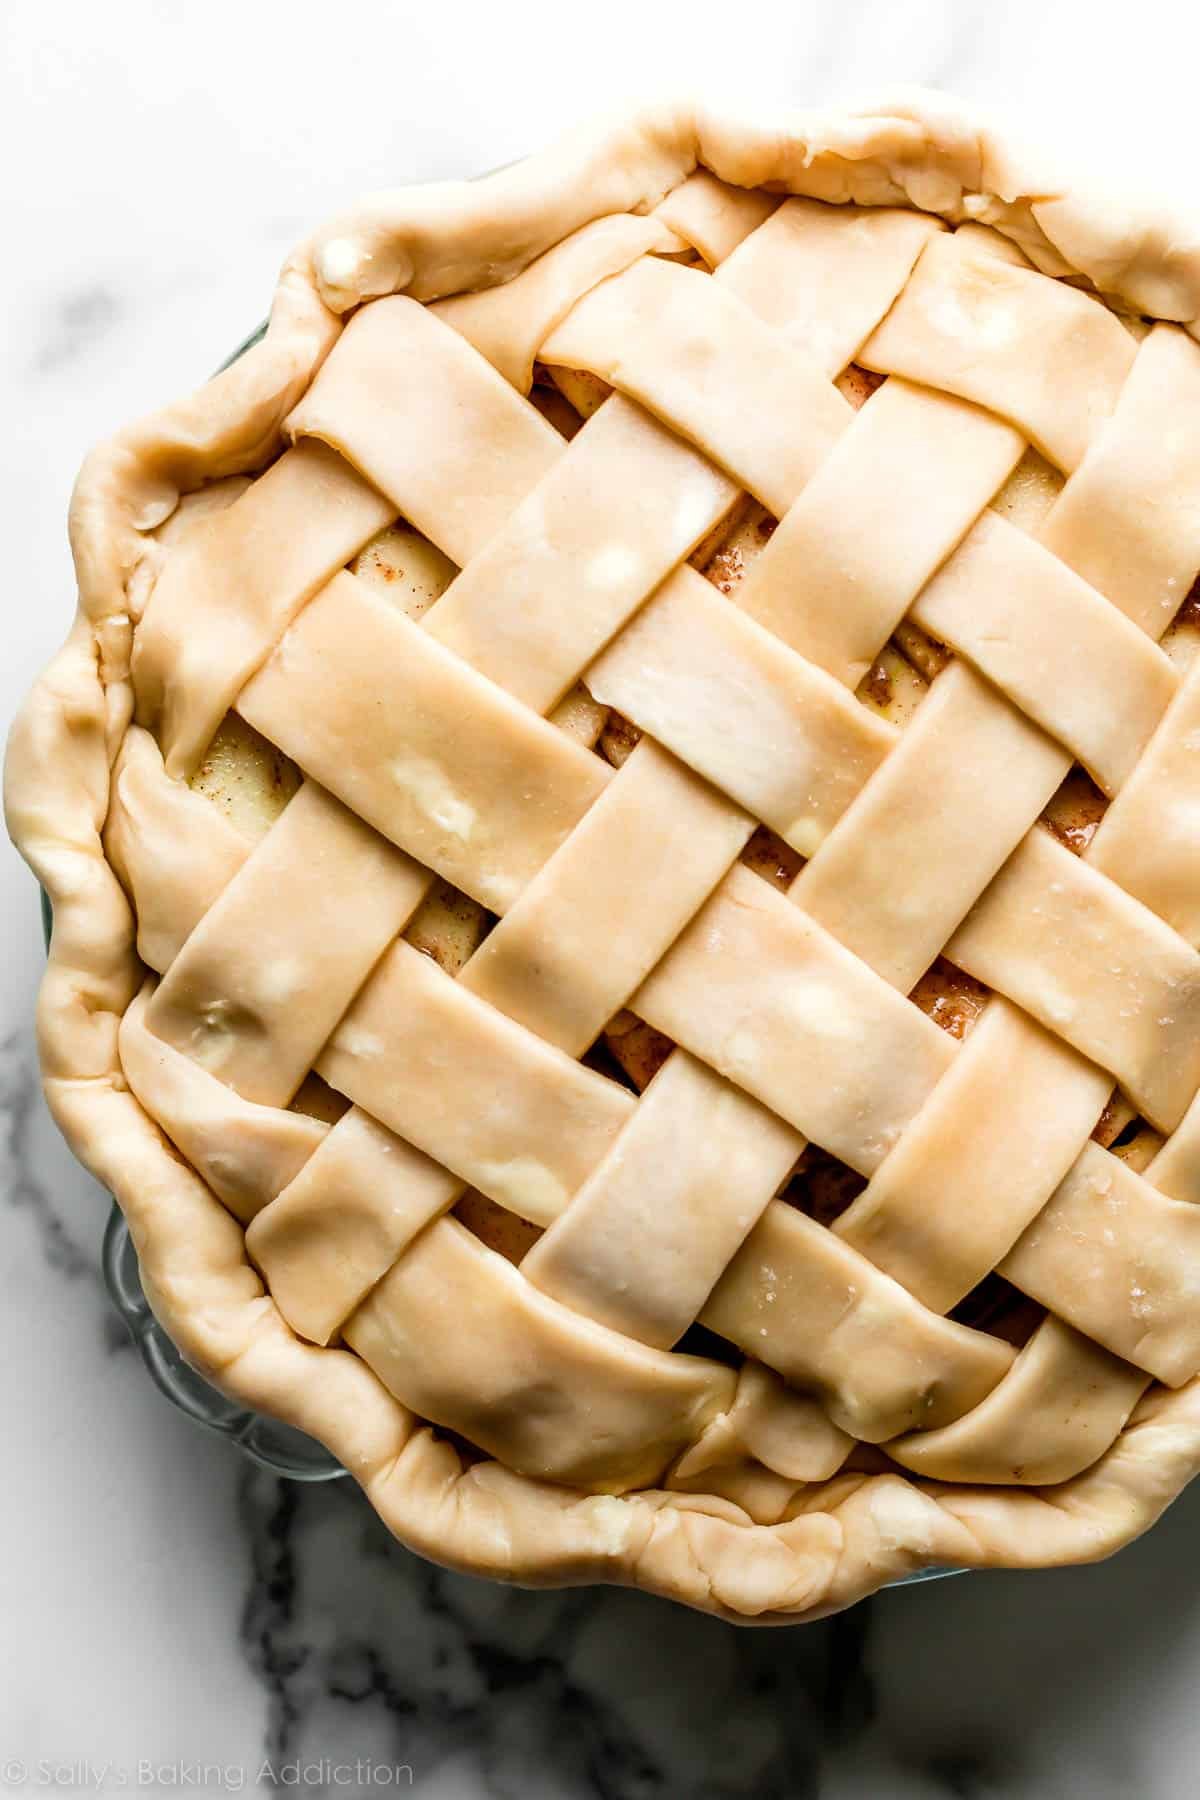
Trim dough across the edges if there’s extra dough in some spots—you need about 1-inch overhang. After you add your pie filling and high crust (akin to a lattice pie crust), fold overhang again over and pinch the highest and backside crusts collectively. Now you may create a reasonably edge, akin to fluting or crimping.
Fluting with fingers: To flute the perimeters, use a knuckle and a pair of fingers to press across the edges of the pie crust, to present it a phenomenal and basic scalloped look, like this apple pie.
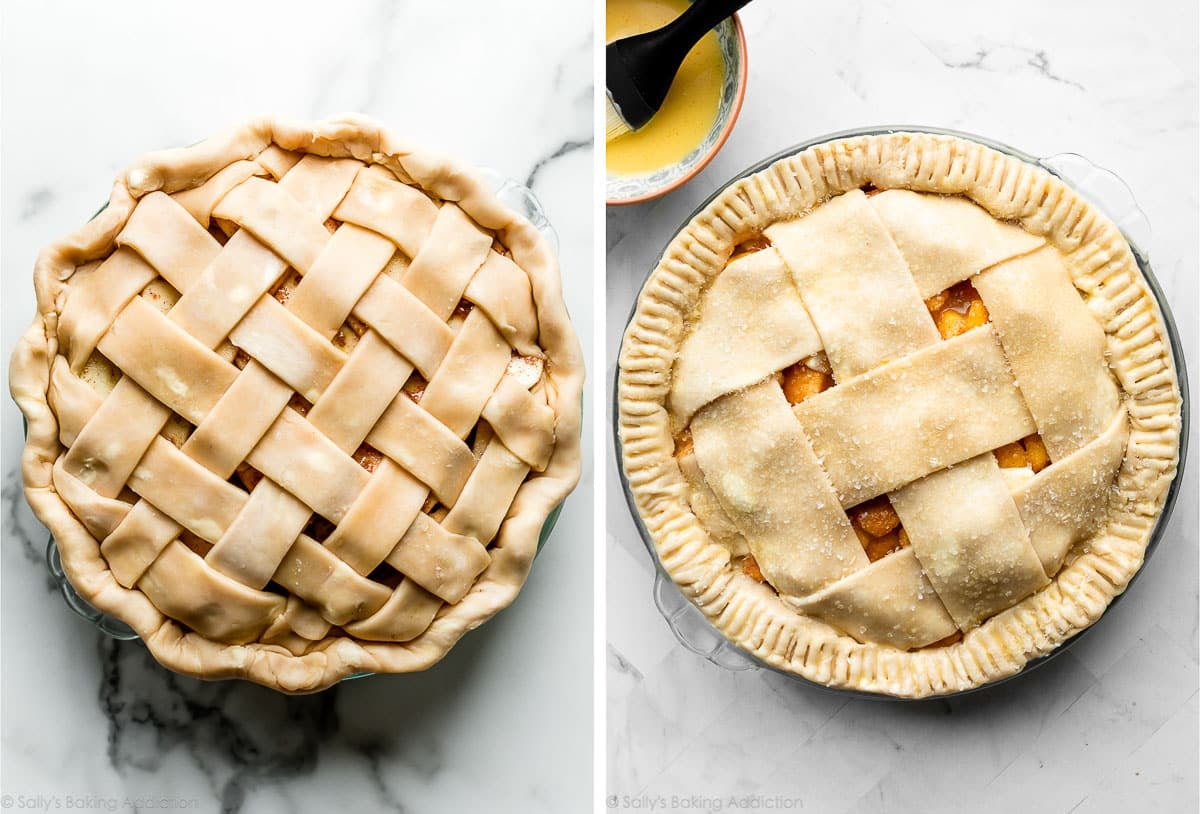
Crimping with fork: You may also use a fork to crimp the perimeters, like I do with this peach pie.
Your pie crust is able to bake! Comply with your pie recipe’s directions from right here; some recipes could name for a completely baked crust, and a few could name for {a partially} baked (par-baked or blind baked) crust. You may learn a tutorial on that right here on this The way to Par-Bake Pie Crust submit. And a few recipes, like this blueberry pie, don’t require baking the crust in any respect earlier than including the filling, as a result of the pie bakes for therefore lengthy; simply spoon/pour the filling proper in.
Troubleshooting Pie Crust
- Pie crust is hard: Robust crusts are the results of not sufficient fats within the crust, in addition to overworking the dough. Use the recipe under (loads of fats) and keep away from dealing with the dough greater than you want.
- Don’t have sufficient pie dough: This recipe yields 2 pie crusts. To make sure you have sufficient pie dough for overhang and a reasonably topping, roll your dough out to a 12-inch circle, about 1/8 inch thick.
- Pie crust shrinks down the edges of the dish when baking: This will occur when par-baking a pie crust. See part under.
- Pie dough is dry & cracking round edges when rolling: Use sufficient ice water when making ready the pie dough. In case you work the fat into the dry components an excessive amount of, the dough will really feel too moist earlier than you may add sufficient water. (And the dough will likely be dry and thirsty.) Don’t overwork the fat within the dry components—you continue to need these good crumbles. If it’s too late and also you discover the perimeters of your pie crust are cracking as you roll it out, dip your fingers in ice-cold water and meld the perimeters again collectively. Wait a minute, after which attempt rolling out once more.
- Pie dough is falling aside & crumbling when rolling: The dough is probably going crumbling as a result of there’s an excessive amount of fats, and never sufficient flour and water. Once more, that is normally a results of fats being labored in an excessive amount of, which may simply occur if the components weren’t chilly sufficient. (Refrigerate these dry components earlier than you begin!) If it’s too late and the pie dough is crumbling as you roll it out, attempt including extra water AND extra flour. Sprinkle a tiny little bit of ice water and flour onto the cracks and crumbled items, and gently work all of it in along with your fingers. Wait a minute, after which attempt rolling out once more.
Gently work ice water drops and flour into your crumbly pie dough to deliver it again collectively:
Blind Baking Pie Crust
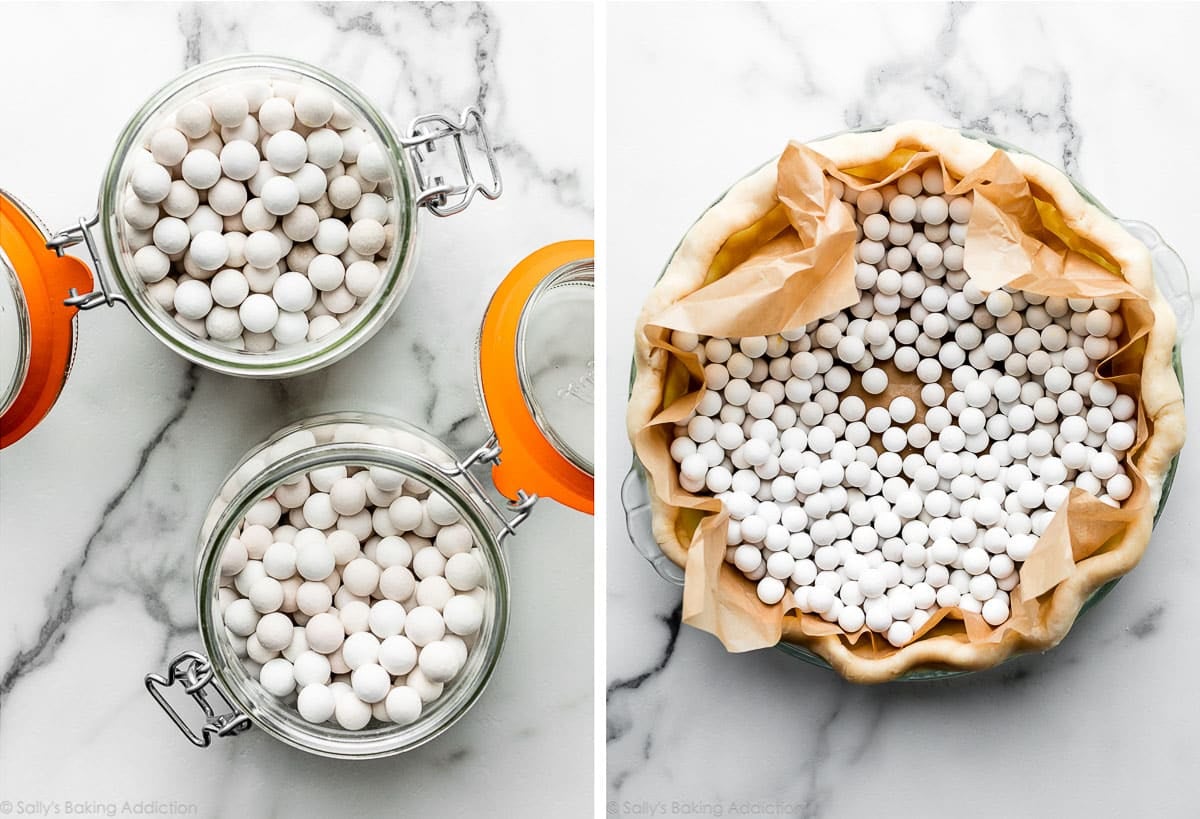
In case your pie recipe requires a completely baked or par-baked pie crust earlier than including the filling, observe the instructions and success suggestions on this The way to Par-Bake Pie Crust information. You want 2 packs of pie weights, that are metallic or ceramic beads that serve to overwhelm the crust to forestall the puffing/shrinking. You would use dried beans as a substitute. Whichever you select, remember to line the crust with parchment paper, then fill the empty pie crust shell with the weights previous to baking. With out pie weights, the dough will puff up, after which shrink down the edges.
Pie Crust Success Ideas
- Use a glass pie dish. I desire utilizing a glass pie dish after I make pie. Why? Glass dishes conduct warmth evenly, which permits the underside of the crust to bake completely. Additionally, you’ll have the ability to see when the sides and backside of the crust have browned.
- The fridge is pie dough’s greatest buddy. Preserve all the pieces chilly each step of the way in which: components, the bowl, and the dough earlier than rolling. When taking the pie crust out of the fridge to roll out and fill, make sure that your pie filling is able to go. If not, preserve the pie crust within the fridge till it’s.
- Preserve dough chilly when rolling out: Heat pie dough is unworkable. If the dough turns into too heat if you’re rolling it out, cease what you’re doing, decide it up as gently as you may, put it on a plate or small baking sheet, after which cowl and refrigerate it for 10–20 minutes.
- Defend the crust edges from burning: Use a pie crust protect to forestall the perimeters from burning. A protect retains the crust edge coated, however the middle of the pie uncovered, defending the perimeters. I normally simply make a pie protect out of a bit of aluminum foil. Take a bit of aluminum foil and fold it in half. Minimize out a half circle. Once you open it again up, you’ll have a sq. of foil with a circle reduce out of the middle. In case you discover the perimeters of your pie crust are browning earlier than the pie has totally baked, rigorously and gently place the foil excessive of the pie, centering the cut-out gap over the pie. Rigorously (clearly it’s extremely popular!) and evenly tuck the edges of the foil across the pie crust edges, then let the pie end baking.
- Create a phenomenal topping: For designing the highest crust, see The way to Lattice Pie Crust, The way to Braid Pie Crust, or these Pie Crust Designs.
For extra pie crust inspiration, see my graham cracker crust and do-it-yourself chocolate pop tarts (with a chocolate crust!).
Description
This recipe is sufficient for a double crust pie. In case you solely want 1 crust to your pie, freeze the opposite half per the Freezing Directions under. Is your pie dough tearing, cracking, or crumbling as you attempt to roll it out? See recipe Notes.
- Whisk the flour and salt collectively in a big bowl.
- Add the butter and shortening. Utilizing a pastry cutter or two forks, reduce the butter and shortening into the combination till it resembles coarse meal (pea-sized bits with a number of bigger bits of fats is OK). Don’t overwork the fat into the dry components.
- Measure 1/2 cup (120ml) of water in a cup. Add ice. Stir it round. From that, measure 1/2 cup (120ml) of water, for the reason that ice has melted a bit. Drizzle the chilly water in, 1 Tablespoon (15ml) at a time, and stir with a rubber spatula or wood spoon after each Tablespoon has been added. Cease including water when the dough begins to kind massive clumps. I at all times use about 1/2 cup of water, and wish a bit extra in dry winter months. Don’t add any extra water than you want.
- Switch the pie dough to a floured work floor. Utilizing floured palms, fold the dough into itself till the flour is totally included into the fat. The dough ought to come collectively simply and mustn’t really feel overly sticky. Keep away from overworking the dough. If it feels a bit too dry or crumbly, dip your fingers within the ice water after which proceed bringing dough collectively along with your palms. If it feels too sticky, sprinkle on extra flour after which proceed bringing dough collectively along with your palms. Type it right into a ball. Use a pointy knife to chop it in half. Gently flatten every half into 1-inch-thick discs utilizing your palms.
- Wrap every tightly in plastic wrap. Refrigerate for a minimum of 2 hours and as much as 5 days.
- After the dough has chilled for a minimum of 2 hours, you may roll it out. Work with one crust at a time, preserving the opposite within the fridge till you’re able to roll it out. Frivolously flour the work floor, rolling pin, and your palms, and sprinkle a bit flour on high of the dough. Use gentle-medium pressure along with your rolling pin on the dough—don’t press down too onerous on the dough; you’re not mad at it! When rolling dough out, begin from the middle and work your means out in all instructions, turning the dough along with your palms as you go. Between passes of the rolling pin, rotate the pie crust and even flip it, to ensure it’s not sticking to your work floor. Sprinkle on a bit extra flour if it’s sticking; don’t be afraid to make use of a bit extra flour. In case you discover the dough turning into a lopsided circle as you’re rolling it out, put down the rolling pin and use your palms to assist mildew the dough again into a good circle. Roll the dough into a really skinny 12-inch circle, which is the right dimension to suit a 9-inch pie dish. Your pie dough will likely be about 1/8 inch thick, which is sort of skinny. Seen specks of butter and fats within the dough are completely regular and anticipated.
- As a result of your dough is so skinny, use your rolling pin to assist switch the pie crust to the pie dish. Rigorously roll one finish of the circle of dough gently onto the rolling pin, rolling it again in the direction of you, slowly peeling it off the work floor as you go. Decide it up, and thoroughly roll it again out excessive of the pie dish. It’s useful to look at how I do it within the video under.
- Proceed with the pie per your recipe’s directions. In case your dough requires par-baking, see useful The way to Par-Bake Pie Crust tutorial.
Notes
- Make Forward & Freezing Directions: Put together the pie dough by step 5 and freeze the discs for as much as 3 months. Thaw in a single day within the fridge earlier than utilizing in your pie recipe.
- Salt: Use common desk salt. If utilizing kosher salt, use 1 and 1/4 teaspoons.
- Shortening: This recipe makes use of a butter and shortening mixture. Butter for flakiness and taste, and shortening for its excessive melting level and skill to assist the crust maintain form. You should use butter-flavor shortening if desired. If you wish to skip the shortening, be at liberty to do that all-butter pie crust as a substitute. Some readers have substituted lard for shortening on this recipe with success.
- Can I take advantage of a meals processor? You should use a meals processor to deliver the dough components collectively in step 1, however I discover it shortly overworks the dough. For greatest outcomes and a light-weight, flaky crust, I like to recommend a pastry cutter.
- Pie dough is dry & cracking round edges when rolling: Use sufficient ice water when making ready the pie dough. In case you work the fat into the dry components an excessive amount of, the dough will really feel too moist earlier than you may add sufficient water. (And the dough will likely be dry and thirsty.) Don’t overwork the fat within the dry components—you continue to need these good crumbles. If it’s too late and also you discover the perimeters of your pie crust are cracking as you roll it out, dip your fingers in ice-cold water and meld the perimeters again collectively. Wait a minute, after which attempt rolling out once more.
- Pie dough is falling aside & crumbling when rolling: The dough is probably going crumbling as a result of there’s an excessive amount of fats, and never sufficient flour and water. Once more, that is normally a results of fats being labored in an excessive amount of, which may simply occur if the components weren’t chilly sufficient. (Refrigerate these dry components earlier than you begin!) If it’s too late and the pie dough is crumbling as you roll it out, attempt including extra water AND extra flour. Sprinkle a tiny little bit of ice water and flour onto the cracks and crumbled items, and gently work all of it in along with your fingers. Wait a minute, after which attempt rolling out once more.
- Extra Crusts: In case you want greater than 2 pie crusts, make one other separate batch of dough. Doubling or tripling the recipe results in over- or under-working the dough, which ruins your entire efforts.
Subscribe
Baking Made Straightforward
Are you new to this web site? This e mail sequence is a good place to start out. I’ll stroll you thru a number of of my hottest recipes and present you precisely why they work.