

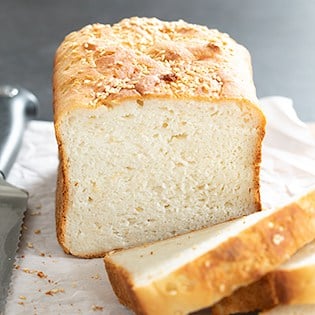
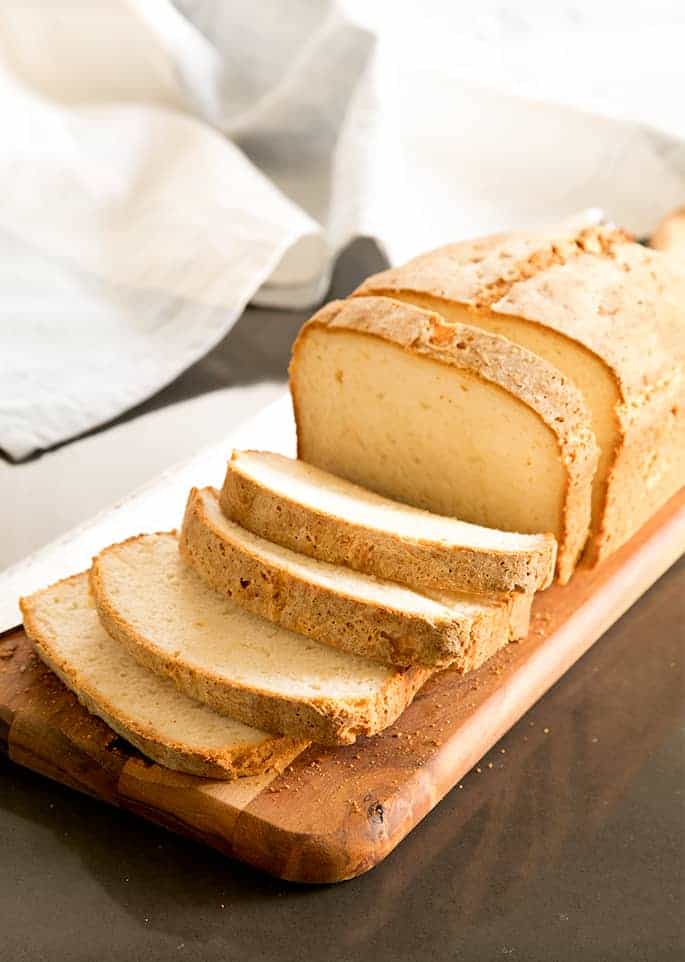
That is one of the best and unique gluten free bread recipe for moist and tender white sandwich bread with a chewy crumb and a crisp, brown crust.
With a tender and tender crumb, this gluten free bread recipe is the unique and finest. The bread bends and squishes, tastes just like the “actual factor”, and has a phenomenal bakery-style crust.
It tastes and behaves similar to common bread. This recipe is straightforward to make and should you observe the recipe faithfully, you will get excellent bread each time. That is the white sandwich bread you have been lacking because you began in your gluten free journey.
make this gluten free bread recipe
This gluten free bread recipe requires a stand mixer fitted with the paddle attachment to make a clean, cohesive dough that rises cleanly and evenly. Right here is the way you make one of the best fundamental gluten free bread recipe utilizing high-quality gluten free baking elements:
- Within the bowl of a stand mixer with the paddle attachment, place certainly one of my really helpful all function gluten free flour blends (together with xanthan gum; I extremely advocate Higher Batter’s traditional mix right here), prompt yeast, cream of tartar, and sugar. Whisk to mix effectively, after which add some salt, and whisk once more. We’re making an attempt to stop the yeast from clumping with the salt, since salt will inhibit yeast exercise.
- Let the mixer run on low pace when you add heat milk, butter that’s melted and allowed to chill, a little bit of apple cider vinegar, and a few egg whites. Flip the mixer pace up and beat for about 3 minutes till the dough is clean. In case you’re not aware of this kind of batter-style gluten free bread, chances are you’ll be stunned by how moist and tender the dough is.
- Scrape the dough right into a greased, lined normal loaf pan, and clean it into a good layer. I prefer to clean the highest with a moistened silicone spatula. Make certain that all of the dough is collectively in a single cohesive piece, not smushed up in opposition to the partitions of the pan.
- Spray some plastic wrap with cooking oil spray and, inserting the oiled aspect in opposition to the dough, cowl the pan. Don’t pull the plastic tight across the pan because you need the dough to have the ability to rise freely, however be certain that the plastic adheres to the sides of the pan to stop most air from getting in.
- Let the dough rise in as heat and draft-free an space of your kitchen as potential till it’s about 50% larger than it was when it began out. In case you’re utilizing a normal 9-inch x 5-inch pan, the dough ought to rise simply above the highest of the pan. It might take as little as 30 or 40 minutes to rise totally, or as a lot as 2 hours in case your kitchen is cool and drafty. If the dough begins to develop craters or cracks, it’s starting to overproof, so act shortly.
- As soon as it’s completed rising, take away the plastic and slice alongside the highest alongside the size about 1/4-inch deep to encourage the bread to rise evenly within the oven.
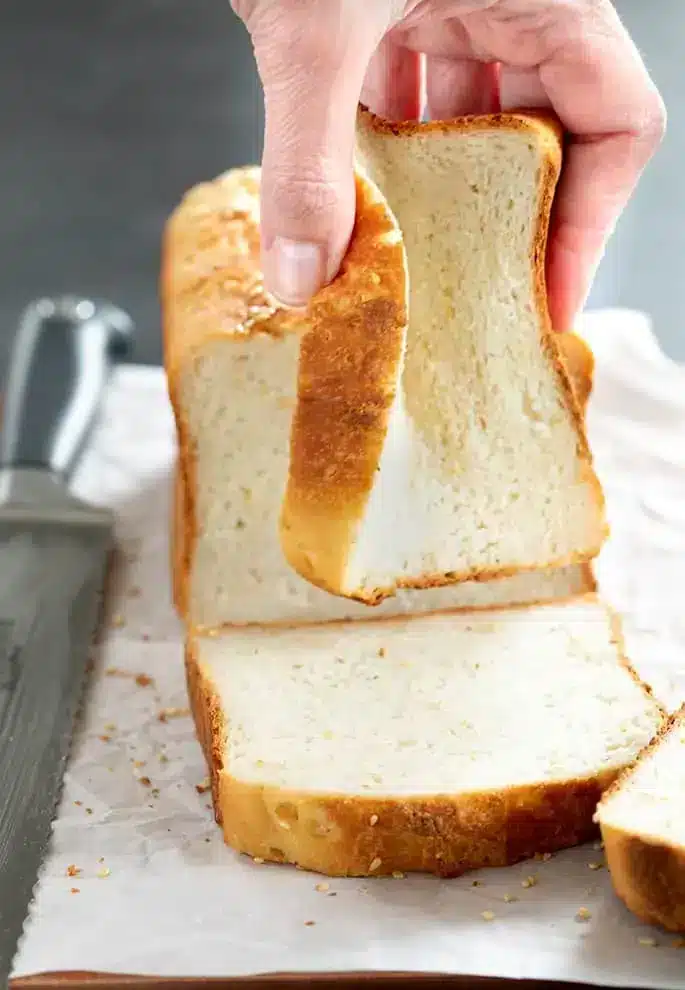
- Bake the loaf at 375°F for 45 minutes to 1 hour, or till an instant-read thermometer inserted into the middle of the loaf reads about 195°F. The skin could have a thick, brown, bakery-style crust and should you elevate the loaf out of the pan and faucet it on the perimeters or the underside, it would sound hole.
- Take away the loaf from the oven and permit the bread to chill within the pan for 10 minutes. Then, rigorously take away the loaf from the pan and place it in a wire rack to chill fully. In case you had lined the loaf with paper within the pan, earlier than to take away the paper to permit it to chill. We would like there to be a number of air circulating all the best way across the bread so the steam from the oven isn’t trapped.

In case you like recipe for an ideal loaf of gluten free bread, try these different formed bread recipes
It is a recipe for a loaf of bread, and I am typically requested if it will also be used to form into various kinds of bread like dinner rolls, burger buns, and even French baguettes. The reality is that this recipe makes superb bread in a loaf pan, however with out the construction of the pan, it simply would not maintain a special form. Since I refuse to imagine that we will not have the easiest model of all the things, regardless of being gluten free, I might love for you to check out a few of the recipes right here on the weblog for formed breads. If you’d like the suitable bread dough to form right into a salty tender pretzel, a chewy pizza with a crisp crust, or tender, foldable naan, we’ve got recipes for all of these and extra.
What’s the dough for this gluten free bread like?
As we talk about in our newbie’s information to gluten free baking, if in case you have any expertise baking standard yeast bread, this gluten free bread dough will appear fully unfamiliar to you.
This batter-style gluten free yeast bread dough is extra like a unfastened cookie dough than it’s standard bread dough. You want a stand mixer with a paddle attachment to combine it, most positively not a dough hook because it is not stretchy like standard yeast bread dough.
The one disadvantage of this recipe is that I’ve by no means made it with whole success with a bowl and spoon. And imagine me, I’ve tried! Mixing all of the elements till they’re actually clean and totally included is simply actually exhausting with out a stand mixer.
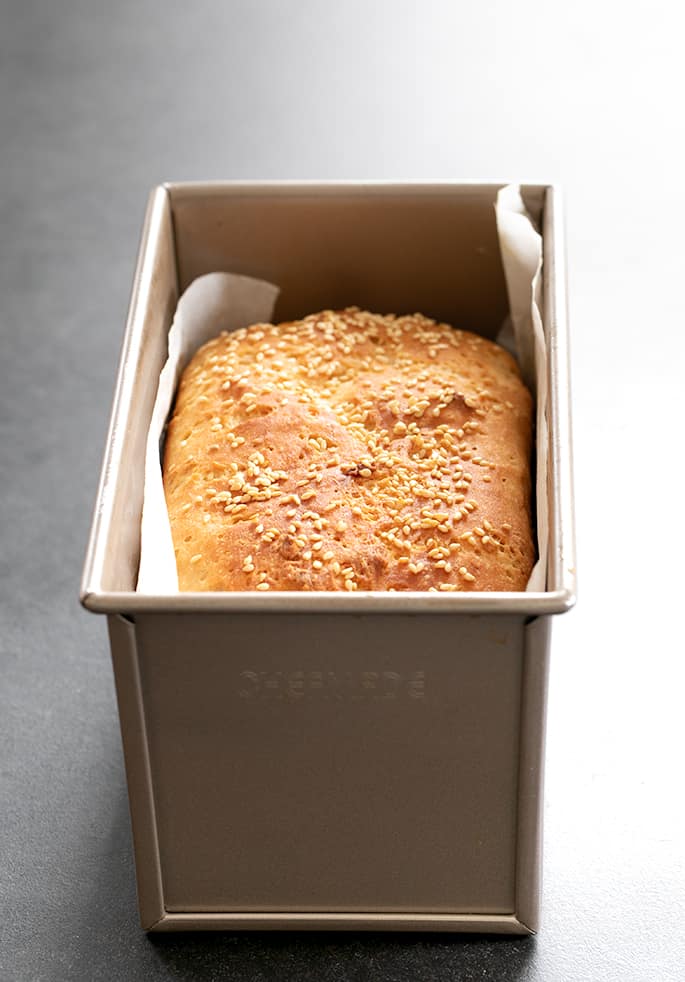
It’s a bit fragile as soon as it’s risen, so deal with with care. In case you’d like so as to add seeds to this gluten free bread, do it and after the dough has risen. Simply brush the highest flippantly with melted butter and sprinkle with seeds. However be mild otherwise you’ll destroy the rise.

Guidelines for baking the proper gluten free sandwich bread
I’ve put collectively my prime ideas that will help you get excellent gluten free bread each time. Belief the recipe and observe the following pointers for flawless gluten free sandwich bread time and time once more.
Rule # 1: Observe the recipe
Attempt to keep away from making any substitutions the primary time you make a gluten free bread recipe, particularly one which is unfamiliar to you. You probably have chosen a recipe that you would be able to solely make with substitutions, choose one other recipe.
Every time a reader tells me that they’re having hassle with a recipe, my first query is all the time whether or not they have made any substitutions. Some may fit, however many is not going to. And early failure will make it very exhausting to remain motivated.
Rule # 2: Measure elements by weight, not quantity
I present weight measurements (grams and kilos) in all of my recipes wherever potential, and on this recipe all however the smallest quantities could be measured by weight.
Quantity measurements (cups) for dry elements like flour are inherently unreliable, as human error is unavoidable and quantity measuring containers differ in dimension. Since correct proportions make the distinction between success and failure, it is value your time to measure by weight utilizing a easy digital kitchen scale (affiliate hyperlink), which is reasonable, and straightforward to make use of.
To make use of a digital scale, merely end measuring one ingredient, and hit “tare.” It zeroes out the size, and you may measure the subsequent ingredient till the size reaches the correct quantity specified within the recipe.
In all of my recipes, 1 cup of all function gluten free flour weighs 140 grams. Don’t trouble making an attempt to see if the measuring cups you will have in your kitchen match their quantity to my weight measurements.
A typical misunderstanding is that you would be able to “check” my weight measurements by evaluating them to the corresponding quantity. I present quantity measurements as a courtesy, since we Individuals have a tendency to withstand baking by weight, however I hope you’ll ignore them.
Rule # 3: Gluten substitutes are very important for making gluten free bread that holds collectively
Don’t attempt to bake bread with none gluten substitutes, like xanthan gum. When yeast provides off carbon dioxide throughout the baking course of, gluten acts like a cloak and suspends the bubbles, so to make gluten free bread, we’d like a substitute.
When gluten traps the rise, it permits the bread to bake across the air pockets. With out gluten and with out a gluten substitute, there’s nothing to “maintain” the rise. Xanthan gum additionally retains baked items more energizing longer.
Some individuals discover that they react poorly to “the gums,” which usually refers to xanthan gum and guar gum, and like to not bake with them. Xanthan gum is best suited to heated purposes like bread baking, and guar gum to chilly purposes like making ice cream. Nevertheless, my gluten free bread recipes are developed to require baking with xanthan gum.
Rule # 4: Use an oven thermometer
Use a easy oven thermometer to gauge your oven’s baking temperature correctly. Most ovens are calibrated improperly, and off by round 50°F.
I do not trouble having the oven calibrated, since it would simply drift out of calibration once more. As an alternative, I take advantage of a easy analog oven thermometer that is straightforward, low-cost, important. I simply exchange it not less than twice a 12 months, and by no means fear whether or not my oven temperature is correct.
If you bake bread in a too-hot oven, the surface will bake earlier than the within has an opportunity to develop sufficient construction to assist it. The bread will then collapse on itself because it cools.
Rule # 5: Use the suitable gluten free flour mix
Selecting a well-balanced all function gluten free flour mix made solely with flours which can be floor superfine is a very powerful determination you will make in gluten free baking. Baking yeast bread requires giant quantities of your chosen flour mix, and it should be capable to assist an increase, each earlier than it goes within the oven and whereas it is baking, and nonetheless maintain its form.
Notably for yeast bread baking, I most frequently bake with Higher Batter’s traditional gluten free flour mix. It is such a flexible mix, and it is all the time labored fantastically for any recipe that is referred to as for an all function gf flour. If you cannot discover Higher Batter regionally or just favor to make your personal, all it’s essential to do is observe my recipe for Mock Higher Batter, which works precisely just like the model.
In case you attempt to make this recipe utilizing a gluten free mix like King Arthur or Bob’s Pink Mill, or one other mix that I do not advocate, there are various potential methods wherein your bread is not going to end up. I want these broadly obtainable blends have been appropriate for bread baking, however they don’t seem to be.
And solely use my gluten free bread flour mix, which provides whey protein isolate and Expandex modified tapioca starch to Higher Batter, in recipes that decision for it particularly, by identify (this bread recipe does not name for it). These recipes are developed very in another way, and similar to you possibly can’t make them with out bread flour, you possibly can’t make this recipe with it.
Rule # 6: Be affected person whereas your bread rises
Yeast is lively at a really big selection of temperatures, however in cooler temperatures it simply rises extra slowly. Overproofing is a perform of an excessive amount of rise, however not too lengthy an increase. In a heat, moist surroundings, your yeast bread will rise extra shortly.
A perfect rise is sluggish and regular. A too-quick rise at too-high temperatures is extra more likely to overproof, resulting in a dough that gained’t maintain its form, and is much less secure. Don’t increase the temperature with something that isn’t meant to help in yeast bread rising, like an oven that you just assume is on its lowest temperature however truly kills your yeast.
Rule # 7: Ensure that your bread dough would not dry out
Yeast will not rise with out sufficient moisture. Ensure to not permit your dough to rise uncovered, uncovered fully to the air, or moisture will evaporate, drying out the dough and stopping a correct rise.
Rule #8. Deal with your yeast proper to get your gluten free bread to rise
Yeast can usually survive the chilly of my fridge at 40°F/4°C, and water as scorching as 120°F/49°C will possible kill yeast. Something in between and your yeast ought to survive.
However surviving is totally different from thriving. Yeast in bread dough wants just a few circumstances to thrive:
- Sufficient moisture (with out sufficient moisture, or in case your uncooked dough loses an excessive amount of moisture, the yeast will not be lively)
- Sufficient time (yeast will rise extra slowly at decrease temperatures, however it would rise given sufficient time)
- Freshness (verify the date in your yeast and do not use something previous its freshness date)
There are just a few circumstances that may inhibit the expansion of your yeast:
- An excessive amount of salt (do not add yeast and salt in on the similar time, and do not overmeasure your salt, which inhibits yeast progress)
- An excessive amount of sugar (which is able to take up liquid within the dough; a correct candy yeast bread recipe will have already got accounted for that by including extra yeast)
- An excessive amount of warmth (I do not advocate setting your bread dough to rise in an oven that is on, even should you’re sure it is solely set to 100°F; most ovens will not retain a temperature setting that low and your yeast will in all probability die)
For finest outcomes when making this straightforward gluten free bread recipe, please do not use a heat oven for proofing. As an alternative, select a naturally heat, draft free spot and let the yeast do its factor. And remember that, in case your surroundings appears fairly cool (however is not actually chilly), your yeast bread will nonetheless rise, simply extra slowly.
Extra ideas for one of the best gluten free bread
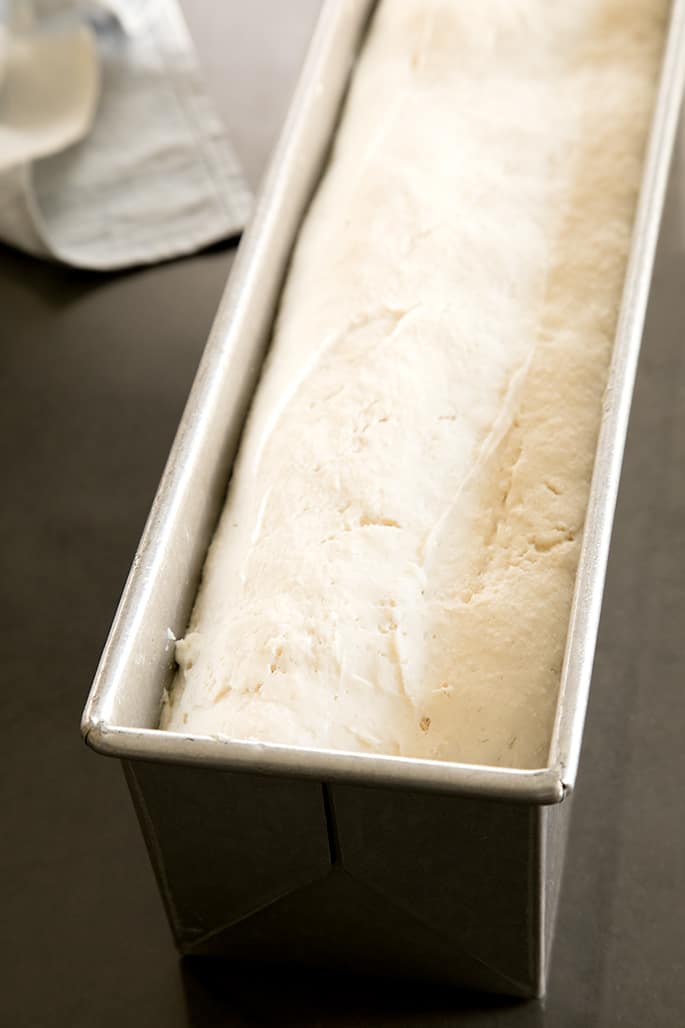
Use one of the best bread pan for baking gluten free sandwich bread — the Pullman loaf pan
I had all the time wished to strive making it in a Pullman loaf pan. That was the one method to see if I might get these excellent, no-dome slices which can be actually made for sandwiches.
Baking in a Pullman pan (which is that taller, slim pan with a lid that slides on) additionally tends to make softer bread. The moisture within the bread is trapped contained in the pan throughout baking, and the bread absorbs it because it bakes.
The photograph above is a loaf baked in a 2 pound Pullman loaf pan. The photographs beneath are of the bread rising in a 1-pound Pullman loaf pan.
You can also make a 1-pound Pullman loaf, or a 2-pound Pullman loaf. The baking time is sort of the identical, because the pans are for much longer but in addition significantly extra slim.
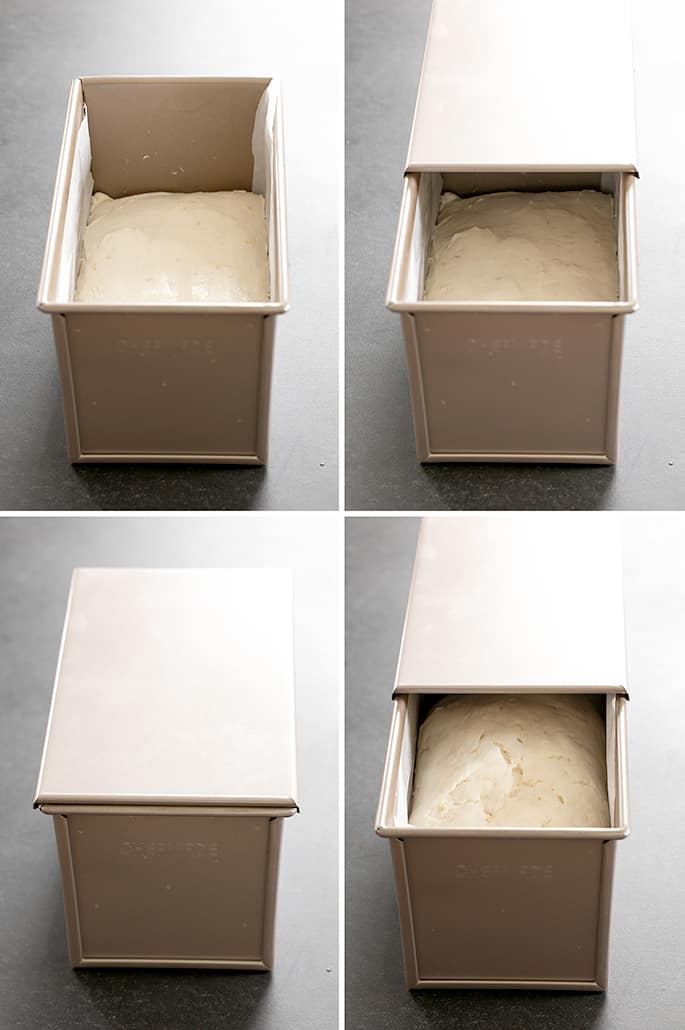
For the 1-pound Pullman pan
For the 1-pound pan, you do not do something totally different to arrange the bread dough. When it is able to rise, use the Pullman cowl as a substitute of plastic wrap, then bake for about 40 minutes with the lid on. Take away the lid and permit the highest to brown.
For the 2-pound Pullman pan
For the 2-pound loaf pan, double the recipe and make sure to combine the elements with a bit of additional care. The directions are the identical as for the 1-pound pan for rising and baking, simply baked in a 2 pound Pullman loaf pan.
Selecting the best yeast for gluten free sandwich bread
Yeast is a necessary ingredient for many bread recipes, however if you head to the grocery retailer, chances are you’ll discover just a few totally different varieties, together with prompt yeast and lively dry yeast.
Immediate yeast vs lively dry yeast
Two of the commonest merchandise you will discover on the shelf are prompt yeast and lively dry yeast.
My selfmade gluten free sandwich bread recipe calls for fast yeast, which can even be labeled as fast rise.
If you would like to substitute lively dry yeast as a substitute, you possibly can, however you will must take just a few additional steps. First, multiply the burden of prompt yeast by 1.25 for the suitable ratio.
As a result of lively dry yeast has a thicker coating across the yeast, you will want to assist break it down. You are able to do this by soaking it in a few of the milk for this recipe till it foams.
As soon as foamy, add it and the remainder of the milk when the recipe requires it.Use a pan liner or cooking spray
Do not let the bread cool fully within the pan
Let your selfmade gluten free sandwich bread cool within the pan for about 10 minutes. After that, switch the loaf to a cooling rack and take away any paper liner so cool air circulates all the best way across the bread. In any other case, the crust can get soggy from trapped steam.
Use a bread knife or serrated knife
If you do not have a bread knife, make sure to use some type of serrated knife for slicing. In any other case, chances are you’ll squish or tear your bread. And let it cool earlier than you slice it or it will not slice cleanly.
Gluten free white sandwich bread recipe elements and substitution recommendations
As all the time, except particularly indicated in any other case, I have not made this recipe with any substitutions.
These are largely simply my best-educated guesses for how one can accommodate different dietary restrictions. Proceed with warning when modifying any recipe!
Gluten free dairy free bread
Making this bread dairy free is straightforward. Simply exchange the butter with vegan butter. Soften and Miyoko’s Kitchen manufacturers are my favourite.
You possibly can even use Earth Stability Buttery Sticks and cut back the salt to 1 teaspoon, however remember that it has extra moisture than butter, so our loaf could sink a bit of because it cools.
Keep away from utilizing the tender vegan spreads although. This bread recipe requires butter, so make sure to use a block the plant butter blocks for one of the best dairy free outcomes.
Use any dairy free milk you want, simply be certain it is not nonfat and is unsweetened. I actually like unsweetened almond milk right here, because it would not impression taste and nonetheless accommodates sufficient fats so the remainder of the recipe would not require any adjustment. Full fats canned coconut milk is rarely an acceptable substitute for dairy milk, because it has little or no moisture, so the hydration ratio will not be what it must be for this yeast bread to rise should you use it.
Egg free gluten free bread recipe
It is a little more durable because the recipe requires egg whites, not an entire egg.
I’ve by no means tried this recipe with any substitutions to make it egg-free, however I’d advocate making an attempt a “chia egg” (1 tablespoon floor chia seeds + 1 tablespoon lukewarm water, combined and allowed to gel). Alternatively, aquafaba could behave extra like egg whites. In case you strive both, tell us the way it goes!
Including seeds
If you wish to costume your bread up a bit of, and switch it right into a fancier-looking bread, or give it a bit extra taste and crunch, you possibly can sprinkle the highest with seeds. Do it after the loaf has risen and is prepared for the oven.
Flippantly sprinkle the seeds excessive, however do not push them down an excessive amount of because the risen dough is kind of fragile. Add sesame, chia, quinoa, sunflower, or pumpkin seeds, and possibly even some finely chopped nuts.

retailer this gluten free bread
This straightforward gluten free bread recipe produces extremely tender bread that shops simply on the kitchen counter. Simply maintain it sealed tightly in an hermetic wrap at room temperature, and it’ll final for about 2 days.
I additionally advocate that you do not pre-slice any gf bread earlier than use, except you are going to freeze it. Doing so could trigger it to dry out prematurely, so go away the loaf complete and slice as wanted, however wrap the remaining loaf tightly in between.
You probably have a slice of bread that appears to have began to go stale, you possibly can refresh it to make it pretty much as good as new. Simply sprinkle it flippantly with lukewarm water and toast it on a really low setting simply to heat it up and permit the bread to soak up the additional moisture.
Freezing this gluten free bread
This gluten free sandwich bread freezes very well. You possibly can freeze the entire, cooled loaf with out slicing it, however I actually favor to slice it totally, after which wrap every slice individually in freezer-safe wrap. If you wish to slice the loaf after which freeze all of it collectively, strive including a small piece of parchment paper between slices to maintain them from sticking collectively as soon as frozen.
If you’re able to make a sandwich, take away as many slices as you want from the freezer, and refresh them within the toaster. There isn’t any must defrost them first.
Gluten Free Bread Recipe FAQs
Listed below are some particular questions which can be steadily requested about this explicit white gluten free bread recipe:
Whereas they’re designed to make life simpler, I can not advocate utilizing a bread machine for this recipe, even when it has a gluten free setting. I’ve tried making this recipe within the Zojirushi bread machine, which appears to be everybody’s favourite bread maker for constant outcomes, and the bread was dense and misshapen. I am exhausting at work on a gf recipe that works effectively in that bread machine, however to this point I have not been profitable. I can advocate explicitly in opposition to making an attempt to make this recipe in a bread machine, although.
There are a number of the explanation why your gluten free bread is probably not rising. Listed below are just a few of the commonest causes:
• You are not utilizing the proper gf flour mix otherwise you’re not utilizing the right amount (you should measure by weight for correct outcomes);
• Your yeast isn’t contemporary or it is not activating due to make use of of chilly elements;
• You did not permit sufficient time or the correct circumstances for proofing and/otherwise you killed the yeast by making an attempt to proof the bread in what you thought was a heat, however not scorching, oven;
• You did not measure your elements by weight, together with water, so the hydration ratio is improper.
Gluten free flours are very absorbent, so should you do not embrace the suitable ratio of dry and moist elements, you will find yourself with a loaf that is dry and crumbly. In case you made ingredient substitutions, particularly with respect to the flour mix, did not measure your elements by weight, or let your dough uncovered to the air so it dried out because it rose, your outcomes might be dry.
Whereas it is potential to incorporate too little liquid in your gluten free bread recipe and find yourself with dry bread, you will expertise the other should you add an excessive amount of liquid, do not let the dough rise sufficient earlier than baking, or do not bake the loaf for lengthy sufficient till it is baked all the best way to the underside.
Another excuse chances are you’ll pull gummy bread from the oven is that the bread wasn’t baked at a excessive sufficient temperature, so you aren’t getting any “oven spring.” In case your oven runs too scorching, the surface could bake too shortly and you may’t bake it lengthy sufficient to bake all the best way to the middle. Lastly, altitude, humidity, or temperature could have an effect on closing outcomes.
When your bread is finished baking, the interior temperature of the bread reaches round 200°F on an instant-read thermometer, if not a bit of increased. The skin will type a thick, brown crust, and it’ll sound hole if you thump it on the underside together with your thumb or forefinger.
The most typical causes for gluten free bread sinking after cooling embrace:
• An excessive amount of proofing; the bread rose increased than it might assist itself. Uncooked gf bread dough tends to tackle a pock-marked look when it is overproofed, so watch rigorously.
• An excessive amount of yeast, so the bread rose too shortly and the dough could not assist the rise and nonetheless maintain its form
• An excessive amount of liquid, resulting in too a speedy overproofing, and an excessive amount of liquid to correctly bake off within the oven
• A too-hot oven that baked the surface to burning lengthy earlier than the within of the loaf was cooked by sufficient to assist the construction.
If you’re baking any recipe, together with this yeasted gluten free bread recipe, at excessive altitude and the recipe, like this one, wasn’t developed to be made at altitude, you should make sure changes to the elements and/or methodology to realize the meant outcomes. Altitude is one situation that I merely cannot recreate, although, so I am not in a position to check any of the potential modifications. Nevertheless, different readers have advised me through the years that their “common” altitude changes work simply as effectively in my gluten free recipes as they do of their standard recipes. This King Arthur Flour information for top altitude baking appears complete.
No, contemporary bread shouldn’t be refrigerated. The fridge tends to dry out bread, and would not lengthen its shelf life. To retailer bread, wrap it tightly and let it sit at room temperature for as much as 2 days, after which freeze for longer storage.
No. Do-it-yourself bread, gluten free or in any other case, by no means stays contemporary so long as packaged bread, which accommodates synthetic preservatives to make them last more than selfmade baked items.
I like to recommend utilizing the traditional mix from Higher Batter because the all function gluten free flour mix on this recipe. It has the suitable steadiness of elements to make chewy bread that also has a moist, tender crumb.
I am afraid you actually do want a stand mixer fitted with a paddle attachment to make the type of clean, uniform bread dough that rises evenly and bakes correctly with a young, uniform crumb. In case you’re keen to take an opportunity that it would not end up, and you’ve got a 7-cup meals processor, you possibly can strive pulsing the elements in that, notably if in case you have a plastic blade to make use of as a substitute of the metal blade. Your meals processor must work on the dough sufficient to make it clean, however not a lot that it heats the dough, which may kill the yeast and even start to cook dinner the elements.
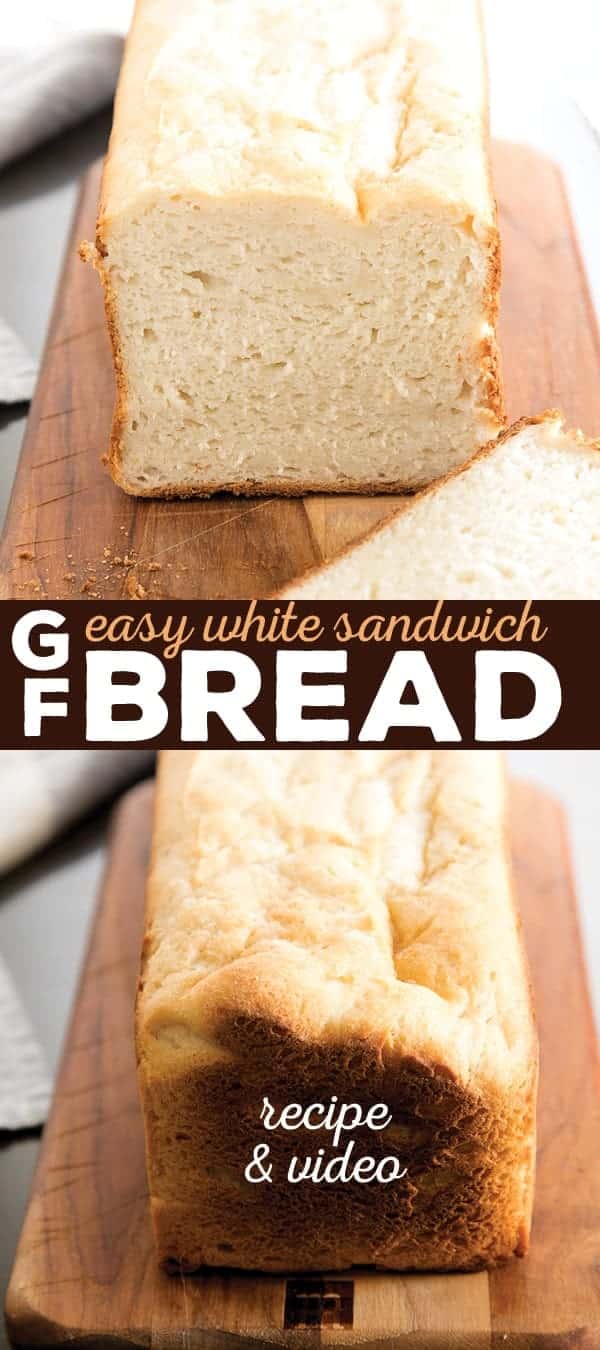
Straightforward White Gluten Free Bread Recipe for Sandwiches | Tender and Springy
That is one of the best and unique gluten free bread recipe for moist and tender white sandwich bread with a chewy crumb and a crisp, brown crust.
Yield: 10 slices bread
Stop your display screen from going darkish
Components
- 3 cups (420 g) all function gluten free flour mix (I used and extremely Higher Batter or my mock Higher Batter mix right here; click on via for the mock mix and full data)
- 3 teaspoons xanthan gum omit in case your mix already accommodates it
- 2 ½ teaspoons (8 g) prompt yeast
- ¼ teaspoon cream of tartar
- 2 tablespoons (25 g) granulated sugar
- 2 teaspoons (12 g) kosher salt
- 1 ½ cups (12 fluid ounces) heat milk (about 95°F)
- 4 tablespoons (56 g) unsalted butter melted and cooled (plus extra for brushing if utilizing seeds)
- 1 teaspoon apple cider vinegar
- 2 (50 g) egg whites at room temperature
- Toasted sesame seeds for sprinkling elective
Directions
-
Grease or line a 9-inch x 5-inch loaf pan (or barely smaller) and set it apart.
-
Within the bowl of a stand mixer fitted with the paddle attachment, place the flour, xanthan gum, yeast, cream of tartar and sugar. Whisk along with a separate, handheld whisk. Add the salt, and whisk once more to mix.
-
Add the milk, butter, vinegar and egg whites, mixing on low pace after every addition. Scrape down the perimeters of the mixer bowl as vital throughout mixing.
-
Flip the mixer to medium-high pace and blend for about 3 minutes. The dough might be thick, clean and fairly moist.
-
Scrape the dough into the ready loaf pan. Utilizing a moist spatula, clean the highest.
-
Cowl the dough with flippantly oiled plastic wrap and permit it to rise in a heat, draft-free place for 30 to 45 minutes or till it’s about 150% of its unique dimension.
-
It needs to be overflowing the highest of the loaf pan by not less than 1/2 inch if you retrieve it, but it surely is not going to have doubled in quantity. It might take longer to rise correctly in colder, drier climate and fewer time in hotter, extra humid climate.
-
When the dough has practically reached the tip of its rise, preheat the oven to 375°F.
-
Take away the plastic wrap, and utilizing a pointy knife or lame slash the highest of the loaf about 1/4-inch deep. If utilizing the elective seeds, brush the highest of the risen bread gently with melted butter, and sprinkle with the seeds.
-
Place the pan within the middle of the preheated oven. Bake for 45 minutes to 1 hour, or till the interior temperature of the bread reaches about 195°F on an instant-read thermometer. The skin will type a thick, brown crust.
-
Take away the loaf from the oven, and permit it to chill for about 10 minutes within the pan earlier than transferring to a wire rack to chill fully.
-
To freeze this bread, cool fully after which slice, wrap tightly, and freeze. Defrost as many slices at a time as you want within the toaster.
Notes
Diet info.
Dietary info is per slice, assuming a single loaf sliced into 10 slices. It’s imprecise and is supplied as a courtesy since it is extremely typically requested, however it’s not to be relied upon.
Diet
Energy: 237kcal | Carbohydrates: 39g | Protein: 5g | Fats: 6g | Saturated Fats: 4g | Polyunsaturated Fats: 0.2g | Monounsaturated Fats: 2g | Trans Fats: 0.2g | Ldl cholesterol: 16mg | Sodium: 533mg | Potassium: 110mg | Fiber: 3g | Sugar: 4g | Vitamin A: 199IU | Vitamin C: 0.01mg | Calcium: 48mg | Iron: 0.1mg

Thanks for stopping by!
Hello, I’m Nicole. I create gluten free recipes that actually work and style pretty much as good as you keep in mind. No extra making separate meals when somebody is GF, or shopping for packaged meals that aren’t adequate to justify the worth. At Gluten Free on a Shoestring, “good, for gluten free” simply isn’t adequate! Come go to my bio!